

Are you looking to make your WordPress site more interactive and user-friendly? Adding an upload file button can be a game-changer for your visitors, letting them easily share documents, images, or other files with you.
Whether you want to collect resumes, receive project files, or gather customer feedback, this simple feature can boost engagement and streamline your workflow. In this guide, you’ll discover exactly how to add an upload file button to your WordPress site—step by step, without any confusing tech jargon.
Ready to make your website work harder for you? Let’s get started!
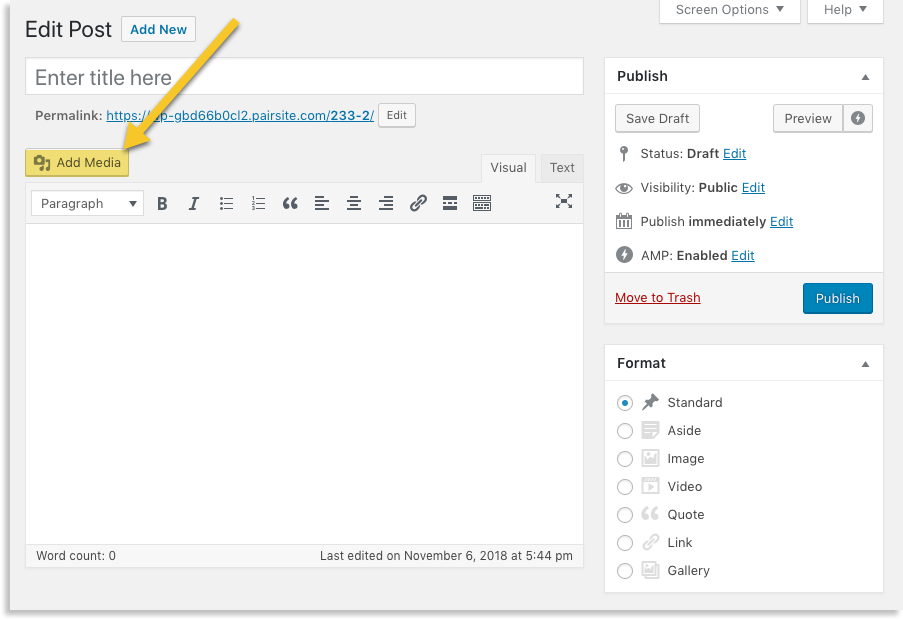
Credit: www.pair.com
Choose The Right Plugin
Choosing the right plugin is key to adding a file upload button in WordPress. The right tool makes the process simple and smooth. It also ensures your website stays fast and secure. Different plugins offer different features. Picking one that fits your needs saves time and effort.
Focus on plugins that are easy to use. They should work well with your current WordPress setup. Good plugins keep your files safe and let visitors upload files without trouble. This section helps you find the best plugin for your site.
Top Plugins For File Upload
Several plugins stand out for file upload tasks. WPForms is popular. It has a drag-and-drop builder and file upload fields. Another is Formidable Forms, known for flexibility and advanced options. Contact Form 7 is simple and widely used. It supports file uploads with add-ons. File Upload Types by WPForms lets you control allowed file types. Each plugin has free and premium versions.
Criteria For Selection
Pick plugins with good user ratings and frequent updates. Check if the plugin supports your WordPress version. Look for security features like file type restrictions and spam protection. Easy setup and clear instructions help beginners. The plugin should handle file size limits and offer storage options. Support from developers is also important. Choose plugins that do not slow down your website.
Install And Activate The Plugin
Installing and activating a plugin is the first step to add an upload file button in WordPress. This process is simple and does not require coding skills. Follow these steps carefully to set up the plugin correctly.
Accessing The Plugin Directory
Log in to your WordPress dashboard. On the left menu, find and click “Plugins.” Then click “Add New.” You will see the WordPress plugin directory. Use the search bar to find the upload file plugin you want. This directory has many free plugins ready to use.
Step-by-step Installation
After finding the plugin, click the “Install Now” button next to it. The installation takes a few seconds. Wait until the button changes to “Activate.” Do not close the page during installation. This step adds the plugin files to your website.
Activating The Plugin
Click the “Activate” button to enable the plugin on your site. The plugin is now ready to use. You may see a new menu or settings page for the plugin. Check the plugin’s instructions for setup details. Activation makes the upload file button available in your WordPress editor.
Configure Upload Settings
Configuring upload settings is key to managing how users upload files on your WordPress site. Proper settings keep your site safe and running smoothly. You control what files can be uploaded and who can upload them. This section covers three main parts of configuration: allowed file types, file size limits, and user permissions.
Allowed File Types
Define which file types users can upload. WordPress accepts common types like images, documents, and videos by default. You can add or remove file types to match your needs. Limiting file types prevents harmful files from being uploaded. Use simple extensions like .jpg, .png, .pdf, or .docx. Keep your site secure by restricting unknown or risky files.
File Size Limits
Set a maximum file size for uploads. Large files can slow down your site or cause errors. WordPress has a default size limit, but you can change it. Choose a size that fits your hosting plan and user needs. Small limits keep your site fast. Bigger limits allow more detailed files but need more storage space.
User Permissions
Control who can upload files on your site. Assign upload rights only to trusted users. You can give permissions to admins, editors, or specific roles. Restricting upload permissions prevents spam and unwanted content. Check user roles and set clear rules for uploads. This keeps your site organized and safe from misuse.
Add Upload Button To A Page Or Post
Adding an upload button to your WordPress page or post lets visitors share files easily. This feature works well for contact forms, event registrations, or job applications. It improves interaction and collects important files from users directly on your site.
WordPress offers simple ways to insert an upload button. You can use shortcodes, Gutenberg blocks, or customize the button’s look. Each method fits different needs and skill levels.
Using Shortcodes
Shortcodes are small pieces of code that add features quickly. Many plugins provide upload button shortcodes. To use one, install a plugin with file upload support. Copy the shortcode from the plugin settings.
Paste the shortcode into your page or post editor. The upload button appears where you place it. Visitors can then upload files through the button. Shortcodes require no coding knowledge and work in classic and block editors.
Using Gutenberg Blocks
Gutenberg blocks make content editing visual and easy. Some plugins add custom blocks with upload buttons. Open your page or post in the block editor. Click the plus icon to add a new block.
Search for the upload button block provided by your plugin. Insert the block where you want the button. Customize basic settings like allowed file types or size. Gutenberg blocks give a live preview of the button.
Customizing Button Appearance
Make your upload button match your site style. Many plugins let you change button color, size, and text. Use the plugin settings or block options to customize. Choose colors that stand out but fit your theme.
You can also add custom CSS for more control. Adjust padding, border, or font style for a unique look. A clear and attractive button encourages visitors to upload files.
Test The Upload Feature
Testing the upload feature is key after adding an upload file button in WordPress. It ensures the button works correctly and files upload without errors. This step helps catch problems early and improves user experience. Follow simple tests to confirm your upload button functions as expected.
Uploading Different File Types
Try uploading various file types like images, documents, and PDFs. This checks if your site accepts all necessary files. Some WordPress setups limit file types for security. Testing different formats helps spot restrictions or errors. Upload small files first to save time.
Checking Upload Success
After each upload, confirm the file appears where expected. Check the media library or the folder you set for uploads. Look for any error messages during upload. A successful upload shows the file ready for use. If files don’t show, the upload did not complete properly.
Troubleshooting Common Issues
Watch for common problems like file size limits or unsupported types. Check your WordPress settings and hosting limits. Increase the upload size in your php.ini or .htaccess files if needed. Clear your browser cache and try again. Disable plugins that might block uploads temporarily.

Credit: barn2.com
Manage Uploaded Files
Managing uploaded files is important after adding an upload button in WordPress. Proper management keeps your website organized and running smoothly. It also helps you find files fast and control storage space.
Accessing Uploads In WordPress
To see uploaded files, go to your WordPress dashboard. Click on “Media” to open the Media Library. Here, you find all files uploaded to your site. You can view images, documents, and other files. The library shows file names, types, and upload dates.
Organizing Files
Organizing files saves time and avoids clutter. Use folders or categories in plugins to group files by type or purpose. Rename files with clear names to identify them easily. Regularly review and update your file structure for better order.
Deleting Or Downloading Files
Delete files to free up space or remove unwanted items. Select the file in the Media Library and click “Delete Permanently.” To download a file, click on it and choose the download option. Always back up important files before deleting.
Enhance Security For File Uploads
Uploading files on your WordPress site can be useful. But it also brings risks. Hackers may try to upload harmful files. These files can damage your site or steal data. Enhancing security for file uploads helps keep your site safe. Follow these steps to reduce risks and protect your website.
Limit File Types And Sizes
Allow only specific file types. For example, images like JPG, PNG, or PDF documents. Block dangerous file types like .exe or .js. Also, set a file size limit. Large files can slow down your site or cause errors. Limiting size helps keep your site fast and secure.
Enable Spam Protection
Spam bots often upload harmful files. Use spam protection tools like CAPTCHA. These tools check if a user is real. This stops bots from uploading unwanted files. Many WordPress plugins offer easy spam protection features.
Regularly Update Plugins
Outdated plugins can have security holes. Hackers exploit these holes to upload bad files. Keep your file upload and security plugins updated. Updates fix bugs and improve security. Regular updates help protect your site from new threats.

Credit: wordpress.com
Frequently Asked Questions
How Do I Add An Upload File Button In WordPress?
To add an upload file button, use WordPress plugins like WPForms or Contact Form 7. These plugins offer easy drag-and-drop fields for file uploads. You can also add custom code using HTML and PHP for more control.
Can I Customize The Upload Button Appearance In WordPress?
Yes, you can customize the upload button using CSS. Most plugins allow style adjustments directly in their settings. Custom CSS helps match the button with your website’s design for a consistent look.
Is It Possible To Limit File Types For Uploads?
Absolutely. WordPress plugins let you restrict file types for security. You can specify allowed formats like. jpg,. pdf, or. docx to prevent unwanted file uploads and keep your site safe.
How To Manage Uploaded Files In WordPress?
Uploaded files are saved in the WordPress Media Library or plugin-specific folders. You can access, organize, or delete files from your dashboard for easy management and better site performance.
Conclusion
Adding an upload file button in WordPress is simple and useful. It lets visitors share files easily. You can do this with plugins or by adding code. Choose the method that fits your skill level. Test the button to make sure it works well.
Keep your website safe by checking uploaded files. This small step improves user experience on your site. Try it today and see the difference.


