
Are you struggling to add a TXT record to your DNS configuration for your WordPress site? You’re not alone.
Managing DNS settings can feel confusing, but it’s a crucial step to improve your site’s security, verify ownership, or set up email services. In this guide, you’ll learn exactly how to add a TXT record to your DNS without any technical headaches.
Keep reading, and by the end, you’ll have the confidence to make these changes quickly and correctly—boosting your website’s performance and trustworthiness.

Credit: wordpress.com
What Is A Txt Record
A TXT record is a type of DNS record. It stores text information about your domain. This information helps other servers check your domain’s authenticity.
TXT records are important for email security and verification. They help prevent spam and phishing attacks. Many services use TXT records to confirm domain ownership.
What Does A Txt Record Do?
A TXT record holds readable text data for various purposes. It often contains SPF, DKIM, or DMARC settings. These settings protect your email from being marked as spam.
Where Are Txt Records Used?
TXT records are used by email servers, website services, and domain verifications. They help prove that you own the domain. This keeps your online presence safe and trusted.
How Is A Txt Record Structured?
A TXT record has two main parts: the name and the value. The name is usually your domain or subdomain. The value is the text data that services read to verify your domain.

Credit: help.leadconnectorhq.com
Why Add Txt Records In WordPress
TXT records are important for WordPress sites. They help prove your website is real and safe. Adding TXT records to your DNS settings improves how your site works with other services.
These records tell email providers and search engines about your website. They stop spam and protect your site from hackers. Many online tools need TXT records to connect to your domain.
What Are Txt Records?
TXT records are simple text files in your DNS settings. They hold information about your domain. This data helps other servers check your site’s identity.
How Txt Records Improve Email Security
TXT records stop fake emails from your domain. They use protocols like SPF and DKIM. These protocols keep your emails safe and trusted.
Why Verify Domain Ownership With Txt Records
Many services ask you to prove you own your domain. Adding a TXT record is a quick way to do this. It shows you control the website and domain.
How Txt Records Help Seo And Site Performance
Search engines use TXT records to trust your site. Proper records can improve your site’s ranking. They also help with faster and safer connections.
Accessing Your Dns Settings
Accessing your DNS settings is the first step to adding a TXT record in WordPress. These settings control where your domain points. They store important information like email servers and verification codes.
You can find your DNS settings in two main places. Either at your domain registrar or your hosting provider. Knowing where to look helps you update records quickly and safely.
Via Domain Registrar
Your domain registrar is where you bought your domain name. Common registrars include GoDaddy, Namecheap, and Google Domains. Log in to your account on their website.
Find the section called “DNS Management” or “Domain Settings.” This area lets you view and edit DNS records. Look for an option to add a TXT record. Enter the details and save changes.
Through Hosting Provider
Your hosting provider may also manage your DNS settings. Providers like Bluehost, SiteGround, or HostGator offer this service. Log in to your hosting account dashboard.
Navigate to the domain or DNS management section. You can add or edit TXT records here too. Make sure to save your updates after adding the new record.
Creating A Txt Record
Creating a TXT record is a key step in managing your DNS settings. TXT records store text information for various uses. Common uses include email verification and domain ownership proof.
This guide explains how to create a TXT record for your WordPress site. The process is straightforward. Follow the steps carefully to avoid errors.
Required Information For Txt Record
You need specific details before creating a TXT record. First, the hostname or subdomain where the record applies. Often, this is your root domain or “@”.
Next, the TXT value or text data. This is the information you want to add, like verification codes or SPF records. Lastly, the TTL (Time to Live) value. It tells how long the record stays cached.
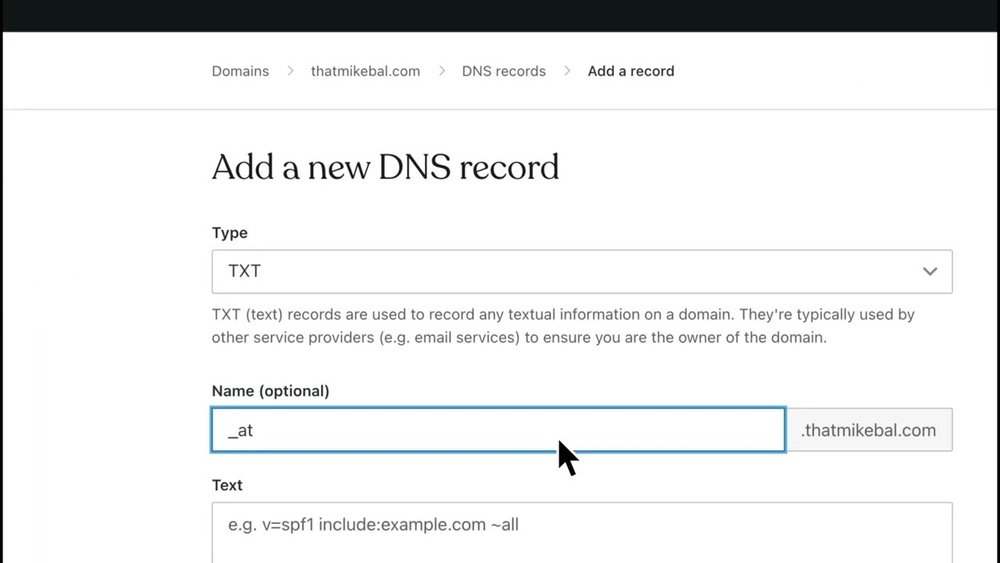
Step-by-step Setup
Log in to your DNS hosting provider’s control panel. Locate the DNS management area or zone editor.
Choose to add a new record. Select “TXT” as the record type from the options available.
Enter the hostname in the name field. Paste your TXT value in the text field.
Set the TTL value or leave it at the default. Save or apply the changes.
Wait for the DNS to update. This may take a few minutes to several hours.
Verifying The Txt Record
After adding a TXT record to your DNS settings in WordPress, verifying it is important. Verification ensures the record works correctly and serves its purpose. Without verification, you may face issues like failed email authentication or domain ownership checks.
Verification involves checking if the TXT record is visible across the internet. This step confirms that DNS servers have updated with your new record. Patience and the right tools help you confirm the update efficiently.
Using Online Tools
Online tools can quickly check your TXT record status. Tools like MXToolbox or DNSChecker help you see if the record is live. Enter your domain name and select TXT lookup to begin. The tool shows the TXT records found for your domain. This method is fast and simple for most users.
Waiting For Propagation
DNS changes do not update instantly worldwide. Propagation can take from a few minutes to 48 hours. Patience is key during this period. Keep checking with online tools to see if the record appears. Avoid making repeated changes before propagation finishes. This helps prevent confusion and errors.
Common Issues And Fixes
Adding a TXT record to your DNS settings can sometimes cause problems. These issues often stop your changes from working correctly. Knowing common problems helps fix them fast. This saves time and avoids frustration.
Below are the frequent issues users face and how to solve them.
Incorrect Record Values
Check your TXT record values carefully. A small typo can break the setup. Make sure quotes, spaces, and characters match exactly.
Copy the value from your service provider without changes. Avoid extra spaces at the start or end. Double-check the domain name too.
Propagation Delays
DNS updates do not happen instantly. It can take from a few minutes to 48 hours. During this time, your changes may not show up.
Be patient. Keep testing after some time. Clear your browser cache to see the latest results.
Dns Caching Problems
Your computer or network may hold old DNS data. This cache stops you from seeing new TXT records.
Clear your local DNS cache. Restart your device or use commands like ipconfig /flushdns on Windows. This forces your system to fetch fresh data.
Tips For Managing Dns Records
Managing DNS records is important for website performance and security. Proper DNS settings help your site run smoothly. This section offers simple tips to handle DNS records well.
Keep A Backup Of Your Dns Settings
Always save a copy of your current DNS records. It helps to restore settings if something goes wrong. You can keep a screenshot or export the records from your DNS provider.
Use Clear And Consistent Naming
Name your DNS records clearly. Use consistent formats for easy identification. This practice avoids confusion and errors when editing records later.
Update Records Carefully
Make changes slowly and check each step. A small mistake can cause your website to stop working. Double-check the TXT record values before saving.
Set Ttl Values Wisely
TTL means how long DNS information is cached. Use a lower TTL when testing changes. Increase TTL after confirming everything works well.
Monitor Dns Changes Regularly
Check your DNS records often for unauthorized changes. Monitoring helps prevent security risks. Use tools or services that alert you about DNS changes.

Credit: www.youtube.com
Frequently Asked Questions
What Is A Txt Record In Dns Configuration?
A TXT record stores text information in DNS for domain verification or email security. It helps verify domain ownership and improves email deliverability.
How To Add A Txt Record In WordPress Dns?
Access your domain’s DNS settings via your hosting or registrar. Add a new TXT record with the required name and value, then save changes.
Why Add Txt Records To WordPress Dns?
Adding TXT records helps verify your domain with services like Google or Microsoft. It also secures email through SPF, DKIM, and DMARC protocols.
How Long Does Txt Record Update Take?
TXT record changes usually propagate within minutes to a few hours. In some cases, it may take up to 48 hours globally.
Conclusion
Adding a TXT record to your DNS for WordPress is simple and clear. Follow the steps carefully to avoid errors. This small task helps verify your site and improve security. Keep your DNS settings organized and updated. Regular checks ensure your site works well.
Feel confident managing your DNS records with ease. Your website’s health depends on good DNS practices. Stay patient and double-check your entries for best results.


