
Are you looking to understand exactly how to add tracking code to your WordPress site? Whether you want to see how visitors interact with your pages or track your marketing success, adding tracking code is a simple step that can unlock powerful insights.
In this guide, you’ll learn clear, step-by-step instructions to add tracking code quickly—even if you’re not tech-savvy. Keep reading, and you’ll gain the confidence to track your website’s performance like a pro.
Credit: www.hostinger.com
Choose The Right Tracking Tool
Choosing the right tracking tool is key to understanding your website’s visitors. The right tool helps collect useful data. This data shows how visitors behave on your site. It guides decisions to improve your website’s performance.
Not all tracking tools offer the same features. Some focus on traffic numbers, others on user behavior. Picking a tool that fits your goals saves time. It also gives clearer insights into your audience.
Popular Tracking Tools For WordPress
Google Analytics is the most popular tool. It tracks visitor numbers, sources, and actions. It offers detailed reports and easy-to-use dashboards.
Jetpack is a WordPress plugin with built-in stats. It shows simple visitor data inside your WordPress dashboard. Jetpack suits beginners who want quick insights.
MonsterInsights connects Google Analytics to WordPress. It simplifies setup and shows reports in WordPress. It’s good for users wanting detailed data without complexity.
Matomo is an alternative focusing on privacy. It stores data on your own server. It appeals to those needing full control over tracking data.
Selecting Based On Your Needs
Decide what you want to learn from your site. Traffic numbers? User behavior? Conversion rates?
Choose a tool that matches your technical skills. Some tools need coding knowledge. Others are plug-and-play with simple interfaces.
Consider your budget. Many tools offer free versions with basic features. Paid plans unlock advanced reports and tracking options.
Check if the tool integrates well with WordPress and other plugins. Seamless integration saves time and effort.
Credit: deeperlook.com.au
Access Your WordPress Dashboard
Accessing your WordPress dashboard is the first step to add tracking code. This area controls your website’s settings and content. Knowing how to reach and use the dashboard helps you manage your site easily. Follow these steps to get started quickly and securely.
Logging In Securely
Open your browser and enter your website’s login URL. It usually looks like yoursite.com/wp-admin. Use your username and strong password to log in. Avoid public Wi-Fi to protect your information. Secure login keeps your site safe from hackers.
Navigating To Theme Editor
Once logged in, find the menu on the left side. Click on “Appearance” to expand the options. Select “Theme Editor” from the list. This tool allows you to edit code in your theme files. Be careful when editing here to avoid errors on your site.
Add Tracking Code Manually
Adding tracking code manually in WordPress is a straightforward way to monitor your website’s performance. It gives you control over where the code goes. This method works well if you want to add custom tracking codes or if plugins don’t fit your needs.
Manual insertion requires editing your theme files. Take care to avoid errors that may break your site. Follow steps carefully to place the code in the right spot.
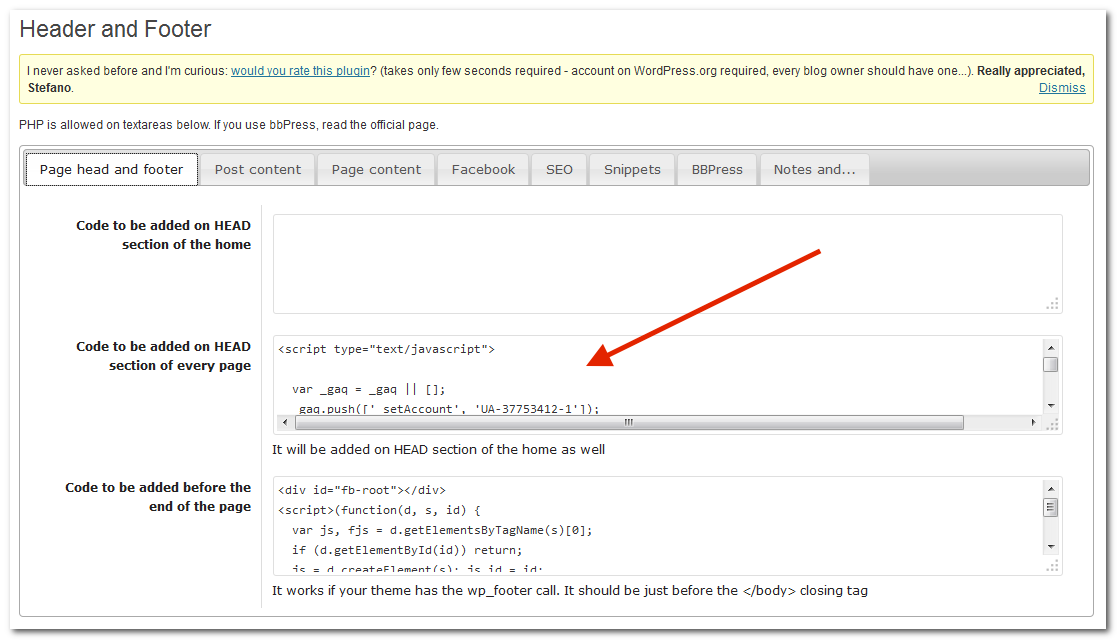
Locating The Header Or Footer
The tracking code usually goes in the header or footer. These areas load on every page, making them ideal for tracking scripts. The header appears in the
section. The footer is near the end of the page, before the tag.To find these files, log in to your WordPress dashboard. Go to Appearance > Theme Editor. Look for header.php or footer.php in the right sidebar. These files contain the code for your site’s header and footer.
Inserting Code Snippets Safely
Before editing, back up your site. This prevents data loss if something goes wrong. Open header.php or footer.php file in the editor. Paste the tracking code just before the closing tag for the header. For footer, place it before the closing tag.
Save changes and check your website to ensure it works. Use browser tools or tracking platforms to confirm the code runs correctly. Avoid editing theme files directly on live sites without backups. Use a child theme to keep changes safe during updates.
Use Plugins For Easy Integration
Adding tracking codes to WordPress can be simple with plugins. Plugins help place code snippets without editing theme files. This method reduces errors and saves time. You can manage all tracking codes from one place. It also keeps your site safe and fast.
Top Plugins For Tracking Codes
Several plugins make adding tracking codes easy. Insert Headers and Footers is popular for placing code in header or footer areas. Header and Footer Scripts offers similar features with a simple interface. Tracking Code Manager helps organize multiple tracking codes efficiently. These plugins support Google Analytics, Facebook Pixel, and more.
Step-by-step Plugin Setup
Start by installing your chosen plugin. Go to WordPress dashboard, then Plugins > Add New. Search for the plugin name and click Install. After installation, activate the plugin.
Next, find the plugin settings in the dashboard. Paste your tracking code in the provided box. Select where to insert the code, such as header or footer. Save changes to apply the tracking code on your site. Check your tracking tool to confirm it works.
Verify Tracking Code Installation
Verifying the tracking code installation ensures your website data is accurate. This step confirms the code works properly. It helps avoid mistakes and missed data. Follow simple methods to check the tracking code on your WordPress site.
Using Browser Extensions
Browser extensions make verification easy and fast. Tools like Tag Assistant or Pixel Helper detect tracking codes on your pages. Install the extension in your browser. Visit your website and activate the tool. It will show if the tracking code is present and working.
These extensions highlight errors or missing tags too. They give clear feedback on what needs fixing. Using browser extensions is the first step to confirm code installation.
Checking Real-time Data
Real-time data in Google Analytics shows active visitors immediately. Open your Analytics account and go to the Real-Time report. Visit your website in another browser tab or device. Check if your visit appears in the report.
If your visit shows up, the tracking code works correctly. No real-time data means the code may be missing or incorrect. This method confirms data collection is live and accurate.
Credit: help.ortto.com
Troubleshoot Common Issues
Troubleshooting common issues is key to successful tracking code setup in WordPress. Problems can stop your tracking code from working properly. Fixing these issues ensures accurate data collection and better website analysis. Understanding typical problems saves time and frustration.
Code Not Working
Check if the tracking code is correctly placed. The code must go in the header or footer as required. Clear your browser cache before testing the code. Sometimes, caching prevents new code from loading. Use a tag assistant tool to verify if the code fires on your site. Incorrect code snippets or typos can cause failure. Make sure you copied the entire tracking code without changes.
Plugin Conflicts
Some plugins may block or interfere with tracking code scripts. Disable plugins one by one to find conflicts. Popular caching or security plugins often cause issues. Deactivate those plugins and test if the tracking works again. Update all plugins and WordPress to the latest versions. Outdated software can create compatibility problems. Use only trusted plugins designed for tracking integration.
Best Practices For Tracking Code
Adding tracking code to your WordPress site helps you understand your visitors. It shows how people use your site and what they like. Using tracking code correctly gives you clear, useful data. Follow best practices to keep your site fast and your data accurate.
Keep Code Updated
Tracking tools update their code often. Use the latest version to get the best results. Old code might not work well or miss important data. Check the tracking service website regularly for updates. Replace old code with new code as soon as possible.
Updated code improves accuracy and security. It also helps your site work smoothly. Avoid mixing old and new code types on your site. Use one clean, updated tracking script for better performance.
Avoid Slowing Down Your Site
Tracking code can slow your site if added incorrectly. Put the code in the right place to keep your site fast. Usually, place tracking scripts in the header or footer as recommended. Use asynchronous loading to let your site load before the tracking runs.
Too many tracking codes affect speed and user experience. Use only the tracking codes you need. Remove old or unused codes to keep your site light. Test your site speed after adding tracking code to ensure fast loading.
Frequently Asked Questions
How Do I Add Tracking Code To WordPress Header?
To add tracking code in WordPress header, use a plugin or edit header. php file. Plugins like Insert Headers and Footers make it easy and safe.
Can I Add Google Analytics Tracking Code In WordPress?
Yes, you can add Google Analytics tracking code using plugins or by inserting it manually into the header. php file of your active theme.
Is It Safe To Edit WordPress Theme Files For Tracking?
Editing theme files is safe if done carefully. Always back up your site before changes. Using plugins is a safer alternative.
Which Plugin Is Best For Adding Tracking Code In WordPress?
Insert Headers and Footers plugin is popular for adding tracking codes. It’s simple, user-friendly, and doesn’t require coding knowledge.
Conclusion
Adding tracking code to WordPress is simple and useful. It helps you see how visitors use your site. Place the code correctly to avoid errors. Use plugins or manual methods as shown. Check your site after adding the code. Tracking gives you ideas to improve your content.
Keep your code updated for best results. Start tracking today to learn about your audience. It’s a small step with big benefits.


