Are you looking to expand your online presence without the hassle of starting a new website from scratch? Adding a subdomain can be a game-changer for your brand, offering you the flexibility to create specialized sections under your main domain.
Whether you want to launch a blog, a store, or a dedicated forum, Namecheap makes it straightforward and cost-effective. Imagine the possibilities of customizing your digital space to better suit your needs and captivate your audience. In this guide, we’ll walk you through the simple steps of adding a subdomain on Namecheap, empowering you to take control of your website’s architecture.
Ready to unlock new avenues for your online success? Let’s dive in and make it happen!
Credit: www.namecheap.com
Setting Up Your Namecheap Account
Setting up your Namecheap account is the first step to manage your domains effectively. A well-organized account simplifies the process of adding subdomains. This guide will help you create a streamlined setup for your Namecheap account.
Creating Your Namecheap Account
Begin by visiting Namecheap’s website. Click on the “Sign Up” button. Enter your details. Choose a username and password. Confirm your email address. Your account is now ready.
Navigating The Dashboard
Once logged in, you will see the dashboard. This central hub shows all your domains. Familiarize yourself with the layout. You can find domain management tools here.
Managing Your Domain List
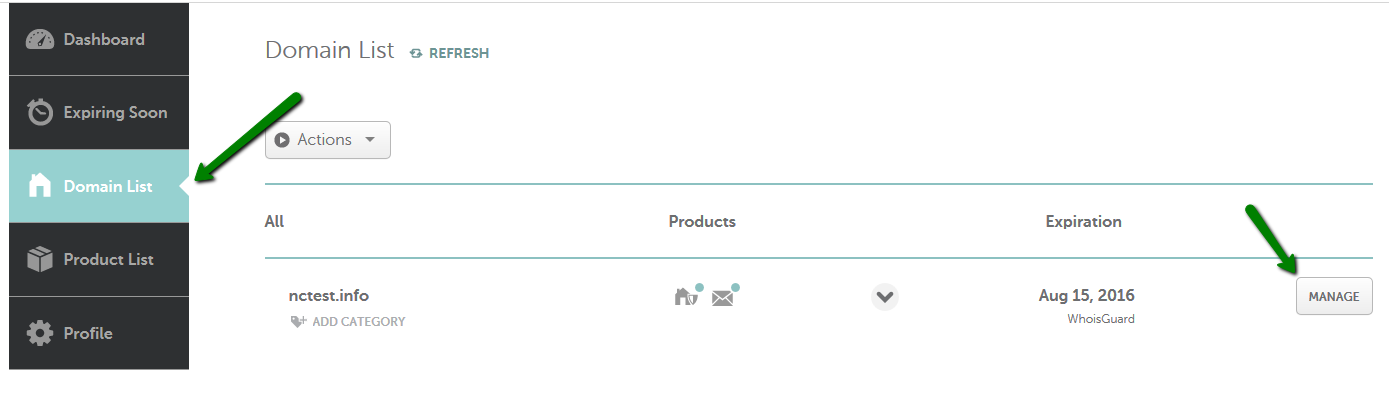
In the dashboard, locate the “Domain List” section. This area displays all registered domains. Select the domain you wish to add a subdomain to. Click on the “Manage” button next to it.
Accessing Advanced Dns Settings
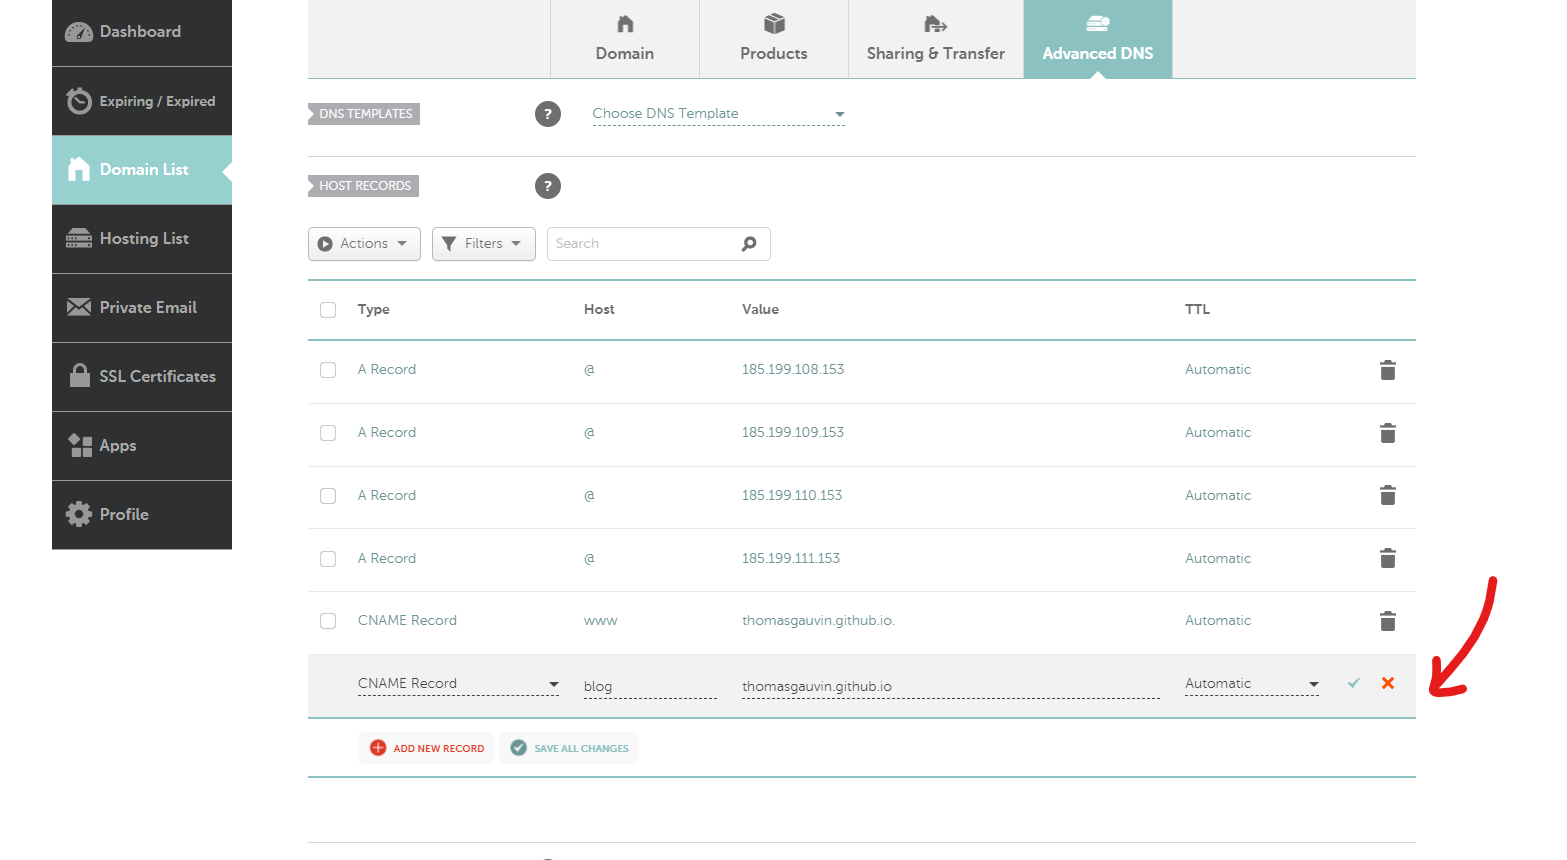
After selecting your domain, find the “Advanced DNS” tab. This section allows you to manage DNS records. Scroll down to the “Host Records” area. Here, you can add a subdomain.
Understanding Host Records
Host records define how your domain functions. They include A records, CNAME records, and others. To add a subdomain, create a new record. Choose the record type that suits your needs.
Credit: help.mailgun.com
Accessing Domain Management Panel
Access Namecheap’s domain management panel to add a subdomain easily. Click on “Domain List,” then “Manage. ” Navigate to “Advanced DNS. ” Add a new record with your subdomain name and target IP. Save changes to activate the subdomain.
Accessing the Domain Management Panel is the first step in adding a subdomain on Namecheap, and it’s surprisingly straightforward. You might feel a little overwhelmed with the technicality, but don’t worry—it’s simpler than you think. This guide will walk you through the process, ensuring you can easily navigate and find what you need. ###1. Log Into Your Namecheap Account
Begin by visiting the Namecheap website. Use your credentials to log in. If you’ve forgotten your password, take a moment to reset it through the provided link. ###2. Navigate To The Dashboard
Once logged in, you’ll land on your account dashboard. Here, you’ll see a list of your active domains. This area is your command center for managing all domain-related tasks. ###3. Find Your Domain
Look through your domain list to find the one you want to add a subdomain to. If you have many domains, use the search bar to quickly locate it. This saves you time and effort scrolling through numerous entries. ###4. Access Domain Management
Next to your domain, you’ll see a ‘Manage’ button—click it. This takes you to the domain management panel, where you can make all necessary changes. This area might look complex, but focus on what you need to do. ###5. Locate The Advanced Dns Tab
In the domain management panel, find the ‘Advanced DNS’ tab. Clicking on it will reveal your DNS settings. This is where you will add your subdomain. ###6. Add A New Record
Look for the option to add a new record. You’ll need to select the type of record you want to add—typically, this will be an ‘A Record’ for most subdomain setups. Ensure you input the correct IP address for your subdomain’s destination. ###7. Save Your Changes
Don’t forget to save your changes once you’ve added your subdomain. Check your work to ensure everything is correct. Namecheap usually takes a few minutes to propagate these changes, so give it some time. By following these steps, you can efficiently add a subdomain on Namecheap without feeling overwhelmed. Have you ever managed to add a subdomain on Namecheap successfully? What were your key takeaways? Share your insights and help others streamline their process.Creating And Configuring Subdomain
Creating a subdomain on Namecheap is a straightforward process that opens up new possibilities for organizing your website. Whether you’re launching a new blog, setting up a customer portal, or simply expanding your online presence, a subdomain can help you achieve your goals seamlessly. It’s not just about adding a subdomain; it’s about configuring it to suit your needs and ensuring it works smoothly. Let’s dive into how you can create and configure a subdomain on Namecheap effortlessly.
Accessing Your Namecheap Account
First things first, log into your Namecheap account. You need to have access to your domain settings, which is where the magic happens. Don’t worry if you’re not tech-savvy; Namecheap’s interface is user-friendly and intuitive.
Navigate to the “Domain List” where all your registered domains are displayed. Click on the domain for which you wish to create a subdomain. This will lead you to a plethora of options for managing your domain.
Finding The Dns Settings
Once you’re in the domain management section, look for “Advanced DNS”. It’s often nestled under the domain details. Here, you can manage your DNS records, which are crucial for subdomain configuration.
In the DNS settings, you will find options to add various types of records. You’ll be working with the ‘A Record’ or ‘CNAME Record’ depending on how you want to route traffic to your subdomain.
Adding A Subdomain
In the DNS settings, click on “Add New Record”. Choose the type of record you want to add, typically ‘A Record’ or ‘CNAME Record’. This depends on whether you’re pointing to a server with an IP address or another domain.
Enter your desired subdomain name in the ‘Host’ field. For example, if your main domain is example.com, you might want ‘blog.example.com’. The value field will depend on the type of record; an IP address for ‘A Record’ or another domain for ‘CNAME Record’.
Configuring Subdomain Settings
Once you’ve added the subdomain, it’s time to configure it according to your requirements. Consider what you want to achieve with this subdomain. Is it going to host a WordPress blog? An e-commerce store? Configure server settings accordingly.
Check the TTL (Time To Live) settings, which dictate how long DNS servers cache your DNS records. Adjusting this can influence how quickly changes take effect across the web.
Testing Your Subdomain
After setting up your subdomain, it’s crucial to test it. Open a web browser and type in your subdomain URL to ensure it’s directing correctly. If it doesn’t load, revisit the DNS settings to troubleshoot.
Sometimes, DNS changes take a little while to propagate, so patience is key. If issues persist, Namecheap’s support team is a valuable resource for guidance.
What new opportunities could this subdomain unlock for your business? As you explore its potential, remember that every subdomain can be a gateway to a unique user experience. Enjoy the process and embrace the possibilities!
Credit: thomasgauvin.com
Frequently Asked Questions
How Do I Add A Subdomain In Namecheap?
Log in to your Namecheap account. Go to the “Domain List” section. Click “Manage” next to your domain. Select “Advanced DNS. ” Click “Add New Record” and choose “A Record” or “CNAME Record. ” Enter the subdomain and IP address or URL.
Save changes to add the subdomain.
How Do I Add A Subdomain?
To add a subdomain, access your hosting account’s DNS settings. Create a new DNS record, selecting “A” or “CNAME” as needed. Enter the subdomain name and point it to the desired IP address or existing domain. Save the changes to make the subdomain active.
Is A Subdomain Bad For Seo?
Subdomains are not inherently bad for SEO. They can rank well if optimized correctly. Search engines treat subdomains as separate entities, so ensure they have unique, valuable content. Proper link building and consistent updates can improve their visibility. Focus on overall site architecture and user experience for best results.
How Do I Add A Domain In Namecheap?
Log into your Namecheap account. Navigate to “Domain List” in the left sidebar. Click “Manage” next to the domain. Select “Advanced DNS” tab and add your domain details. Save changes to complete the process.
Conclusion
Adding a subdomain on Namecheap is a straightforward process. Follow the steps carefully. First, log into your Namecheap account. Then, navigate to the “Domain List” section. Click “Manage” next to your domain. Locate the “Advanced DNS” tab. Here, add your new subdomain details.
Make sure to save your changes. This will ensure your subdomain works correctly. Now, you can use your subdomain for various purposes. Host different content or create specialized sites. Namecheap makes managing domains simple. Enjoy the flexibility that subdomains offer.
Explore new possibilities with your website today.