
Are you ready to make your WordPress site more powerful and organized? Adding new pages is a simple step that can boost your website’s value and help visitors find exactly what they need.
Whether you want to create an about page, a services page, or anything else, this guide will show you how to do it quickly and easily. Keep reading, and you’ll learn the exact steps to add pages that look great and work perfectly—no tech skills required!
Credit: wordpress.org
Creating A New Page
Creating a new page on your WordPress site is simple and quick. Pages help you share important information, like About Us or Contact details. Follow these steps to start building your page.
Accessing The WordPress Dashboard
First, log in to your WordPress admin area. This area is called the Dashboard. It is where you control your entire website. Use your username and password to enter.
Once logged in, you see the main menu on the left side. This menu guides you through your site’s settings and content.
Navigating To The Pages Section
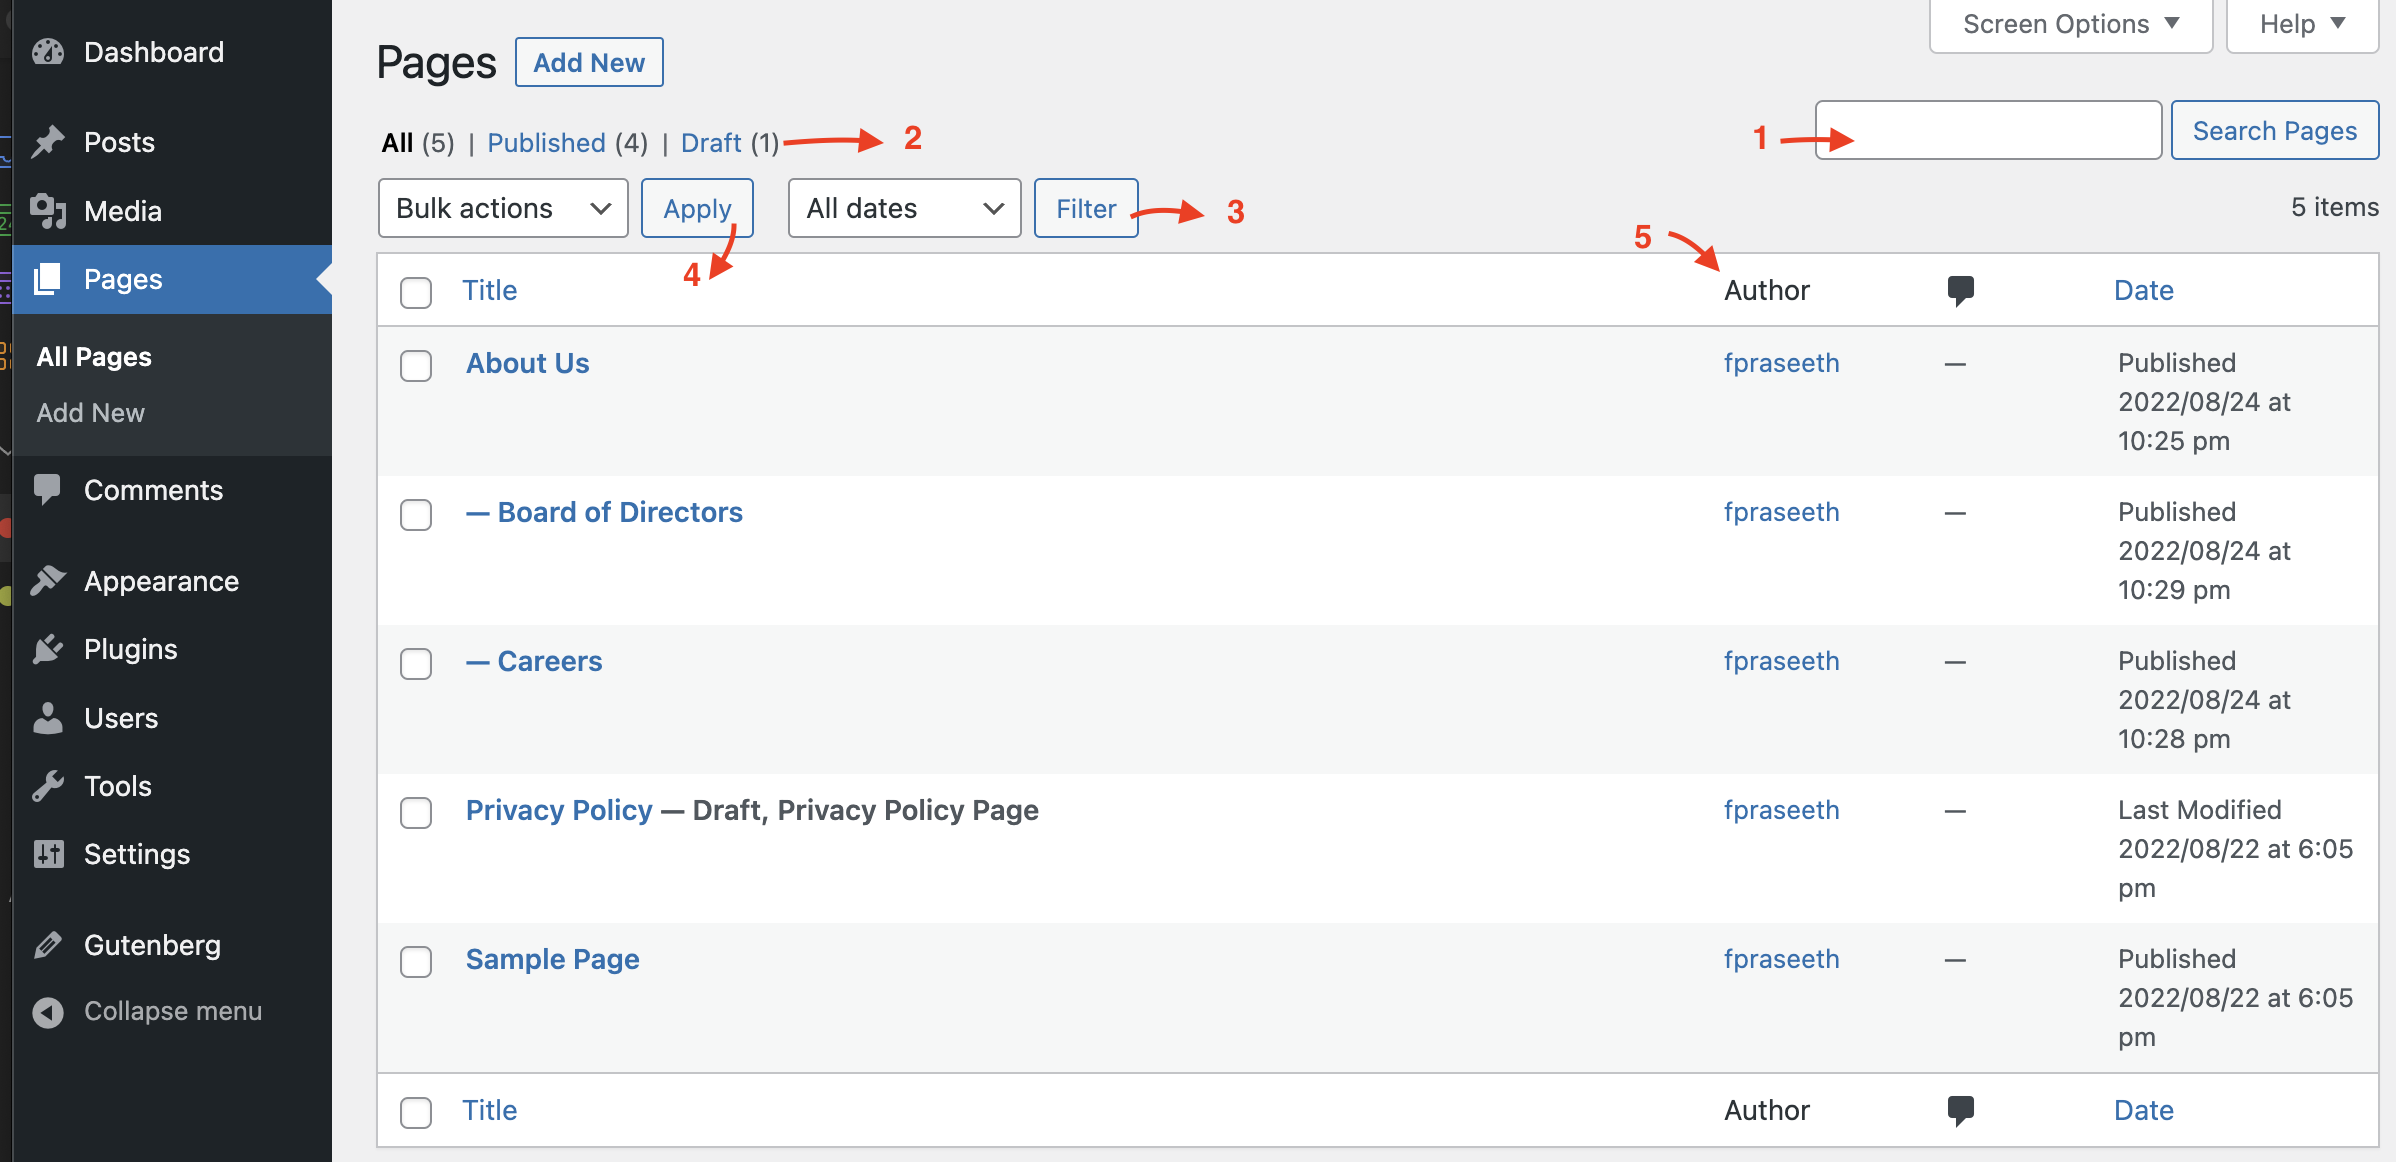
Look for the “Pages” option in the left menu. Click on it to see all your current pages. This section shows a list of all pages on your site.
You can edit or delete pages here. But to create a new one, you need to add it.
Clicking On Add New
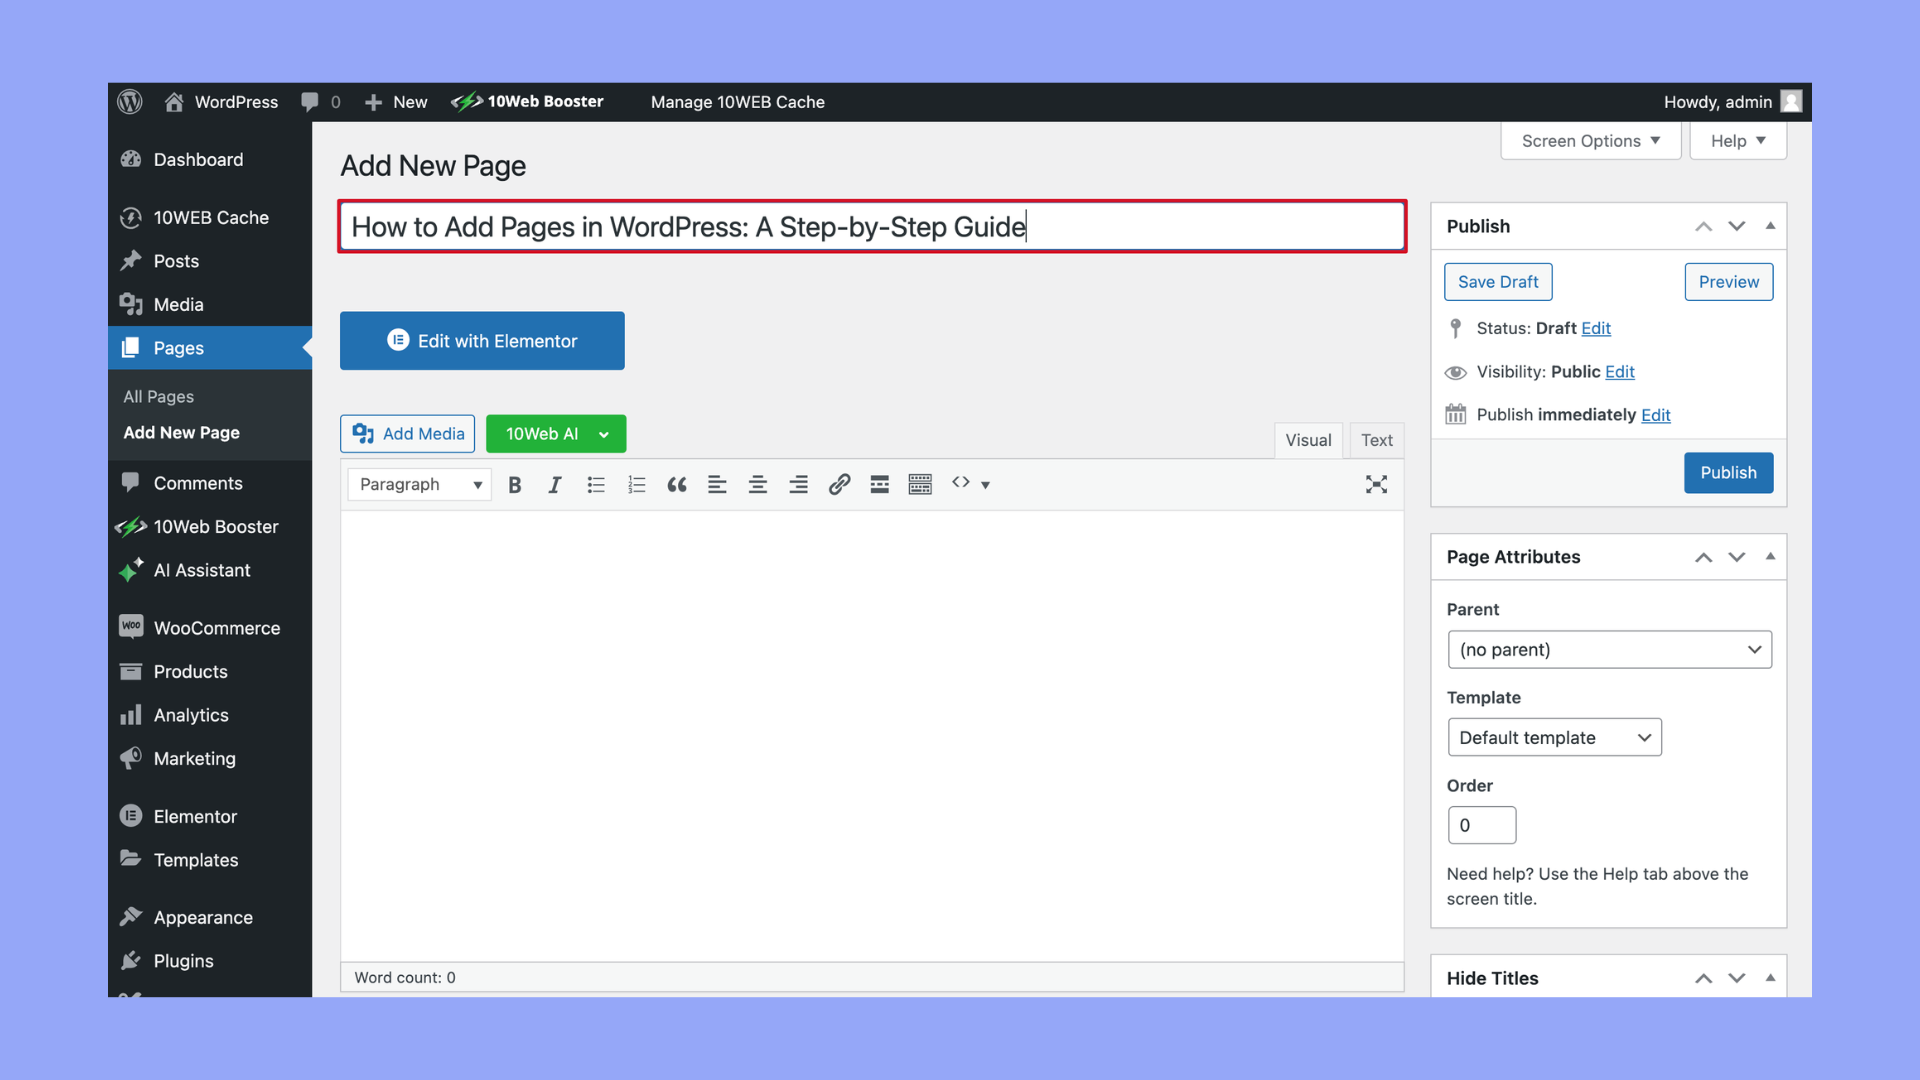
At the top of the Pages screen, find the “Add New” button. Click it to open a blank page editor. Here, you can enter your new page’s title and content.
Use the editor to add text, images, or videos. When finished, save or publish your page to make it live.
Setting Up Your Page
Setting up a new page on your WordPress site is simple. It starts with a clear structure. Each step helps build a page that looks good and works well. Follow these steps to create a page that fits your site’s style and purpose.
Adding A Page Title
The page title tells visitors what the page is about. It also helps search engines understand your content. To add a title, click the text box at the top of the editor. Type a clear, short title that matches your page topic. Use words visitors might search for. This improves your page’s visibility online.
Using The WordPress Editor
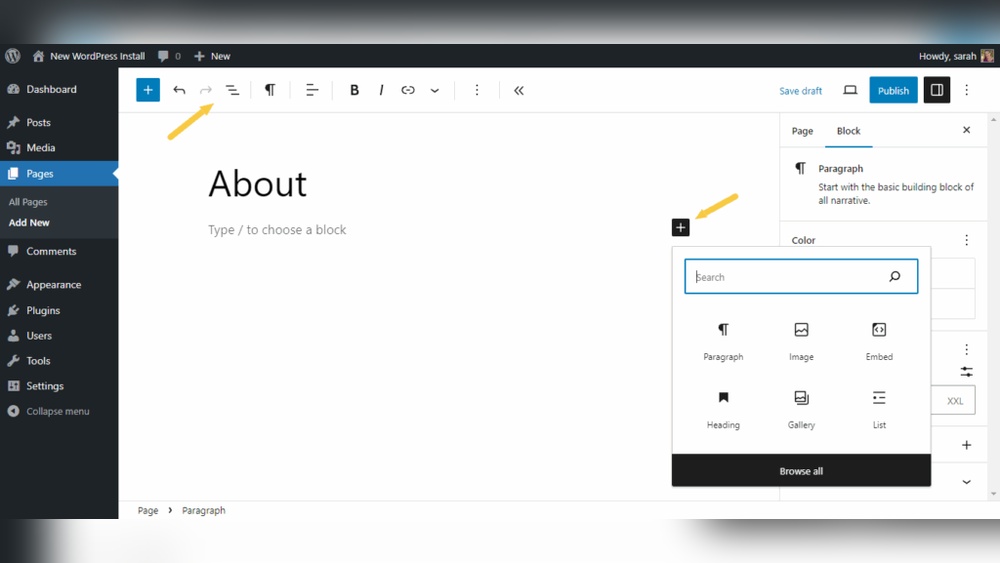
The WordPress editor is easy to use. It lets you add and arrange content blocks. You can add text, images, and other media. The editor shows a live preview of your page. This helps you see changes as you make them. Spend time exploring the tools to get comfortable.
Inserting Text And Media
Start by adding text blocks to share your message. Keep sentences short and clear. Break long paragraphs into smaller ones. To add images or videos, click the plus icon. Choose the type of media from the list. Upload files from your computer or select from the library. Media makes pages more interesting and helps explain ideas better.
Customizing Page Settings
Customizing page settings helps your WordPress pages look unique and work well. You control how your page appears and when visitors see it. Small changes can make your page fit your site’s style perfectly.
Choosing A Page Template
WordPress offers different page templates to change page layout. Templates can show full-width pages or pages with sidebars. Pick a template that suits your content type. This step adjusts how your page looks without coding.
Adjusting Visibility And Publish Options
You decide who sees your page and when. Pages can be public, private, or password-protected. Set the publish date to control when the page goes live. These settings help you manage your site’s content easily.
Setting A Featured Image
A featured image represents your page on your site. It shows in page lists and social media shares. Choose an image that matches your page topic. This image makes your page more attractive to visitors.

Credit: wordpress.org
Publishing Your Page
Publishing your page on a WordPress site is the final step to make your content live. It allows visitors to see the new page on your website. This step is simple but important. You have options to preview, publish immediately, or schedule for later. Each choice helps you control when your page goes public.
Previewing The Page
Previewing lets you see the page before it goes live. It shows how the page looks on your site. Check for spelling, images, and layout. Make sure everything appears right. Preview helps avoid mistakes and ensures a good user experience.
Publishing Immediately
Publishing immediately makes your page live at once. Click the “Publish” button in the WordPress editor. Your page becomes visible to all visitors right away. Use this option when your content is ready and error-free. It is quick and simple.
Scheduling For Later
Scheduling lets you set a future date and time to publish. Choose this to plan content releases ahead. Enter the date and time in the editor. WordPress will publish automatically at that moment. It helps keep your site updated regularly.
Adding Pages To Navigation Menus
Adding pages to your navigation menu helps visitors find important content quickly. A clear menu improves site usability and keeps users engaged. WordPress makes it simple to customize menus with new pages.
Opening The Menus Settings
Start by logging into your WordPress dashboard. On the left sidebar, find and click Appearance. Then select Menus from the dropdown options. This opens the menu editor where you can manage your site’s navigation.
Selecting Pages To Add
In the menu editor, look for the Pages box on the left. It lists your published pages. Tick the checkboxes next to the pages you want to add. Then click the Add to Menu button. These pages appear as new items in your menu structure.
Arranging Menu Items
Drag and drop menu items to reorder them. Place important pages at the top or in a visible spot. You can also create submenus by dragging items slightly to the right. This groups related pages under a main menu item for cleaner navigation.
Managing And Editing Pages
Managing and editing pages on your WordPress site is simple and important. It helps keep your content fresh and relevant. You can update information, change layouts, or remove pages you no longer need.
WordPress gives you control over every page. This section explains how to find, edit, and delete pages effectively.
Finding Existing Pages
Log in to your WordPress dashboard. On the left menu, click “Pages.” You will see a list of all your pages. Use the search box to find a specific page. Sorting options let you organize pages by date or title. This makes finding pages fast and easy.
Editing Content And Settings
Click on the page title to edit it. The editor opens with your page content. You can change text, images, and layout here. Use the block editor to add or remove sections. On the right, find settings like page visibility and publishing options. Make sure to save or update changes before leaving.
Deleting Unwanted Pages
To delete a page, go to the Pages list. Hover over the page name and click “Trash.” The page moves to the trash folder but is not deleted permanently. You can restore or delete it from there. Removing old pages improves site navigation and user experience.
Tips For Optimizing Pages
Optimizing pages on your WordPress site improves user experience and search rankings. Simple steps can make your pages load faster, rank higher, and look great on any device. Follow these tips to create pages that visitors enjoy and search engines favor.
Using Seo Best Practices
Choose clear, relevant keywords for each page. Include these keywords in titles, headings, and content. Write short, descriptive meta descriptions that explain the page topic. Use alt text for all images to help search engines understand them. Keep URLs simple and readable by using words instead of numbers. Use internal links to guide visitors to other parts of your site.
Enhancing Page Load Speed
Compress images before uploading to reduce file size. Use a caching plugin to save page versions and load faster. Limit the use of heavy plugins that slow down the site. Minimize CSS and JavaScript files to improve speed. Choose a reliable hosting provider with fast servers. Check your site speed regularly using free online tools.
Making Pages Mobile-friendly
Use a responsive WordPress theme that adjusts to all screen sizes. Test pages on different devices to ensure easy reading and navigation. Keep font sizes large enough for small screens. Avoid using pop-ups that block content on mobile devices. Place buttons and links where users can easily tap them. Make sure images resize correctly on mobile screens.
Credit: 10web.io
Frequently Asked Questions
How Do I Add A New Page In WordPress?
To add a new page, go to your WordPress dashboard. Click on “Pages” then “Add New. ” Enter your page title and content. Finally, click “Publish” to make it live on your site.
Can I Customize WordPress Pages After Adding Them?
Yes, you can customize pages using the WordPress block editor or page builders. Customize layouts, add images, and format text easily to match your site’s style and branding.
How Do I Organize Pages In WordPress Menus?
Go to “Appearance” > “Menus” in your dashboard. Add pages to your menu and arrange them by dragging. Save the menu to update your site’s navigation.
Are WordPress Pages Seo Friendly By Default?
WordPress pages are SEO-friendly by default. Use SEO plugins to optimize titles, meta descriptions, and keywords for better search engine visibility.
Conclusion
Adding pages to your WordPress site is simple and quick. You just need to follow a few easy steps. Creating pages helps share important information with your visitors. It also improves your site’s structure and navigation. Keep your pages clear and organized for the best results.
Regularly update your content to keep it fresh and useful. Practice these tips and watch your website grow steadily. Keep exploring WordPress features to make your site even better. You have the tools; now it’s time to build!


