
Adding a new user to your WordPress site might sound tricky, but it’s actually simpler than you think. Whether you want to give a team member access, invite a guest author, or manage your site more efficiently, knowing how to add users is essential.
You’ll learn step-by-step how to do it quickly and safely. Keep reading, and you’ll gain the confidence to manage your site’s users like a pro—without any hassle.
Credit: www.theedigital.com
Access WordPress Dashboard
Accessing the WordPress dashboard is the first step to managing your website. This dashboard is the control center where you can add new users, create posts, and change settings. It gives you full control over your site’s content and appearance.
To reach the dashboard, you must log in using your admin credentials. Once logged in, you will see the main menu on the left side. This menu helps you navigate to different parts of your site quickly.
Locate The Login Page
The login page is usually your website URL followed by /wp-admin or /wp-login.php. For example, www.yoursite.com/wp-admin. Type this in your browser to open the login screen.
Enter Your Username And Password
Use the username and password created during WordPress installation. These details must be kept safe and private. Enter them carefully to avoid login errors.
Navigate The Dashboard Menu
After logging in, the dashboard appears. The menu on the left includes sections like Posts, Pages, and Users. To add a new user, you will use the Users section.
Credit: www.greengeeks.com
Navigate To Users Section
Navigating to the Users section in WordPress is the first step to adding a new user. This area helps you manage all users on your site. It shows who can log in and what they can do. Finding this section is simple and quick.
Locate The WordPress Dashboard
Start by logging into your WordPress admin panel. The dashboard is the main control area. It appears right after login. You see many menu options here.
Find The Users Menu Item
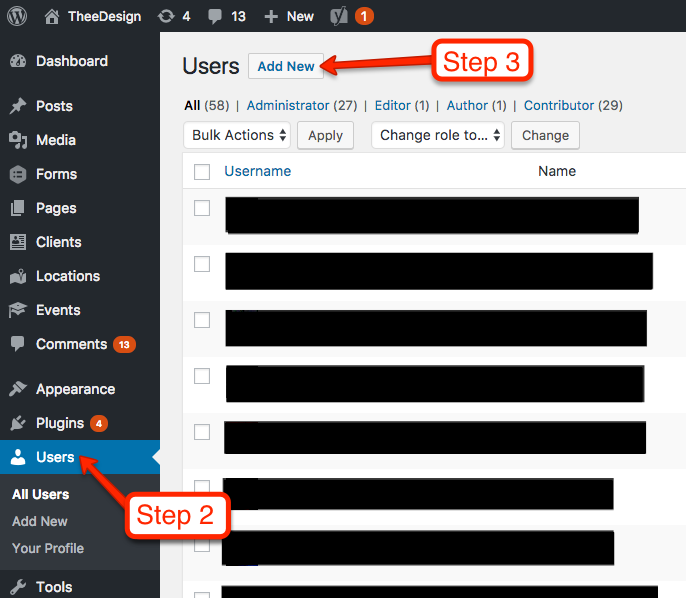
Look at the left sidebar of the dashboard. Scroll down to find the “Users” menu. This option controls user management. Click on it to open the users area.
Understand The Users Section Layout
The Users page lists all current users. You can see usernames, roles, and emails. This page also has options to edit or delete users.
Start Adding A New User
Starting to add a new user in WordPress is simple and quick. This process lets you give access to people who help manage your site. You control what each user can do by setting their role. Follow these steps to begin adding a new user.
Access The WordPress Dashboard
First, log in to your WordPress admin area. This is where you control your site. Use your username and password to enter the dashboard.
Navigate To The Users Section
On the left menu, find and click on “Users”. This opens a list of current users. To add someone new, click the “Add New” button at the top.
Fill Out The New User Form
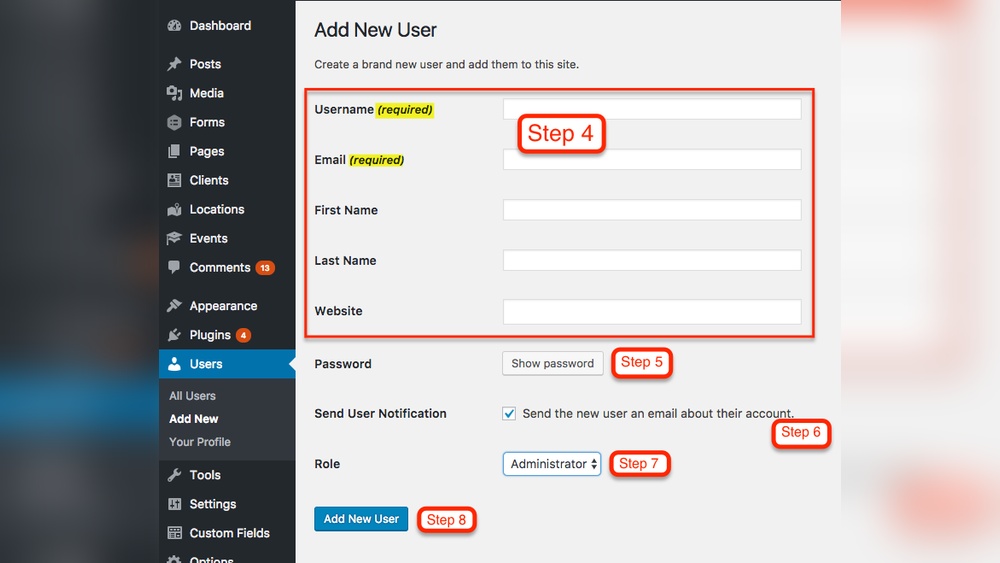
Enter the new user’s details carefully. Provide a username, email, and name. Create a strong password or let WordPress generate one.
Assign A Role To The New User
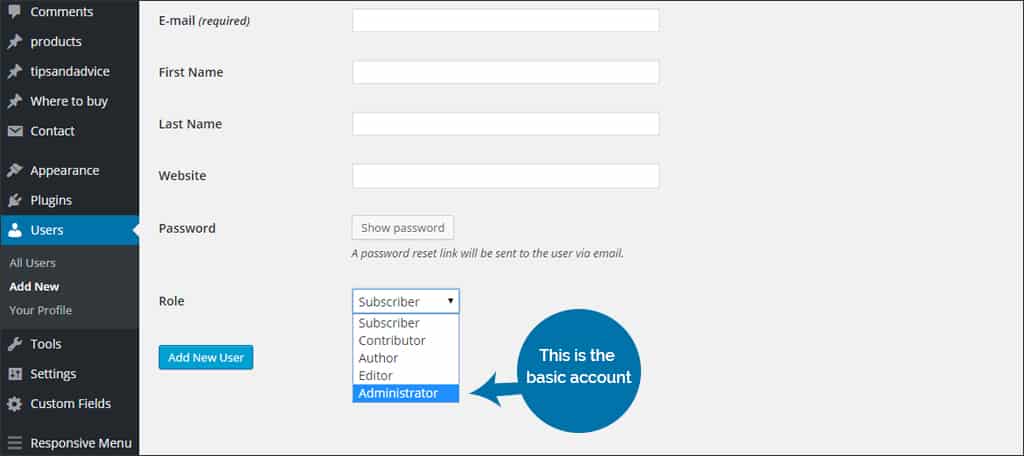
Choose the role that fits the new user’s tasks. Roles include Subscriber, Contributor, Author, Editor, and Administrator. Each role has different permissions.
Send The New User Notification
Check the box to send the new user an email. This message contains login details and instructions. It helps them start using the site right away.
Save The New User
Click the “Add New User” button at the bottom. The user is now part of your WordPress site. You can edit or delete their account anytime.
Fill In User Details
Filling in user details is the key step to adding a new user in WordPress. This process sets up the user’s identity and contact information. It helps WordPress manage users properly and send notifications if needed.
Each field in the form has a specific purpose. Take your time to complete them carefully. Correct details make the site safer and easier to manage.
Username And Email
The username is the unique name the user will use to log in. It cannot be changed later, so choose it wisely. Use simple and clear names without spaces or special characters.
The email address must be valid and active. WordPress sends important messages to this email. It also helps in password recovery and user communication.
First And Last Name
Enter the user’s first and last name. These fields are optional but useful. They make the user profile more personal and professional. Names also appear in posts and comments.
Website Url
This field is optional. Add the user’s website address if they have one. Use the full URL starting with http or https. This link shows on the user’s profile and can help visitors learn more about them.
Set A Strong Password
Setting a strong password is essential for every new WordPress user. A strong password protects your site from hackers. It keeps your content and user data safe. Weak passwords make your site easy to break into.
Choose a password that is hard to guess. Use a mix of letters, numbers, and symbols. Avoid common words or simple number sequences. A strong password keeps your WordPress site secure.
Use A Mix Of Characters
Combine uppercase and lowercase letters. Add numbers and special characters like !, @, or . This mix makes passwords harder to crack. It also improves your site’s security.
Make Passwords At Least 12 Characters Long
Longer passwords are stronger. Aim for 12 characters or more. Short passwords are easier for hackers to guess. Length adds a layer of protection to your site.
Avoid Common Words And Patterns
Do not use words like “password” or “admin”. Avoid simple patterns like “123456” or “abcd”. Hackers try these first. Unique passwords reduce the risk of attacks.
Use A Password Manager
Password managers create and store strong passwords for you. They keep all your passwords safe in one place. This helps avoid forgetting or reusing passwords. It improves security and convenience.
Assign User Roles
Assigning user roles in WordPress controls what each user can do. It helps keep your site safe and organized. Each role has specific permissions. Choose roles carefully based on tasks users will handle.
Administrator
The Administrator has full control over the site. They can change settings, install plugins, and manage all content. Only trusted users should be given this role.
Editor
Editors manage and publish posts and pages. They can also moderate comments and manage categories. Editors do not have access to site settings.
Author
Authors write, edit, and publish their own posts. They cannot edit others’ posts. Authors have limited control but can upload files.
Contributor
Contributors write and edit their posts but cannot publish them. They need approval from Editors or Administrators. Contributors cannot upload files.
Subscriber
Subscribers can only manage their profiles. They cannot write or edit posts. This role is useful for sites with membership or newsletter features.
Send User Notification
Sending a user notification is an important step after adding a new user in WordPress. It lets the new user know their account is ready. This message usually contains login details and a welcome note. It helps users access the site quickly and easily.
WordPress offers a simple way to send this notification automatically. You can control whether to notify the user or not during the user creation process. This saves time and ensures clear communication.
How To Enable User Notification In WordPress
When adding a new user, WordPress shows an option to send the notification email. It is a checkbox labeled “Send User Notification”. Make sure to check this box before saving the new user. This activates the email to be sent immediately.
Customizing The Notification Email
By default, WordPress sends a standard email. You can customize this message using plugins. Plugins allow you to add your brand name and personal greetings. A custom email feels more welcoming and professional.
What Information Does The Notification Include?
The notification email includes username and a login link. It may also contain a temporary password or instructions to set a new password. This helps users log in without extra support.

Credit: www.youtube.com
Save And Confirm New User
Saving and confirming a new user in WordPress is a crucial step. It ensures the new user is added correctly to your site. This process secures the user’s access and activates their account.
After filling out the user details, saving the information is next. WordPress stores the new user’s data safely. This lets the user log in and interact with your site as intended.
How To Save The New User Details
After entering the username, email, and role, find the “Add New User” button. Click it to save all the details. WordPress will process the information immediately. A confirmation message will appear at the top.
Confirming The New User Registration
WordPress may send an email to the new user. This email contains a link to confirm their account. The user must click the link to activate their profile. This step prevents fake or spam accounts.
What Happens After Confirmation
Once confirmed, the user can log in using their credentials. They gain access based on the role assigned. Admins can manage roles and permissions anytime. This control keeps your website secure and organized.
Manage Users After Creation
Managing users after adding them to your WordPress site is key to keeping your site organized and secure. You can update user details, remove users who no longer need access, or change roles to fit their current responsibilities. These actions help maintain control over who can do what on your site.
Edit User Information
To edit user details, go to the WordPress dashboard and click on “Users.” Find the user you want to update and click “Edit.” You can change their name, email, password, and other profile information. Save the changes to keep the user data accurate and up to date.
Delete Users
Deleting a user is simple but important. In the “Users” section, select the user to remove and click “Delete.” WordPress will ask what to do with the content created by that user. Choose to either delete it or assign it to another user. This step helps keep your site clean and organized.
Change User Roles
User roles control what users can do on your site. To change a role, open the user’s profile and find the “Role” dropdown menu. Select the new role, such as Subscriber, Editor, or Administrator. Save the changes. This adjustment ensures users have the right permissions for their tasks.
Troubleshoot Common Issues
Adding a new user in WordPress is usually simple. Still, some common problems can stop you. This section helps you fix those issues fast. Understanding these troubles saves time and effort.
User Role Restrictions
WordPress limits what users can do based on their role. Sometimes, new users cannot perform needed tasks. This happens if the wrong role is assigned. Check the user role carefully before saving. Use the correct role for the user’s job.
If a user cannot access a page, review their permissions. Admin roles have full access. Editor roles manage content but not settings. Author roles create their own posts only.
Email Notification Problems
New users should receive an email with login details. Sometimes, this email does not arrive. Check if the email address is correct in the user profile. Also, check spam or junk folders.
Email issues can come from your hosting server. Some servers block WordPress emails. Use a plugin to fix email sending problems. This ensures users get their notifications on time.
Frequently Asked Questions
How Do I Add A New User In WordPress?
To add a new user, go to your WordPress dashboard. Click “Users” then “Add New. ” Fill out the user details and assign a role. Finally, click “Add New User” to save.
What User Roles Can I Assign In WordPress?
WordPress offers roles like Administrator, Editor, Author, Contributor, and Subscriber. Each role has different permissions. Choose a role based on the user’s responsibilities and access needs.
Can I Add Multiple Users At Once In WordPress?
By default, WordPress does not support bulk user creation. You can use plugins or import tools to add multiple users simultaneously for efficiency.
How Do I Manage User Permissions In WordPress?
User permissions are managed through roles. Edit a user’s role to change access rights. Use plugins for more detailed permission control if needed.
Conclusion
Adding a new user in WordPress is quick and simple. Just follow the steps carefully. Assign the right role to keep your site safe. New users can help manage your website smoothly. Regularly review user roles for better control. Now, you can easily add users and grow your site’s team.
Try it yourself and see the difference.


