
Are you looking to give your WordPress site a fresh look and feel? Adding a new menu to your WordPress theme can do just that, enhancing both the aesthetics and functionality of your website.
Imagine guiding your visitors smoothly through your site, making it easier for them to find exactly what they need. A well-structured menu is not just a fancy addition; it’s a powerful tool to boost user engagement and keep your audience coming back for more.
In this guide, you’ll learn simple steps to create a new menu in your WordPress theme, transforming your site into a user-friendly haven. Whether you’re a seasoned WordPress user or a beginner, this tutorial will have you navigating the world of WordPress menus with ease. Keep reading, and unlock the potential of your website today!
Credit: easywpguide.com
Understanding WordPress Menus
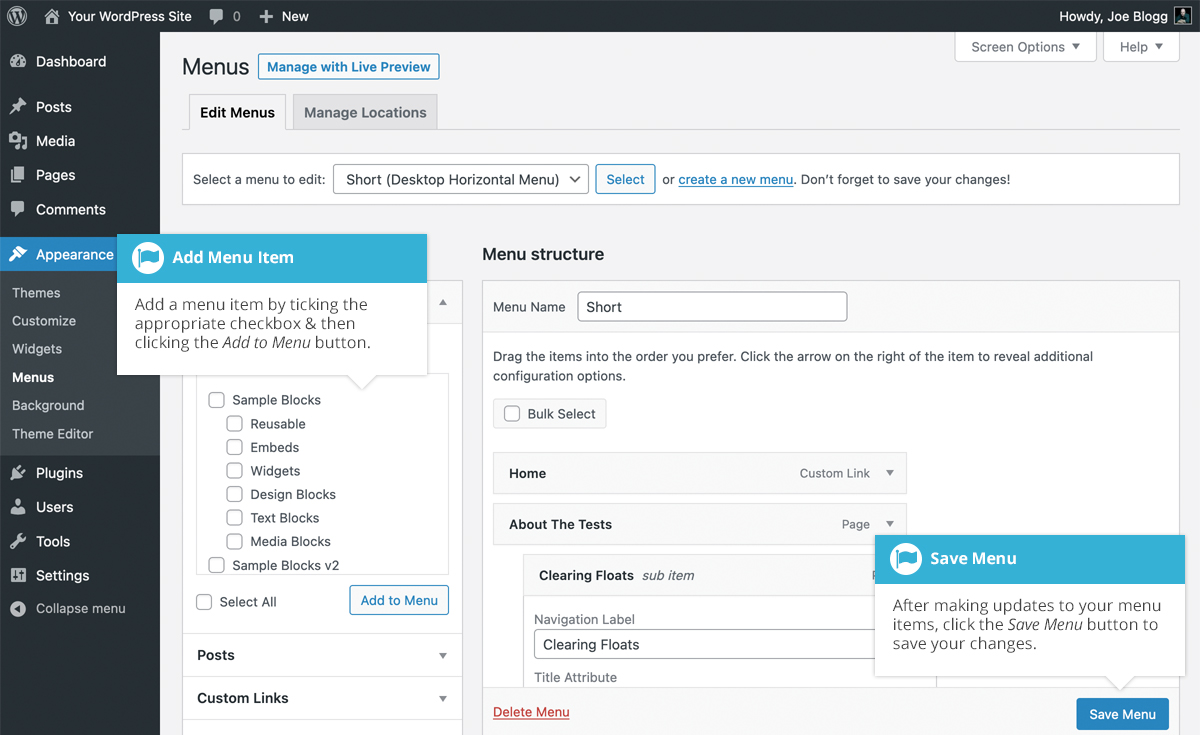
WordPress menus help users find pages on your site. They are important for navigation. Adding a new menu is easy. Start by going to the WordPress dashboard. Find the “Appearance” section. Click on “Menus”. Here, you can create a new menu. Give it a name. Choose where you want it to appear. Options include the top or side of your page.
Adding items to the menu is simple. Use the checkboxes to select pages. You can add posts, links, and categories. Drag them to arrange the order. Save your changes. Check your site to see the new menu. It should be visible now. Menus help visitors find what they need fast.
Credit: www.wpbeginner.com
Preparing Your Theme For A New Menu
Creating a new menu in a WordPress theme involves using the “Appearance” tab. Navigate to “Menus” to begin. Customize by adding pages, categories, and links. Save changes to update your site.
Checking Theme Compatibility
Your theme must support menus. Check the theme documentation to see if menus are supported. Look for a section about menu locations. Sometimes, themes offer more than one location for menus. This is good. It gives you options. If your theme supports menus, you can start adding them.
Backing Up Your Theme Files
Always back up your theme files before making changes. You can use plugins for this. Some plugins are free. They help you save copies of your files. This is important. If something goes wrong, you can restore your theme. It’s like having a safety net. Backup files to your computer or cloud storage. This keeps them safe.
Registering A New Menu
To add a new menu, edit the functions.php file. This file is in the theme folder. Open the file using a code editor. Be careful when making changes. Mistakes can break the site.
Use the register_nav_menu function to create menus. This function helps WordPress know about the new menu. Add the code inside the functions.php file. Here is a simple example:
function my_custom_new_menu() {
    register_nav_menu('my-new-menu',__( 'My New Menu' ));
}
add_action('init', 'my_custom_new_menu');
The code above registers a new menu. It uses the name ‘My New Menu’. You can choose any name you like. Save the changes after adding the code. Refresh your WordPress dashboard to see the menu.
Adding Menu Locations In Theme
To add a new menu, modify the header or footer files. Locate the theme files in your WordPress dashboard. Open the header or footer file. Use a text editor to make changes. Find the section where you want the menu.
Insert the menu code in this area. Save the changes after editing. Then, refresh the website to see the new menu. Ensure you have a backup before making changes. This helps to restore if errors occur.
The wp_nav_menu function helps to display menus. This function is important for placing menus. Insert the function in the desired file. You can add it in header or footer. It accepts several arguments to customize.
Key arguments include ‘theme_location’ and ‘menu_class’. These help in styling the menu. Ensure your theme supports menus. Check the theme’s functions file for support. Add support if needed by using add_theme_support.
Customizing Menu Appearance
Enhancing your WordPress theme involves customizing menu appearance. Add a new menu by navigating to the WordPress dashboard. Select “Appearance,” then “Menus,” and click “Create a New Menu. ” Choose your preferred display location and add desired items.
Applying Css Styles
CSS styles change how menus look. They make menus pretty. Use CSS code to change colors. Make fonts bigger or smaller. Adjust padding and margins. Align text to left or right. Use background-color to add color. Use font-family to change font style. Experiment with hover effects for interactive menus. Make each menu unique. Keep it simple for users. Too many styles can be confusing.
Using Custom Menu Classes
Custom classes give more control. Assign classes in menu settings. Use classes for special styles. Target specific menu items. Apply styles to one item only. Use menu-item and menu-item-title classes. Create new classes in CSS file. Add them to menu items. Keep class names simple. Easy names are better. Avoid complex names. Custom classes make menus flexible. They help match site design.
Managing Menus In WordPress Dashboard
First, find the Appearance option in your WordPress dashboard. Click on Menus. You’ll see a list of menus. To create a new one, click on the Create a New Menu button. Name your menu. Choose a name that makes sense. After naming, click Create Menu. You’ve made a new menu!
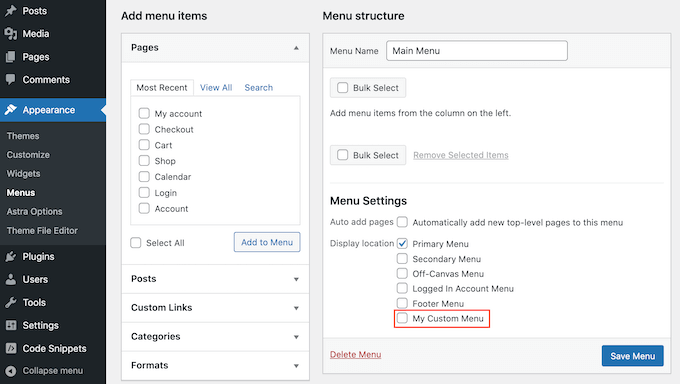
Now, it’s time to assign your menu. Look for Menu Settings below your menu list. You’ll see options like Primary or Footer. Choose where you want your menu. Select the location that fits best. After choosing, click Save Menu. Your menu is now set to show in the chosen spot.
Troubleshooting Common Issues
Adding a new menu in a WordPress theme often poses challenges. Navigate to ‘Appearance’ then ‘Menus’ for setup. Customize menu items by selecting pages, posts, or categories.
Menu Not Appearing
Sometimes, the menu might not show up. Check if the menu is assigned. Go to the WordPress dashboard. Click on Appearance, then Menus. Ensure the right menu is selected for your theme location. If it’s still missing, check theme settings. Some themes have custom menu settings. Verify that your menu is set correctly there. Updating the theme can also help. Sometimes, updates fix issues.
Styling Conflicts
Menus may look odd due to styling issues. Start by checking for CSS conflicts. Go to your WordPress theme’s style.css file. Look for any CSS code that affects menus. Remove or adjust conflicting styles. Another way is to use the Inspect Element tool. Right-click on your menu and select Inspect. It helps in finding CSS issues. Fixing the CSS can solve styling problems.
Credit: www.seedprod.com
Frequently Asked Questions
How Do I Add A Menu In WordPress?
To add a menu in WordPress, go to Appearance > Menus. Click on “Create a New Menu” and name it. Select pages, categories, or custom links to add. Arrange the items as desired. Save the menu and assign it to a theme location.
Can I Customize Menu Styles In WordPress?
Yes, you can customize menu styles using the WordPress Customizer. Navigate to Appearance > Customize > Menus. Here, you can change menu colors, fonts, and layout. Additional custom styles can be added using CSS. For advanced customization, consider using plugins or child themes.
Is It Possible To Add A Dropdown Menu?
Yes, creating a dropdown menu in WordPress is simple. In Appearance > Menus, drag menu items slightly to the right beneath a parent item. This creates a hierarchy, making a dropdown menu. Save changes and check your website for the updated menu structure.
What Plugins Help With Menu Customization?
Several plugins assist with menu customization, like Max Mega Menu and WP Mega Menu. They offer advanced features like responsive menus, custom styles, and animations. Install and activate your chosen plugin from the WordPress Plugin Directory for enhanced menu customization.
Conclusion
Adding a new menu in WordPress is simple. Follow the steps carefully. Start by accessing your WordPress dashboard. Navigate to the menu section. Create a new menu. Customize it with your preferred items. Save your changes. Your site now has a fresh menu.
This enhances user experience. Helps visitors find information easily. Ensures your website looks organized and professional. Regularly update your menu. Keep content relevant and engaging. Explore different menu styles. Find what suits your theme best. Remember, a well-structured menu boosts navigation.
Improves user engagement. Makes your site stand out. Happy customizing!


