
Are you ready to take control of your website by connecting your Namecheap hosting to your domain? Whether you’re just starting out or want to improve your online presence, this step is crucial.
But you might be wondering, how exactly do you link your hosting with your domain without hassle? Don’t worry—you’re in the right place. In this guide, you’ll discover simple, clear steps to make the process smooth and quick. By the end, you’ll have your website up and running, ready to attract visitors and grow your brand.
Keep reading to unlock the easy path to connecting your Namecheap hosting to your domain.

Credit: community.cloudflare.com
Choose A Domain Registrar
Choosing the right domain registrar is an important first step. This choice affects how easy it is to manage your domain later. A domain registrar sells domain names and helps you register them. You want a reliable company with good support and clear pricing. This section explains popular registrars and how to register your domain.
Popular Domain Registrars
Several companies offer domain registration services. Some of the well-known ones include GoDaddy, Namecheap, and Google Domains. Each has a simple website to search for available domain names. They also offer tools to manage your domain settings. Prices vary, so check what fits your budget. Look for registrars that provide good customer service.
Registering Your Domain
Start by searching for your desired domain name on the registrar’s site. If it is available, you can add it to your cart. You will need to provide your contact details for registration. Choose the registration period, usually from one to ten years. Pay attention to additional services like privacy protection. Complete the payment to secure your domain name. After registration, you can link your domain to Namecheap hosting easily.
Sign Up For Namecheap Hosting
Signing up for Namecheap hosting is the first step to connect your domain with reliable web hosting. The process is simple and fast. It helps you get your website online quickly.
This section explains how to choose a hosting plan and complete the purchase. Follow these steps carefully to avoid confusion.
Selecting A Hosting Plan
Visit the Namecheap hosting page. Review the available plans. Each plan offers different features and prices. Choose one that fits your website needs and budget.
Look for plans that include enough storage and bandwidth. Consider the number of websites you want to host. Starter plans suit small sites, while advanced plans support larger projects.
Completing The Purchase
After selecting a plan, click the “Buy Now” button. You will be prompted to create a Namecheap account or log in.
Fill out your personal and payment information accurately. Double-check the details before submitting the order. Namecheap often offers discounts for first-time users.
Once the payment is complete, you will receive a confirmation email. This email contains important information about your hosting account.
Locate Namecheap Hosting Nameservers
Locating Namecheap hosting nameservers is the first step to connect your domain with hosting. Nameservers are essential because they tell the internet where your website files live. Without the correct nameservers, your domain will not show your website properly.
This process is simple and quick. You only need to find the nameserver details inside your Namecheap hosting account. These details usually look like “ns1.namecheap.com” and “ns2.namecheap.com.”
Accessing Hosting Dashboard
Start by logging into your Namecheap account. After logging in, go to the “Hosting List” section. This area shows all your active hosting plans.
Click on the hosting plan linked to your domain. This action opens the hosting dashboard. The dashboard gives you control over your hosting settings and resources.
Finding Nameserver Details
Inside the hosting dashboard, look for the “Nameservers” section. This place displays the nameservers assigned to your hosting plan.
Copy the nameserver addresses exactly as shown. You will need these to update your domain’s DNS settings later. Keep these details handy for the next steps.
Update Domain Nameservers
Updating your domain nameservers is a key step to connect your domain with Namecheap hosting. This process tells the internet where to find your website files. Without updating nameservers, your domain will not show your hosted content.
Nameservers act like a map. They direct visitors to your website’s hosting server. Changing them to Namecheap’s servers makes your domain point to your new hosting account.
Logging Into Domain Registrar
Start by signing into your domain registrar account. Use the website where you bought your domain. Enter your username and password to access your dashboard.
Look for sections like “Domains” or “My Domains.” Choose the domain you want to connect to Namecheap hosting. This opens the domain management page.
Replacing Default Nameservers
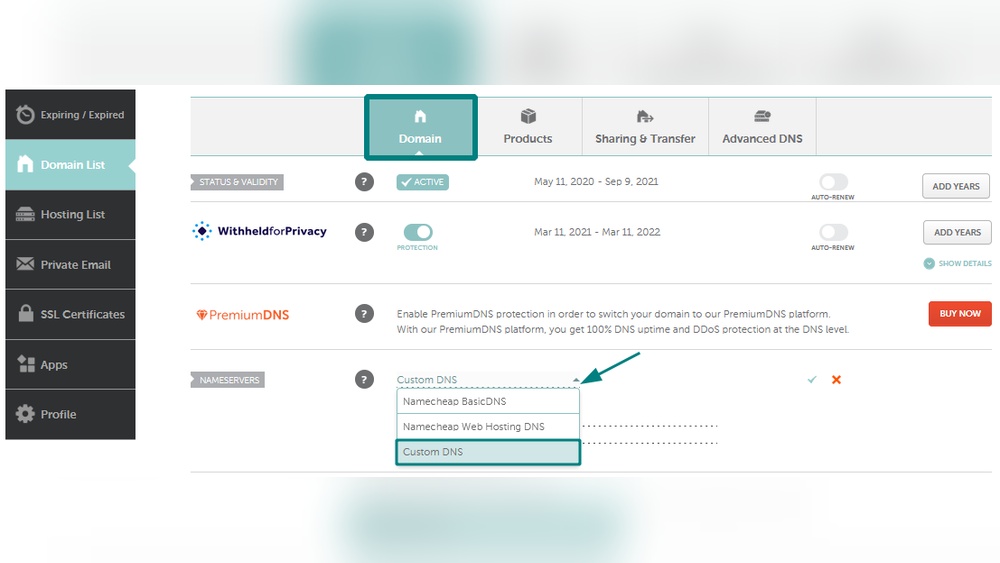
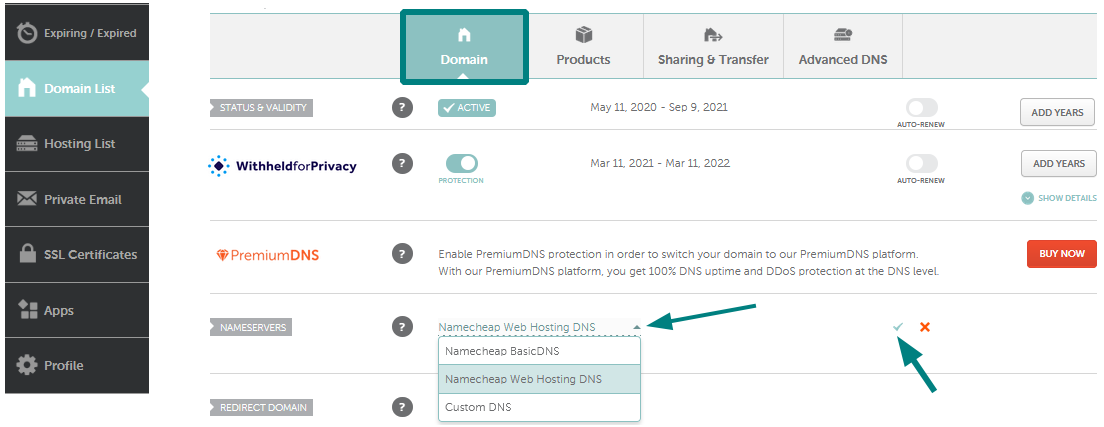
Find the option to change nameservers or DNS settings. Usually, it says “Use custom nameservers” or “Set nameservers.”
Remove any existing default nameservers. Type the Namecheap nameservers exactly as provided. Common Namecheap nameservers start with dns1.namecheaphosting.com and dns2.namecheaphosting.com.
Saving Changes
After entering the new nameservers, save your changes. Look for a “Save” or “Apply” button at the page bottom.
Nameserver updates may take a few minutes to 48 hours to spread worldwide. Wait patiently for your domain to connect fully to Namecheap hosting.
Verify Dns Propagation
Verifying DNS propagation is important after connecting Namecheap hosting to your domain. It shows if your domain points to the new hosting server correctly. DNS changes take time to spread worldwide. Checking propagation helps avoid website downtime and email issues.
You can confirm the update by checking the DNS records. This process ensures your site is live and accessible everywhere. It gives peace of mind before you start using your hosting fully.
Using Online Tools
Several free tools check DNS propagation easily. Enter your domain name, and these tools scan DNS servers worldwide. They show if your DNS records updated correctly. Popular tools include DNSChecker and WhatsMyDNS.
These tools display results from many locations. You can see if your domain resolves to the new Namecheap hosting IP. They provide a quick and simple way to track DNS status.
Typical Propagation Time
DNS propagation usually takes from a few minutes to 48 hours. Some changes update faster, while others need more time. The exact time depends on your DNS provider and server caches.
During this period, some users might see the old site. Others see the new hosting content. Waiting patiently helps avoid confusion and errors. Refresh your checks every few hours for the latest status.
Credit: www.namecheap.com
Connect Domain To Hosting Account
Connecting your domain to your hosting account is a key step to get your website online. This process links your website’s address with the place where your files live. It allows visitors to find your site by typing your domain name in their browser.
The connection involves adding the domain in your hosting panel and setting up your website files. Both steps are simple and important for your site to work properly. Follow the instructions below to complete this process easily.
Adding Domain In Hosting Panel
First, log in to your Name Cheap hosting account. Find the section labeled “Domains” or “Domain Management.” Look for an option to add a new domain or “Addon Domain.”
Enter your domain name exactly as you registered it. Choose the folder where your website files will be stored. This folder is usually created automatically. Save your changes to link the domain to your hosting space.
Setting Up Website Files
Next, upload your website files to the folder you selected. Use the hosting panel’s file manager or an FTP client. Make sure to upload the main page as “index.html” or “index.php.”
Check your domain in a browser to see your website live. If you see your site, the connection worked. If not, wait a few minutes and try again.
Test Your Website
Testing your website after linking Namecheap hosting to your domain is key. It shows if the setup works well. This step helps find any problems early. You can fix them before visitors see your site. Below are simple ways to check and solve common issues.
Checking Domain Access
Open a web browser. Type your domain name in the address bar. Press Enter. Your website should load quickly. If you see your homepage, the connection works fine.
Try different devices like phones or tablets. Check if the site loads on them too. Use a private or incognito window to avoid cached results. If your site appears, the domain points correctly to your hosting.
Troubleshooting Common Issues
If your site does not load, check DNS settings. Make sure your domain points to Namecheap’s hosting servers. DNS changes may take time to spread, up to 48 hours.
Clear your browser cache or try another browser. This can fix display problems. Check your hosting account for any errors or notifications.
Contact Namecheap support if issues persist. Provide details about what you tried. They can help diagnose and fix your setup quickly.
Credit: help.mailgun.com
Frequently Asked Questions
How Do I Link Namecheap Hosting To My Domain?
To link Namecheap hosting, update your domain’s nameservers to Namecheap’s hosting nameservers. Then, add your domain to the hosting dashboard under “Add New Domain. ” This connects your domain to your hosting account smoothly.
Can I Use Namecheap Hosting With Domains From Other Registrars?
Yes, you can use Namecheap hosting with domains registered elsewhere. Simply update the domain’s DNS settings to point to Namecheap’s nameservers. This allows your domain to work with Namecheap hosting without transferring it.
What Are The Steps To Update Dns For Namecheap Hosting?
Log in to your domain registrar’s dashboard. Locate DNS or nameserver settings. Replace current nameservers with Namecheap’s hosting nameservers. Save changes and wait up to 48 hours for full propagation.
How Long Does Dns Propagation Take With Namecheap Hosting?
DNS propagation typically takes 24 to 48 hours. During this time, your website might not be accessible globally. This delay is normal and depends on various internet service providers worldwide.
Conclusion
Adding Namecheap hosting to your domain is simple and quick. Follow each step carefully for the best results. Double-check your settings to avoid errors. Your website will be live soon after setup. Enjoy managing your site with ease and confidence.
Keep learning to improve your online presence. This guide helps you get started right away. No need to feel confused or overwhelmed. Just take it one step at a time. Your domain and hosting will work together smoothly.


