
Are you looking to enhance your WordPress website with a custom menu? Adding a menu to your WordPress theme can significantly improve your site’s navigation, making it easier for your visitors to find exactly what they’re looking for.
Imagine guiding your audience smoothly through your content, leading them exactly where you want them to go. The good news? It’s simpler than you might think. In this guide, you’ll discover step-by-step how to seamlessly integrate a menu into your WordPress theme.
Whether you’re a seasoned developer or just starting out, you’ll find practical tips and insights that make the process straightforward and rewarding. Ready to transform your site’s user experience? Let’s dive in and get your menu set up!
Credit: www.seedprod.com
Understanding WordPress Menus
WordPress menus help users find pages easily. A menu is a list of links. These links guide users through the website. Adding a menu enhances site navigation. It makes the site user-friendly. Menus can include pages, posts, and categories.
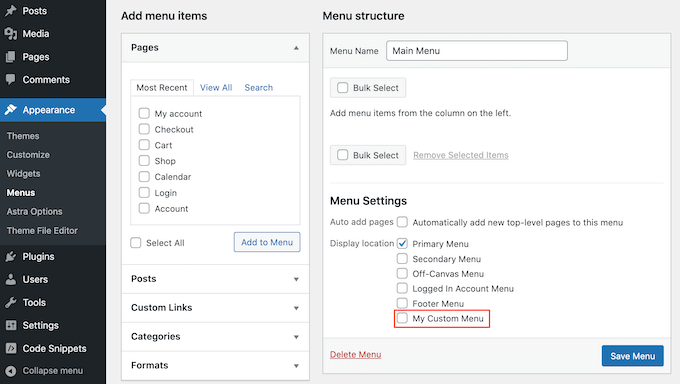
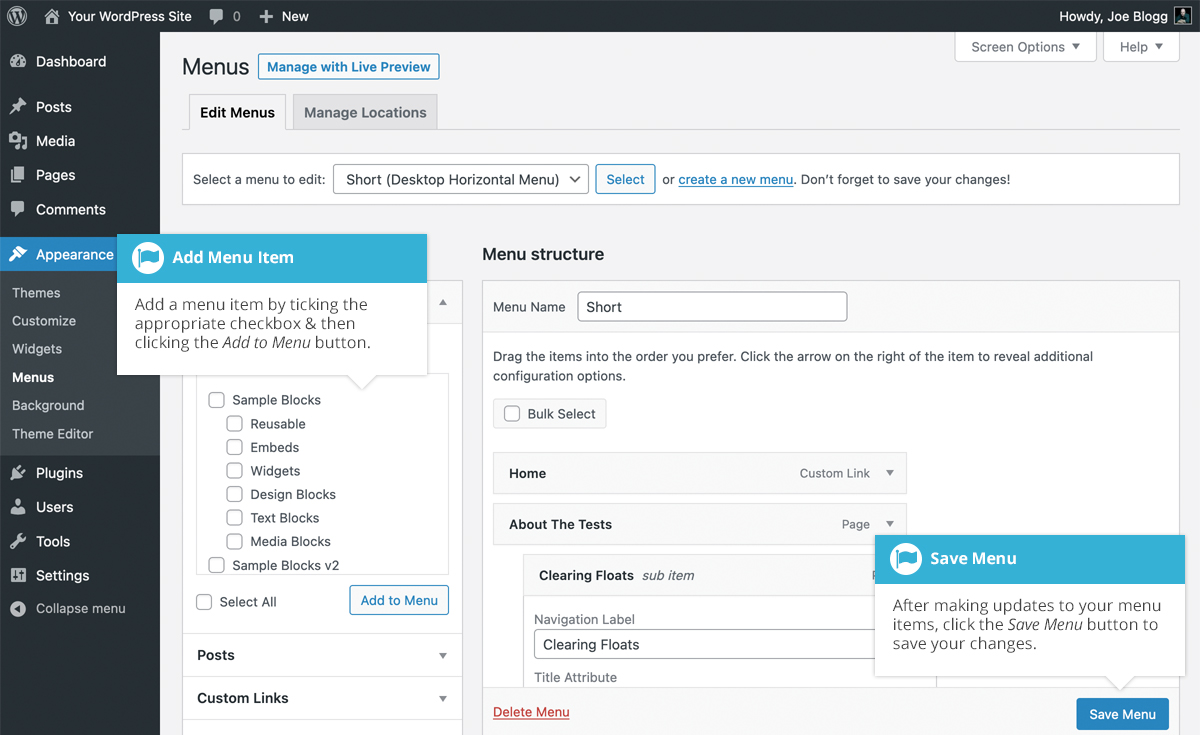
Creating a menu is simple. First, go to the dashboard. Find the “Appearance” option. Then, click on “Menus”. You can add items to the menu. Drag items to rearrange them. Make sure to save changes.
Menus can be placed in various locations. Most themes support multiple menu areas. Choose a location that fits your theme. Test the menu to ensure it works. A well-placed menu improves user experience. It helps visitors find information quickly.
Preparing Your Theme
Ensure your theme supports menus. Not all themes do. Visit your theme’s settings page. Look for menu options. Check if your theme has menu locations. If yes, your theme is ready. If not, you may need a different theme.
Find the right files in your theme. Usually, they are in the wp-content folder. Look for header.php or functions.php. These files often hold menu code. If unsure, ask your theme’s creator. They know their themes best.
Registering A New Menu
To add a menu, use the functions.php file. Open your theme’s folder. Find the functions.php file. This file is important for adding features.
Add code to this file. This helps register the menu. Use the register_nav_menus function. It’s a simple function. It tells WordPress about new menus.
This function makes things easy. Write code like: register_nav_menus(array('menu_name' => 'Menu Name')); It registers the menu. Use any name you like. Choose a name that makes sense. It’s easy to understand. Now, your theme knows about the menu. You can see it in the WordPress admin area. Add more menus if needed. Just repeat these steps.
Displaying The Menu
Find the header file in your theme folder. Usually, it’s named header.php. Open the file with a text editor. Look for the HTML structure of your site. This is where the menu will go. Be careful not to change other parts. Save your changes.
Place the wp_nav_menu function in the header file. This function shows the menu. Use this code: php wp_nav_menu(); ?. It should be inside the
Styling The Menu
Incorporating a menu into a WordPress theme enhances navigation. Start by accessing your WordPress dashboard and selecting ‘Appearance’. Choose ‘Menus’ to create or edit your menu. After creating, assign it to the desired theme location for optimal placement. This process ensures users find information easily and improves website usability.
Applying Custom Css
Custom CSS makes your menu look unique. Start by selecting the menu element. Use classes or IDs to target it. Add properties like background-color or font-size. Change the menu color and font style. Adjust padding and margins to make it neat. Use hover effects for interactive elements. Apply transitions for smooth animations. Keep the code clean and organized. Test the menu to see changes.
Ensuring Responsive Design
Responsive design makes the menu fit all screens. Use media queries in your CSS. Change styles based on screen size. Adjust the menu width for mobile devices. Ensure buttons are easy to click. Check how the menu looks on tablets and phones. Use flexbox or grid layouts for arrangement. Make sure the text is readable on small screens. Always preview changes on different devices.
Assigning The Menu In WordPress Dashboard
First, open your WordPress dashboard. Look for the Appearance tab. It is usually on the left side. Click on it. A drop-down menu will appear. Choose Menus. This takes you to the menu page.
On the menu page, find the Manage Locations tab. Click it. You will see different menu locations. Choose where you want the menu. Like header or footer. Assign your menu to the chosen location. Save your changes. Now your menu is set.
Troubleshooting Common Issues
Struggling with adding a menu to your WordPress theme? Ensure your theme supports menus by checking the functions. php file. Next, navigate to the WordPress dashboard, select ‘Appearance,’ then ‘Menus’ to create and customize your menu. Save changes and refresh your site to see the new menu in action.
Menu Not Displaying
Menus can hide due to simple reasons. First, check the menu settings. Ensure you have assigned the menu to a location. Sometimes, the menu gets saved but not displayed. Go to the Appearance section and select Menus. Ensure your menu is in the right spot.
Another reason is CSS conflicts. Custom CSS can hide menus. Check the Custom CSS section in your theme. Find any codes that might be hiding your menu. Remove or adjust them. You can also use the Inspect Tool in your browser. This tool helps find CSS issues. Right-click on your menu area and select Inspect. Look for any styles that hide or affect the menu.
These steps often fix menu issues. If not, consider checking the theme documentation. Sometimes, themes have special instructions for menus.

Credit: cyberchimps.com
Enhancing Menu Functionality
Dropdown menus make your site easy to use. Users find information quickly. Begin by creating a new menu in WordPress. Add items you want in the menu. Then, click and drag items slightly to the right. This creates a dropdown. Remember to save your changes. Your menu now has a dropdown!
Plugins help make menus better. They add more features to your site. Popular plugins include Mega Menu and WP Mobile Menu. These plugins make beautiful and useful menus. First, install and activate the plugin. Follow the plugin guide to set up. Now, your menu has more options. These plugins are easy to use. Enhance your site with plugins today!
Credit: easywpguide.com
Frequently Asked Questions
How To Customize WordPress Menu?
To customize the WordPress menu, navigate to Appearance > Menus in the dashboard. Here, you can add, remove, or rearrange menu items. Use the drag-and-drop feature to rearrange items easily. You can also assign menus to different locations based on your theme settings.
Can I Add A Dropdown Menu In WordPress?
Yes, you can add a dropdown menu in WordPress. Go to Appearance > Menus and create a parent menu item. Then, drag other menu items under it slightly to the right to create a dropdown effect. This hierarchy allows menu items to appear as sub-items.
How To Change Menu Location In WordPress?
To change menu location, go to Appearance > Menus. Select the menu you want to assign to a new location. Under “Menu Settings,” choose the location provided by your theme, such as header or footer. Save changes to apply the new menu location.
What Plugins Help In Menu Creation?
Plugins like “Max Mega Menu” and “WP Mobile Menu” assist in advanced menu creation. They offer features like responsive design, customizable layouts, and improved user interface. Install and activate these plugins to enhance menu functionality in WordPress.
Conclusion
Adding a menu to your WordPress theme enhances site navigation. It ensures visitors find important pages quickly. Follow the steps carefully for best results. Customize your menu to suit your needs. Organize categories and links logically. Keep design simple and intuitive.
Regular updates keep the menu fresh and relevant. Check mobile responsiveness too. Use WordPress tools efficiently. Implementing these tips makes your website user-friendly. Your visitors will appreciate the ease of use. Enjoy your improved website experience.


