
Are you struggling to add a menu to your custom WordPress theme? You’re not alone.
Many WordPress users find it challenging to navigate the complexities of theme customization, especially when it comes to creating a seamless and functional menu. The good news is that adding a menu doesn’t have to be daunting. With a few straightforward steps, you can enhance your site’s navigation, improve user experience, and keep your visitors engaged.
Imagine your website’s visitors easily finding what they need, spending more time on your site, and ultimately driving more traffic and conversions. Sounds great, right? Let’s dive into how you can achieve this by adding a menu to your custom theme in WordPress.
Setting Up The Theme
The right theme makes your website look good. First, explore different themes. Check if the theme supports custom menus. This is important. You want a theme that fits your style. Some themes are free. Others cost money. Think about your needs. A simple theme is easier to use. An advanced theme may have more features. Choose wisely.
Installing a custom theme is easy. First, download the theme file. Then, go to your WordPress dashboard. Click on “Appearance”. Next, select “Themes”. Click “Add New”. Choose “Upload Theme”. Find your theme file. Click “Install Now”. Wait a few seconds. Finally, click “Activate”. Your theme is now installed. It will change how your site looks.
Credit: www.seedprod.com
Creating A New Menu
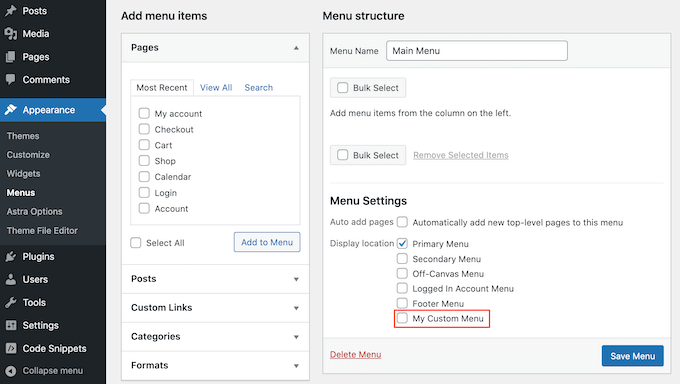
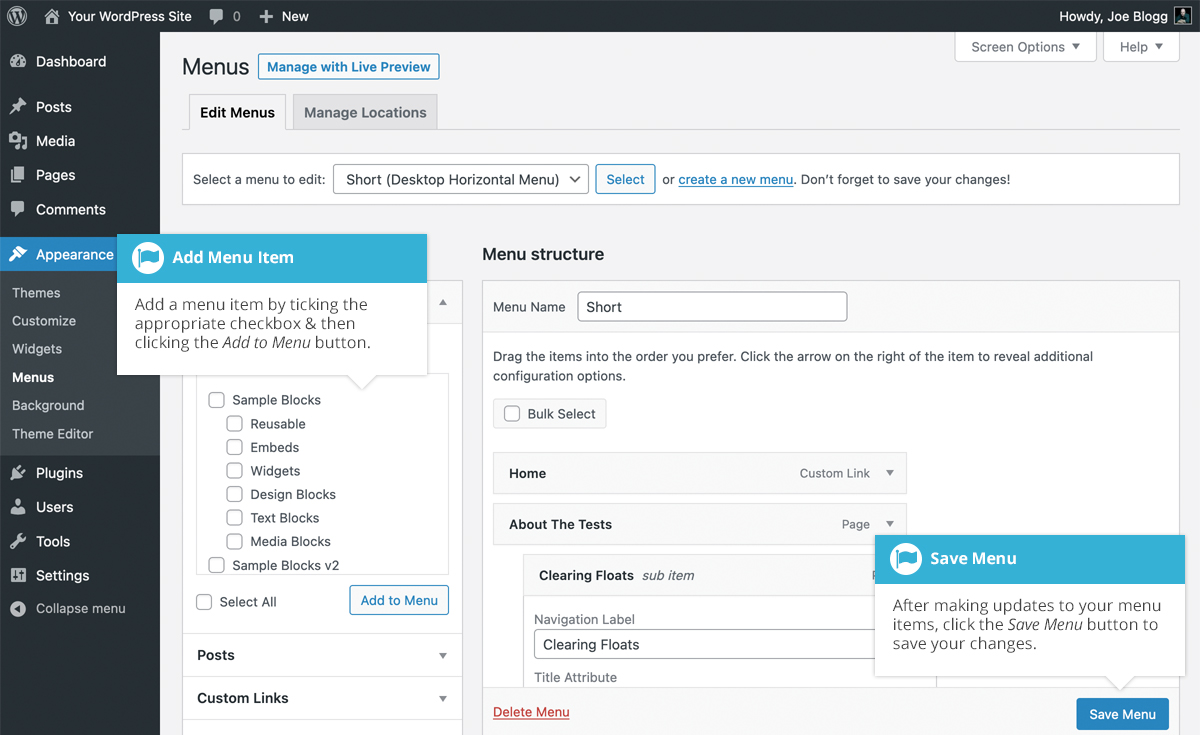
Start by opening your WordPress dashboard. Find the Appearance tab on the left side. Click on it. You will see the Menus option. Click on it. This opens the Menu Editor.
Look at the left side of the screen. You will see different options. These are pages, posts, categories, and more. Pick the items you want. Check the boxes next to them. Then, click Add to Menu. Your items will appear in the menu list.
Arrange them by dragging. Place them in the order you like. Save your changes by clicking Save Menu. Your menu is ready!
Registering The Menu In Theme
Open the functions.php file in your theme folder. This file helps add code to WordPress. Use a code editor to make changes. This will make things easier.
Add the register_nav_menus function in the file. This function creates menu locations. You can name them what you want. Write the code carefully to avoid errors. Save the file after making changes.
Menus help visitors find pages. They make navigation simple. Now, visitors can see your menu on your site.
Credit: easywpguide.com
Displaying The Menu
A menu helps people find pages on your site. To put a menu in the header, use a special function. This function is called wp_nav_menu. First, open the header file in your theme. Next, add the function where you want the menu to show.
The wp_nav_menu function helps display menus. It is easy to use. Write the code like this: php wp_nav_menu( array( 'theme_location' = 'header-menu' ) ); ?>. This code tells WordPress to find the menu. The menu will appear where you placed the code. Always check if your menu shows up. If not, check the theme’s settings.
Customizing Menu Styles
CSS helps make menus look nice. It changes colors, fonts, and sizes. Use CSS to create a special style. This makes your menu unique. You can add borders and shadows. These make the menu stand out. Use padding to space out menu items. This keeps them neat. CSS is easy to learn. It has simple commands. A little practice helps you master it.
Custom classes help organize your menu. They keep code clean. Add classes to menu items. This gives each item a unique look. You can style each class differently. Use custom classes for special effects. You can change a menu item with one class. This makes styling fast. Custom classes are easy to add. They make the menu flexible.
Troubleshooting Common Issues
Adding a menu to a custom WordPress theme can be tricky. First, register the menu in your theme’s functions. php file. Then, display it by adding the necessary code to your theme’s header or footer file. This ensures users can easily navigate your site.
Menu Not Appearing
Menus sometimes don’t show up. Check if the menu is assigned. Go to Appearance and click Menus. Ensure your menu is set to a location. If it still doesn’t appear, it might be a theme problem. Some themes need custom code for menus. Look into your theme’s documentation. Update your theme if needed. Also, check if plugins are causing issues. Disable all plugins and see if the menu appears. If the menu shows up, enable plugins one by one. This helps find which plugin causes the problem.
Styling Problems
Menus can look odd sometimes. This might be a CSS issue. Check your theme’s style.css file. Look for menu-related styles. Make sure you didn’t accidentally delete or change something important. Use browser tools to inspect the menu. This helps find styling problems. Fix the CSS if needed. Sometimes plugins change menu style. Try disabling them. If the menu style returns, the plugin might be the problem.
Enhancing Menu Functionality
Dropdown menus make websites easy to use. Visitors find what they need fast. Use the WordPress admin panel to add dropdowns. Go to Appearance and click on Menus. Select the menu item. Click on the arrow next to it. Drag other items under it. This creates a dropdown. Save your changes. Test the menu on your site. Make sure it works well. Keep it simple for users.
Plugins add more features to WordPress menus. They are easy to use. Install a plugin from the WordPress plugin library. Many plugins offer advanced menu options. Some plugins add icons. Others add animations. Choose a plugin that fits your needs. Activate the plugin after installation. Customize the menu using plugin settings. Plugins make menus look nice. Be sure to keep them updated.

Credit: stackoverflow.com
Frequently Asked Questions
How To Create A Menu In WordPress?
To create a menu in WordPress, navigate to the dashboard. Click on “Appearance” and then “Menus. ” Add menu items by selecting pages, posts, or custom links. Save your menu once you’ve arranged the items. Finally, assign the menu to a theme location for it to appear on your site.
Can I Add A Menu To A Custom Theme?
Yes, you can add a menu to a custom theme in WordPress. Use the `register_nav_menu()` function in your theme’s functions. php file. Create a menu in the WordPress dashboard and assign it to the registered location. Customize its appearance using CSS for better integration with your theme.
What Are WordPress Menu Locations?
WordPress menu locations are specific areas where menus can be displayed. Themes define these locations in their code. They include areas like the header, footer, or sidebar. You can assign menus to these locations via the dashboard under “Appearance” and “Menus.
” This helps organize navigation on your site.
How Do You Customize Menu Styles?
Customize menu styles using CSS in your WordPress theme. Access your theme’s stylesheet and target the menu’s class or ID. Change properties like color, font, and layout. Use WordPress Customizer for visual adjustments. Testing changes in a staging environment ensures the final design meets your needs.
Conclusion
Creating a custom menu in WordPress enhances your site’s navigation. Follow the steps to set up menus easily. Begin by accessing your theme settings. Then, add menu items using the WordPress dashboard. Customize the menu to match your website’s style.
Ensure your menu is visible and functional. Regularly update menu links to keep content fresh. A user-friendly menu improves visitor experience. Don’t forget to save changes after editing. This simple process boosts site organization and accessibility. Keep practicing for better results.
Happy designing your WordPress site!


