
Imagine your website as a digital storefront. What’s the first thing you want visitors to notice?
Your logo. It’s more than just an image; it’s your brand’s identity, your signature, and often the first impression visitors get. So, how do you make sure it stands out right where it should be, in the header of your WordPress theme?
You’re about to discover how simple it can be to add your logo to your WordPress theme header. Whether you’re a seasoned web designer or a beginner just starting out, this guide will walk you through the steps. You’ll feel empowered to customize your site, making it truly yours. Dive in, and let’s make your brand unforgettable.
Choosing The Right Logo
A good logo is simple yet memorable. It should reflect your brand. Use bold colors to grab attention. Avoid complex designs. They can be hard to recognize. Make sure it looks clear in small sizes. This is important for mobile screens.
Logo Design Tips
Keep the design clean and simple. Use no more than two colors. Ensure the font is easy to read. Avoid using many words. A single icon works best. Test your logo on different backgrounds. It should stand out everywhere.
Logo File Formats
Use the right file format for quality. PNG files are great for web. They keep the background transparent. JPEG files are good for complex images. For high-quality prints, use SVG or EPS. These formats keep details clear.
Credit: www.inmotionhosting.com
Preparing Your Logo For Upload
Logo size matters a lot. It should fit nicely in the header. A common size is 250×100 pixels. This size works well for most themes. A bigger logo might look out of place. A smaller one might be hard to see. Check your theme settings for exact size recommendations.
Small file size is key. Large files slow down your site. Keep your logo under 500KB. Use formats like JPEG or PNG. They keep quality high but size low. Use online tools to compress the logo. This helps with faster loading. A quick site makes users happy.
Accessing WordPress Dashboard
Open your web browser. Type your website URL. Add /wp-admin at the end. Press enter. The login page will appear. Enter your username and password. Click the login button. Now you are inside the dashboard.
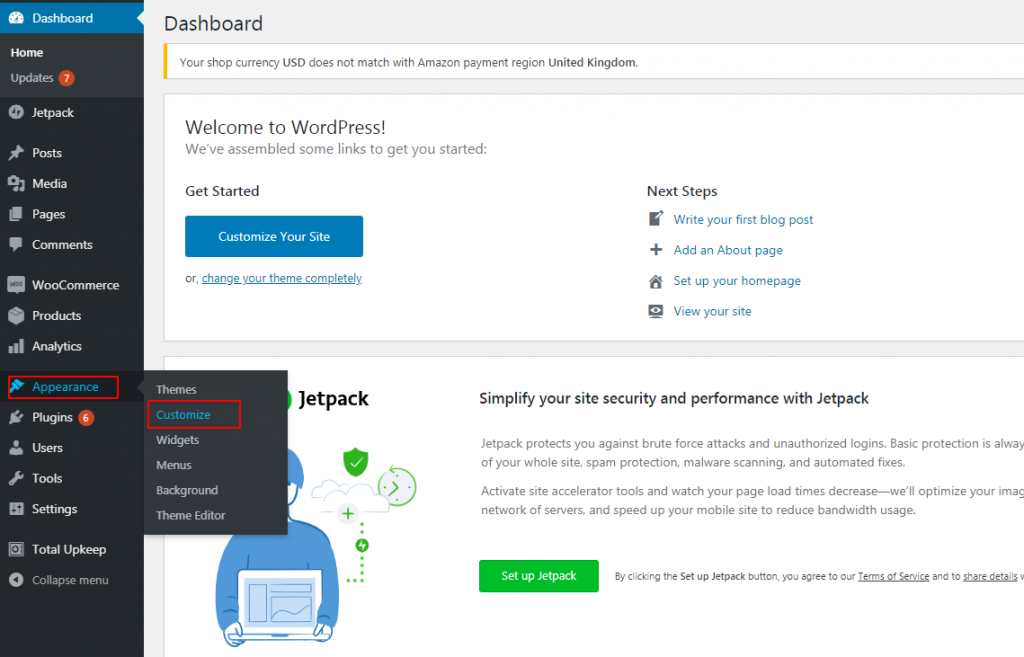
Look at the left menu. Find Appearance. Click it. A dropdown will appear. Choose Customize. The Theme Customizer will open. Here you can change your theme settings. You can also add your logo. Explore different sections for more options.
Uploading Logo Through Theme Customizer
Find the WordPress dashboard. Click on Appearance. Next, click Customize. This opens the Theme Customizer. Look for Header Options. Different themes have different names. It could be Site Identity or Header Image. Click on the right option. This helps find where to add your logo.
Once in the right area, find Logo or Site Icon. Click on Select Logo. A new window will pop up. Choose Upload Files. Select your logo from your computer. After uploading, adjust the logo size. Make sure it fits well. Finally, click Publish to save changes. Your logo is now on the header.
Using A Child Theme For Logo Customization
Enhance your WordPress theme by customizing the header logo with a child theme. Preserve original design elements while making specific logo changes. This approach ensures safe updates without losing customizations.
Creating A Child Theme
A child theme helps in making changes without harming the original theme. First, make a new folder in the wp-content/themes directory. Name it anything you like. Inside, create a style.css file. Add this code:
/
Theme Name: Your Child Theme
Template: Parent Theme Name
/
This tells WordPress it’s a child theme.
Editing Header Code
Open the parent theme’s header file. Copy its contents to your child theme folder. Save it as header.php. Look for the to display the logo. Save the changes and activate your child theme. Your logo will now appear in the header.
Adding Logo Via Theme Options Panel
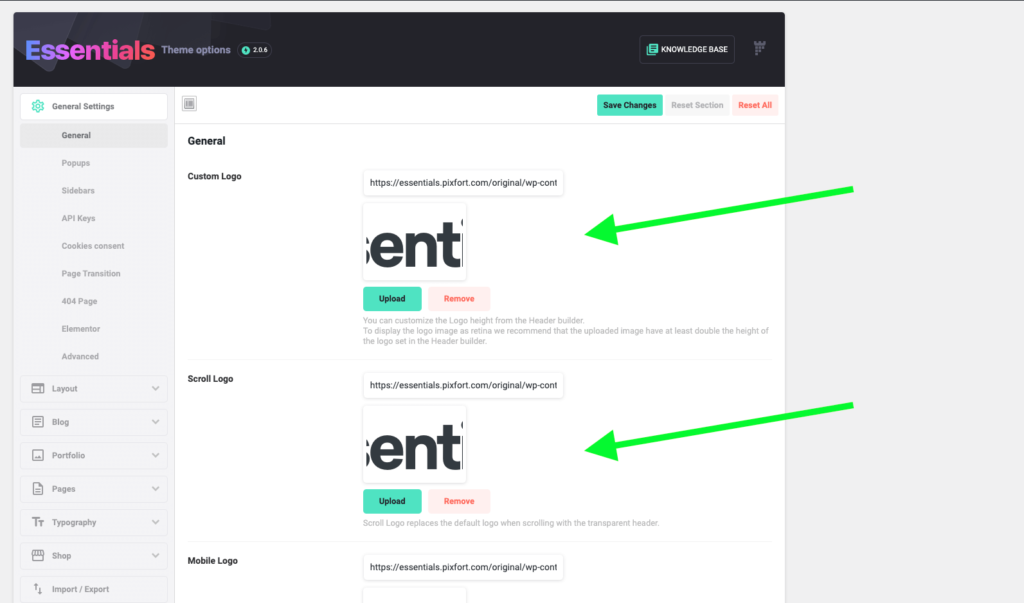
Understanding Theme Options is key. Theme options help you customize your site. Every theme has different settings. Some themes allow logo changes easily. Others may have limited options. Always check your theme’s documentation. This will save time and effort. Most premium themes offer more options. Free themes might have fewer features.
Here are the Steps to Upload Logo:
- Log in to your WordPress dashboard.
- Go to Appearance and click on Customize.
- Find the Header or Logo option.
- Click on it and select Add Logo.
- Upload your logo from your computer.
- Adjust the size if needed.
- Save changes and check your site.
Ensure your logo fits well. Use high-quality images. This makes your site look professional. Always preview before finalizing. This ensures everything appears correctly.
Customizing Logo With Css
Add your logo to a WordPress theme header using CSS for a personalized touch. Adjust size, position, and style to match your design. Make your brand stand out effortlessly with simple CSS tweaks.
Basic Css For Logo Placement
Adding a logo to your WordPress header is easy. Use CSS to place it right. First, find the CSS file in your theme folder. Then, add a line of code. This code tells where the logo should be. Use margin and padding for spacing. Try margin-left: 10px; to move it left. Or margin-top: 5px; for up. Adjust these numbers until it looks good.
Advanced Styling Techniques
Make your logo look fancy with more CSS. Use border for a neat frame. Try border: 2px solid black; for a simple border. Add box-shadow for a cool effect. Use box-shadow: 5px 5px 5px grey; for depth. Change the color and size to fit your theme. Experiment with opacity to make it see-through. Use opacity: 0.8; for a subtle touch.
Testing And Troubleshooting
Make sure your logo fits on all screens. Use different devices to test. Adjust the logo size if needed. Small screens may need a smaller logo. Ensure the logo is clear on phones and tablets. Try rotating the screen. Does the logo stay in place? If not, adjust the theme settings.
Sometimes, the logo does not appear. Check if the logo file is uploaded correctly. Ensure the file type is supported, like JPEG or PNG. Double-check the theme’s header settings. Turn off any conflicting plugins. Refresh the page to see changes. If the logo is blurry, upload a higher resolution image. Make sure the logo’s dimensions are correct. This helps in displaying the logo properly.
Finalizing And Publishing Changes
Easily enhance your website’s identity by adding your logo to the WordPress theme header. Navigate to the theme customizer, select the header section, and upload your logo file. Ensure you save changes for the logo to appear live on your site.
Previewing Changes
Seeing changes before going live is important. The preview button helps a lot. It shows how the new logo looks on the site. If the logo is not right, you can fix it. Make sure everything looks nice and clean. Double-check the size and position of the logo. This saves time and makes your site look good. Happy with the preview? Great! You are almost done.
Publishing The Logo
Time to make the logo live on your site. Click the publish button to see it in action. This makes the new logo visible to everyone. Check your site once more to ensure everything works well. If something seems wrong, go back and edit it. The logo is now part of your website. It makes your site look unique and professional. Well done on adding the logo!

Credit: gutenbergtimes.com
Credit: essentials.pixfort.com
Frequently Asked Questions
How Do I Customize My WordPress Theme Header?
To customize your WordPress theme header, navigate to “Appearance” and click on “Customize. ” Select “Header” to access customization options. You can upload a logo, adjust its size, and change header colors. Ensure you save changes to apply them. Each theme might have unique features.
Can I Add A Logo Without Coding?
Yes, you can add a logo without coding. Use WordPress’s built-in Customizer tool under “Appearance. ” Go to “Header” settings and upload your logo file. Adjust its size and placement if needed. This method is simple and doesn’t require technical skills or coding knowledge.
What Logo Size Is Best For WordPress Header?
The best logo size for a WordPress header is typically around 250 x 100 pixels. Ensure your logo is clear and fits the header space without distortion. Check your theme’s specific requirements for optimal display. Use high-resolution images for professional appearance.
Why Is My Logo Not Displaying Correctly?
If your logo isn’t displaying correctly, check the file format and size. Supported formats are usually JPEG or PNG. Ensure the file size doesn’t exceed theme limits. Also, verify the Customizer settings to ensure the logo is properly uploaded and positioned.
Conclusion
Adding a logo to your WordPress theme header is simple. This customization enhances your site’s identity. Follow the steps carefully. Use WordPress dashboard for easy navigation. Upload your logo file directly. Resize the image if needed. Preview changes before finalizing.
Ensure logo aligns with your site design. Consistent branding builds trust with visitors. A well-placed logo makes your site look professional. Remember, a logo reflects your brand’s essence. Keep it clean and visible. Regular updates improve your site’s appearance. Your audience will appreciate the effort.
Now your WordPress site stands out.


