
Are you looking to elevate your WordPress site’s branding by adding a custom logo? Having a personalized logo is more than just a visual touch; it’s a powerful tool for creating a memorable identity and establishing trust with your audience.
If you’ve ever felt puzzled about integrating your logo into your WordPress theme, you’re not alone. The good news is, you don’t need to be a tech wizard to make it happen. In this guide, we’ll walk you through the simple steps to add a logo option to your WordPress theme.
Stick around and discover how you can transform your site’s appearance with just a few clicks. Let’s dive in and make your website truly yours!

Credit: mekshq.com
Choosing The Right Theme
The theme must support logo addition. Check the theme’s documentation. It often mentions logo support. Some themes might not allow logo changes. Ensure your theme is compatible. This saves time and effort. A compatible theme makes customization easy.
Themes offer various customizability features. Look for a theme with a built-in customizer. This tool helps add a logo easily. It should have a user-friendly interface. You can change colors, fonts, and logos. A theme with these features is ideal. It provides flexibility. Make your site unique and attractive. Choose a theme that meets your needs.
Preparing Your Logo
Adding a logo to your WordPress theme enhances your brand identity. Start by accessing the theme customizer, then locate the “Site Identity” section. Upload your logo file, adjust its size, and save changes to display it seamlessly on your site.
Logo Design Tips
Think about your brand identity. A logo should reflect what your business stands for. Keep the design simple and memorable. Avoid too many colors or fonts. Consistency is key. Make sure it looks good on small and large screens. Test your logo at different sizes. You want it to be clear and recognizable.
Optimal File Formats
Choose the right file format for your logo. PNG and JPEG are common choices. PNG is great for web use. It supports transparency. JPEG is useful for images with many colors. For high-quality prints, use SVG or PDF. SVG is scalable. It keeps the logo sharp on all devices. PDF is good for sharing and printing. Check file size. Smaller files load faster.
Accessing Theme Customizer
Navigating the Dashboard is easy. First, log in to your WordPress account. On the left menu, find and click on “Appearance”. This will open a submenu. Click on “Customize” to proceed. The Customizer allows you to change your site’s look.
Opening the Customizer is simple. After clicking “Customize”, a new screen appears. This screen is the Theme Customizer. On the left side, you see options. On the right, you see a preview of your site. The Customizer lets you add your logo easily. Find the “Site Identity” tab. Click it to open more options. Here, you can upload your logo. Make sure your logo is clear and fits well.
Uploading Your Logo
Start by going to your WordPress dashboard. Look for the Appearance tab. Click on it. Find the Customize option. This will open a new page. Here, you see many options. Look for Site Identity. Click on it. You will see a place to upload your logo. Click the Select Logo button. Choose your logo from your computer. Then, hit Open. This uploads your logo. You can see how it looks on your site.
After uploading, you may need to adjust the logo size. Some themes have a slider for this. Move the slider to change size. Make sure your logo fits well. You can also choose its position. Some themes allow top or side placement. Check how it looks. Keep it neat and tidy. This makes your site look better. Remember to save changes before leaving. Now, your logo is live on your site.
Customizing Logo Appearance
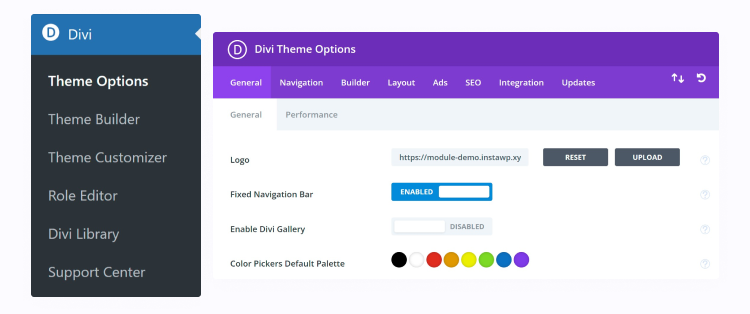
Changing the size of your logo is important. It helps it look good on your site. Use the WordPress Customizer to do this. Find the “Logo” section. Adjust the size using the slider. Small logos can be hard to see. Big logos can look messy. Try different sizes until you find the right one. Make sure it fits well on all devices. Test on phones and computers. Your logo must always be clear. A good size makes it easy to remember.
The logo’s place on your site matters. It should be easy to find. Most people put it at the top left. This is where people expect it. You can also center it if you like. Check the Customizer for options. Some themes offer different spots. Test each position to see what looks best. Make sure it does not block other parts. A good spot helps people know your brand fast.
Credit: diviflash.com
Verifying Logo Display
Always check your logo after adding it. Go to the WordPress Customizer. Find the section where your logo appears. Make sure it looks correct. It should not be blurry. It must be in the right spot. If something looks wrong, fix it. Sometimes, adjusting the size helps.
Your logo should look good on every device. Check it on a phone, a tablet, and a computer. The logo must be clear on all screens. Sometimes, it might look different. If it does, you may need to adjust the settings. Testing ensures everyone sees your logo well.
Troubleshooting Common Issues
Logo not displaying? Check the file type first. WordPress supports formats like JPEG, PNG, and GIF. Ensure your logo is in one of these formats. Next, verify the upload process. Go to the WordPress dashboard. Click on Appearance, then Customize. Check if the logo is uploaded correctly. Refresh the page to see if it appears. If not, try clearing your browser cache. Sometimes, this solves the problem.
Image quality problems can be frustrating. Low-quality images look blurry or pixelated. Ensure your logo is high resolution. Recommended size is 300 x 100 pixels. Check your theme settings. Some themes compress images. This can affect quality. Use a plugin to adjust this if needed. Always preview before saving changes.
Using Plugins For Logo Management
Enhance your WordPress theme by incorporating a logo option using plugins. These tools simplify logo management, allowing seamless integration. Customize effortlessly, ensuring your website’s visual identity stands out.
Recommended Plugins
Selecting the right plugin can make logo management easy. Some plugins are very popular. Logo Carousel is a good choice for showing logos in a slider. Customify allows you to upload and edit logos easily. SiteOrigin Widgets Bundle offers a logo widget. These plugins are easy to use. They work well with most themes.
Plugin Configuration
After installing a plugin, configuration is important. Go to the plugin settings. You will find options to upload your logo. Follow the instructions. You can adjust the size and position of the logo. Some plugins allow you to add alt text. This is good for search engines. Save your changes after you finish.
Best Practices For Logo Integration
Logos represent your brand’s identity. They should match your website’s theme. Keep colors and styles similar. This helps users recognize your brand. Always use high-quality images. Blurry logos look unprofessional. Stick to the same logo on all platforms. This builds trust and recognition. Align your logo properly. It must not look out of place.
Everyone should see your logo. Use alt text for screen readers. This helps visually impaired users. Make sure the logo size is right. Too big or too small can confuse users. Check the contrast. The logo should stand out from the background. Avoid colors that blend in. Test the logo on different devices. It should look good everywhere.

Credit: learn.wordpress.org
Frequently Asked Questions
How Do I Add A Logo In WordPress?
To add a logo in WordPress, navigate to your theme’s Customizer. Then, select ‘Site Identity’ and upload your logo. Save the changes to make your logo visible. Ensure your logo file is optimized for web use to maintain site speed and quality.
Can I Change My WordPress Logo Easily?
Yes, changing your WordPress logo is simple. Go to your theme’s Customizer and find ‘Site Identity’. Upload your new logo, then publish the changes. Always preview the logo to ensure it fits well and looks sharp on all devices.
What Size Should My WordPress Logo Be?
The ideal logo size varies by theme. Typically, logos should be around 200×100 pixels. Check your theme’s documentation for specific recommendations. Ensure your logo is high-resolution and optimized for fast loading without sacrificing quality.
Why Isn’t My WordPress Logo Displaying?
If your logo isn’t displaying, check the file format and size. Ensure it’s uploaded in the correct section of the Customizer. Clear your cache and refresh the page. Sometimes, theme compatibility issues might require support assistance to resolve.
Conclusion
Adding a logo to your WordPress theme is simple. Follow the steps outlined. Customize your site with ease. A logo enhances brand identity. It makes your site unique. Your visitors will recognize your brand quickly. This boosts your site’s professionalism.
Remember to choose a clear and relevant logo. Test how it looks on various devices. This ensures consistency. Regular updates keep your site fresh. Now, your WordPress site has a personal touch. Your brand stands out. Happy customizing!


