
Have you ever visited a website and been instantly captivated by its professional look and feel? Often, it’s the logo that leaves a lasting impression.
Your logo is more than just an image; it’s your brand’s identity. And if you’re using WordPress, you might be wondering how to seamlessly integrate your logo into your theme. The good news? It’s easier than you think! You’ll discover step-by-step instructions on how to add your logo to any WordPress theme, helping you enhance your site’s visual appeal and reinforce your brand’s presence.
Imagine the confidence you’ll feel once your site proudly displays your logo, making it recognizable to every visitor. Dive in to learn how to make your website a true reflection of your brand’s uniqueness.
Choosing The Right Theme
Picking the perfect theme is important for your site. Not all themes fit every logo. Make sure your theme is compatible with your logo size and shape. Some themes might crop or distort your logo.
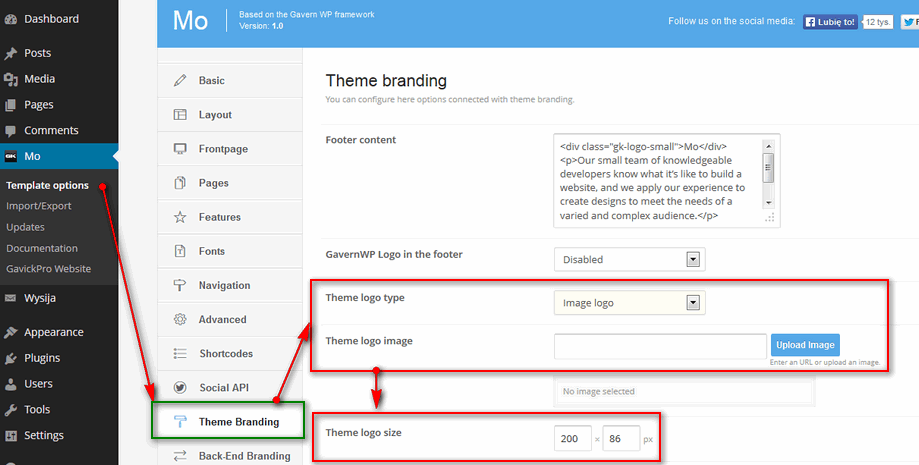
Compatibility is key. Check if the theme supports your logo format. Some themes allow custom logo upload. Others have fixed logo spaces. Always preview the theme first. Ensure your logo looks clear and sharp.
Your theme should be responsive. This means it works on all devices. A good theme will adjust the logo size automatically. It helps your logo look great on phones and tablets. Test your theme on different screens. Make sure the logo is always visible and neat.
Credit: www.gavick.com
Preparing Your Logo
Using the right dimensions for your logo is crucial. Most themes have specific size requirements. Check the theme settings for recommended sizes. Common dimensions include 250×100 pixels or 300×200 pixels. Keep your logo clear and visible. A logo should not be too small or too big.
Choose the correct file format for your logo. Use PNG for transparency, and JPEG for non-transparent images. Ensure the quality is high. Avoid blurry images. High resolution makes logos look professional. Always test your logo on different devices. This ensures it looks good everywhere.
Using The WordPress Customizer
Find the WordPress Dashboard. Click on Appearance. Then, choose Customize. This opens the Customizer. You can see many options. Look for Site Identity.
Inside Site Identity, find the Logo option. Click on Select Logo. A box will pop up. Choose your logo file. Click on Upload. Adjust the logo size if needed. Click Publish. Now, your logo is live.
Adjusting Logo Settings
WordPress themes offer several logo placement options. You can place the logo at the top, side, or center. Each spot gives your site a unique look. The top placement is common and classic. Center placement can look modern and balanced. Placing it on the side gives a creative touch. Choose what fits your style best.
Proper sizing of your logo is crucial. A too-big logo might overwhelm. A too-small one might be missed. Adjust the size for clarity and impact. Alignment is also key. Align it left, center, or right. This can affect the overall feel. Experiment with different alignments. Find what suits your design. Keep it simple and clear for the best result.
Customizing With Css
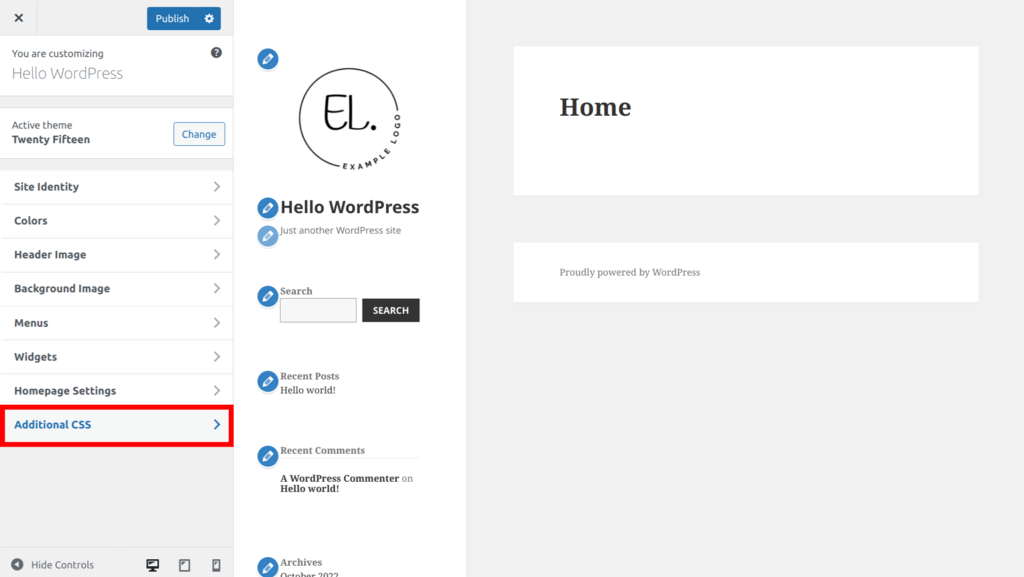
Basic CSS Modifications are simple. Find the theme’s CSS file. Look for the logo section. Change the width and height to fit your logo. Use the background-image property. This helps to add your logo image. Ensure the path is correct. You can also adjust margins for better placement. Keep changes minimal for consistency. Always preview changes before saving.
Advanced Customization Techniques require more skill. Use CSS media queries for different devices. This keeps logos looking good on phones and computers. Experiment with hover effects. Add animations to make logos stand out. Use CSS variables for easy updates. This helps in managing multiple logos or styles. Always back up your work. This prevents loss of changes.
Utilizing Theme-specific Options
Many themes have built-in options for logos. These options simplify the process. Check the theme’s customizer panel. Look for the logo upload section. Follow the steps to upload your logo. Ensure the logo fits well. Adjust the size if needed. Preview the changes to see your logo. Save changes to make the logo visible.
Built-in features help in easy logo addition. Some themes provide a dedicated logo area. Others offer header options for logos. Explore the theme settings for logo options. Check the theme documentation for guidance. Find instructions on logo placement. Use theme support if you face issues. Ask questions about logo settings. Get help from the theme community.
Theme documentation guides you on adding logos. Check for a section about logos. Follow the steps provided. Documentation offers detailed instructions. Use it to solve logo problems. Seek support if you need more help. Support teams assist with logo issues. Contact them via theme forums. Get quick answers to your questions.
Testing And Finalizing
Cross-Browser Checks are important. Your logo should look good on all browsers. Test it on Chrome, Firefox, and Safari. Make sure it appears correctly. Each browser may show things differently. Check the alignment and size. It’s vital that everything stays the same. Consistency is key. Errors can confuse visitors. Fix issues quickly. This keeps your site looking professional.
Mobile Responsiveness needs careful attention. Many users visit sites on phones. Ensure your logo fits well on small screens. Check how it scales down. Test on different devices like tablets and smartphones. Adjust if the logo looks too big or small. Responsiveness improves user experience. Good design makes users happy. Make sure everything functions properly. Double-check your settings.

Credit: themewinter.com
Troubleshooting Common Issues
Sometimes, the logo might not show on your website. Check if the file path is correct. A broken path can hide the logo. Also, ensure the image is uploaded correctly.
Verify your theme settings. Some themes have options to hide the logo. Double-check these settings. Lastly, confirm the file format. Use a common format like PNG or JPG.
Poor image quality can make your logo look bad. Use a high-resolution image. This ensures clarity. Resize the image to fit the space. Too large or too small can distort the logo.
Compress the image to reduce file size. This helps with faster loading. But don’t over-compress. It can degrade the quality. Test different sizes to see what works best.
Backing Up Your Customizations
Safeguarding your custom logo in WordPress themes is essential. Ensure you back up your designs before adding your logo. This preserves your work and prevents data loss, keeping your site looking professional.
Using Backup Plugins
Backup plugins are helpful tools. They save your WordPress site data easily. Many plugins are free. Some are paid. UpdraftPlus and BackWPup are popular choices. They work well with most themes. Install a plugin from the WordPress dashboard. Follow simple steps to set it up. Automatic backups can be scheduled. This keeps your site safe. If something goes wrong, you can restore it. Always keep your plugin updated. This ensures better security.
Manual Backup Methods
Manual backups need some extra work. They are not hard, though. First, use an FTP client. This lets you download files to your computer. FileZilla is a good option. Next, access your WordPress files. Download them to a secure place. You also need to back up your database. Use phpMyAdmin for this task. Export your database as a .sql file. Store it safely with your other files. Always double-check your backups. This makes sure nothing important is missing.
Credit: www.hostinger.com
Frequently Asked Questions
How To Upload A Logo In WordPress?
To upload a logo in WordPress, go to your dashboard. Navigate to “Appearance” and then “Customize”. Select “Site Identity” and click on “Select Logo”. Upload your desired logo from your computer. Adjust the size if needed and save changes. Your logo will now appear on your site.
Can I Change The Logo Size In WordPress?
Yes, you can change the logo size in WordPress. After uploading the logo, use the cropping tool in the “Site Identity” section. Adjust the dimensions to fit your theme’s requirements. Some themes also offer custom CSS options for precise adjustments.
Save your changes to see the updated logo size.
Why Is My WordPress Logo Not Showing?
If your WordPress logo isn’t showing, check for caching issues first. Clear your browser and site cache. Ensure that the logo is uploaded correctly in the “Site Identity” section. Verify theme compatibility, as some themes have specific logo requirements. Lastly, check for any plugin conflicts that might hide the logo.
Is It Possible To Use Svg Logos In WordPress?
Yes, using SVG logos in WordPress is possible but requires a plugin. SVG files aren’t supported by default due to security concerns. Install a plugin like “Safe SVG” to enable SVG uploads. Always ensure your SVG files are sanitized to prevent any security risks.
This allows you to use scalable vector graphics.
Conclusion
Adding a logo to your WordPress theme is simple and essential. It boosts your brand’s visibility. A personalized logo helps your site stand out. Follow the steps and make your site unique. Uploading images is straightforward in WordPress. Use the theme customizer for easy adjustments.
Regular updates keep your logo fresh. A recognizable logo builds trust with visitors. Always check the logo’s size and placement. Consistency in branding strengthens your message. Experiment with different designs. Find what suits your brand best. A good logo enhances your site’s professionalism.
Make it memorable, make it yours.


