
Are you looking to give your WordPress website a unique identity? Adding a logo and title to your WordPress theme can make your site stand out and create a lasting impression on your visitors.
Imagine your website as a book; the logo is the cover, and the title is the headline that draws readers in. Without them, your site might just be another face in the crowd. But don’t worry—this isn’t rocket science. You don’t need to be a tech wizard to achieve this.
With a few simple steps, you can customize your theme and showcase your brand’s personality effortlessly. Ready to make your website unforgettable? Let’s dive in and transform your WordPress theme from ordinary to extraordinary!

Credit: www.youtube.com
Choosing The Right Theme
Picking the right theme is important. It affects your site’s look. Choose a theme that matches your style. Check if it’s easy to use. Some themes have many features. Others have less. Find a balance.
Look for themes that load fast. Speed matters for users. Make sure the theme is updated often. It should work with new WordPress versions.
Not all themes let you add a logo. Check if the theme supports logos. Some themes have a logo upload feature. This makes it easy. Read the theme’s description. It tells you if logos are supported.
Responsive themes adjust logos for different screens. This is good for mobile users. Test the theme’s demo. See if the logo looks good. Choose a theme that makes your logo shine.

Credit: docs.themeisle.com
Preparing Your Logo And Title
A professional logo is your brand’s face. Make it simple and memorable. Colors should be consistent. Use easy shapes. Your logo must look good on screens and paper. Test how it appears in different sizes. Your logo needs to represent your brand. Think about your message.
A catchy title grabs attention. Use clear words. Keep it short. Make it unique. Your title should reflect your brand’s essence. Think of it as your website’s headline. Make it easy to remember. Avoid complex words. Your audience should understand it quickly.
Accessing WordPress Dashboard
First, open your web browser. Type in your website’s URL. Add /wp-admin at the end. Press enter. You will see the login page. Enter your username and password. Click on Log In. Now, you are in the WordPress Dashboard. This is the control center for your site.
Look on the left menu. Find Appearance. Click on it. Then, select Customize. A new page will open. Here, you can change your site’s look. Find the options for logo and title. Change them as you like. Always click Save when done. This keeps your changes safe.
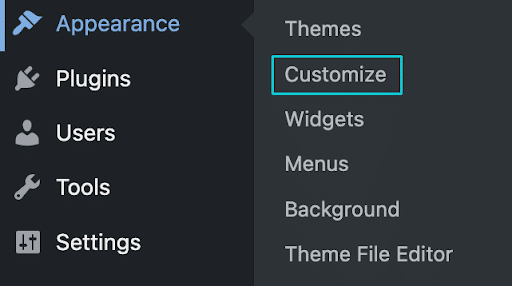
Credit: wpengine.com
Adding A Logo
Open your WordPress dashboard. Go to Appearance, then click Customize. Find the option for Site Identity or Header. This section lets you add a logo. Click on the Select Logo button. Choose your logo file from your computer. Make sure the file is in PNG or JPG format. After uploading, you might need to crop the image.
Uploading your logo is simple. Click the Upload button. Pick your logo from your computer. Wait for it to load. Check the size of your logo. It should not be too big. A large logo can slow down your site.
After uploading, you can change the logo size. Use the slider to make it larger or smaller. Ensure it fits well. You can also set the logo position. Left, center, or right. Preview the changes before saving. Click Publish to make it live. Now your site has a new logo!
Setting The Site Title
Add a logo and set the site title in WordPress themes easily. Customize your website’s appearance by accessing the WordPress dashboard. Navigate to the ‘Appearance’ section and select ‘Customize’ to upload your logo and edit your title for better branding.
Locating The Site Identity Section
Find the Site Identity section in your WordPress dashboard. This section is in the customize menu. Click on the Appearance tab first. Then click Customize. Look for Site Identity. It holds the title settings. Here, you can change the title of your site.
Entering And Saving The Title
In the Site Identity section, type your site’s new title. Make sure it’s clear and easy to read. Click the Save button after typing your title. Your site will show the new title. This title appears at the top of your browser. It helps visitors know your site. Always choose a meaningful title. It should reflect your site content well.
Customizing Appearance
Adding a logo and title makes your site unique. Use the WordPress Customize option. Find it under Appearance in the dashboard. Click and see the Site Identity section. Upload your logo here. Type your site title next to it. Save changes to see the update.
Exploring Additional Customization Options
Check out other settings in the Customize menu. Change colors to match your logo. Choose fonts that are easy to read. Add widgets to your sidebar. Try different layouts. Make the site look just right.
Ensuring Mobile Responsiveness
Test your site on a phone. Make sure the logo looks clear. The title should be easy to read. Use WordPress themes that work well on all devices. This keeps your site looking good everywhere.
Testing Your Changes
Easily customize your WordPress theme by adding a logo and title. Navigate to the “Customize” section in your dashboard. Upload your logo and type your desired title for a personalized touch.
Previewing On Different Devices
Use the preview option to check your theme. Look at it on a computer. Then check on a phone and tablet. Different devices show your theme differently. Make sure the logo and title look good on each one.
Checking For Consistency
Check that the logo and title are consistent. They should be in the same place on every page. The size and color should be the same. Make sure everything matches. This helps your website look neat and tidy.
Common Issues And Troubleshooting
Adding a logo and title in WordPress themes often leads to confusion. Users frequently encounter issues with image dimensions and theme compatibility. Troubleshooting includes checking theme settings and ensuring proper image formatting for seamless integration.
Resolving Logo Upload Errors
Logo upload errors are common in WordPress. First, check your file type. WordPress supports JPEG, PNG, and GIF formats. Ensure your logo is in one of these. File size matters too. Large files often cause errors. Reduce the size and try again. Use a reliable internet connection. Upload issues can stem from poor connectivity. Clear your browser cache. A cluttered cache can disrupt uploads. Still facing issues? Update WordPress. Older versions may have bugs. Contact your theme support if problems persist. They can offer theme-specific solutions.
Fixing Title Display Problems
Title display issues can be frustrating. First, check your theme settings. Some themes require manual input for titles. Use the WordPress Customizer. It’s a simple tool for editing titles. Update your theme regularly. Outdated themes cause display glitches. Check for plugin conflicts. Plugins can interfere with title settings. Disable plugins one by one to find the culprit. Adjust the title font size in the Customizer. A too-large font can cause display errors. Seek help from theme support if the problem continues. They can provide detailed guidance.
Helpful Plugins
Discover helpful plugins to easily add logos and titles in WordPress themes. Customize your site with tools designed for seamless integration. Enhance your site’s appearance with user-friendly options that simplify the design process.
Top Plugins For Enhanced Customization
Adding a logo and title in WordPress is simple with plugins. These tools help customize your site easily. Logo Designer plugin offers drag-and-drop features. It lets you place logos without coding. Another choice, Custom Logo, is user-friendly. It supports high-resolution logos.
Installing And Using Logo Plugins
First, visit the WordPress dashboard. Click on “Plugins” and select “Add New”. In the search bar, type the plugin name you want. Click “Install Now” and then “Activate”. Once active, go to the settings of the plugin. Upload your logo from your computer. Adjust the size and position as needed. Save your changes. Your logo will now appear on your site.
Frequently Asked Questions
How Do I Change The Logo In WordPress?
To change the logo in WordPress, go to your theme customization settings. Find the ‘Site Identity’ section where you can upload your logo. Choose your logo file and save the changes. Ensure the logo fits well in the designated space for optimal appearance.
Can I Add A Title To My WordPress Theme?
Yes, you can add a title by navigating to ‘Site Identity’ in your theme customizer. Enter your site title in the designated field. The title appears on your website’s header and browser tab, helping visitors identify your site quickly.
What Size Should My WordPress Logo Be?
Your WordPress logo should ideally be between 100×100 pixels and 250×250 pixels. It should be clear and recognizable at smaller sizes. Use a high-quality image to ensure clarity. Check your theme documentation for specific size recommendations.
Is It Possible To Use A Custom Logo In WordPress?
Yes, you can upload a custom logo in WordPress. Go to your theme’s customization settings under ‘Site Identity. ‘ Use the upload option to select your custom logo file. Make sure the logo is optimized for web use to ensure fast loading times.
Conclusion
Adding a logo and title is easy in WordPress themes. It enhances your site’s identity and professionalism. Follow simple steps to customize your theme effectively. Update your settings to reflect your brand consistently. This change can improve user experience and engagement.
Remember to keep your logo clear and your title concise. Regularly check your site’s appearance for any needed updates. Creating a strong visual identity is crucial. It helps in building trust and recognition with your audience. Apply these tips and watch your website thrive.
Your site’s look matters a lot. Make it memorable!


