
Your website’s logo is more than just a pretty image—it’s a powerful tool to guide visitors and boost your brand. But have you ever noticed that clicking on your logo doesn’t take you anywhere?
Adding a link to your logo in WordPress can fix that and improve your site’s navigation instantly. You’ll learn exactly how to add a clickable link to your logo, step-by-step. By the end, you’ll have a smoother, more user-friendly website that keeps your visitors engaged.
Ready to make your logo work harder for you? Let’s dive in!
Choose The Right Logo
Choosing the right logo is key for your WordPress site. It shows your brand to visitors at first glance. Your logo needs to be clear and easy to recognize.
A good logo fits well with your site’s style and colors. It should look good on all devices, from phones to large screens. The right logo helps visitors remember your site better.
Pick A Simple Design
Simple logos are easy to see and understand. Avoid too many details that can blur on small screens. A clean design works well as a clickable link.
Use The Correct File Format
Choose a logo file that loads fast. PNG or SVG formats work best for web use. SVG is great for sharp images on any screen size.
Check The Logo Size
Your logo should not be too big or too small. A balanced size fits nicely in the header area. This size makes the logo easy to click and link.
Match Your Brand Colors
Use colors that match your brand identity. Consistent colors help build trust with visitors. Make sure the logo colors look good on your site background.
Credit: www.geeksforgeeks.org
Access WordPress Customizer
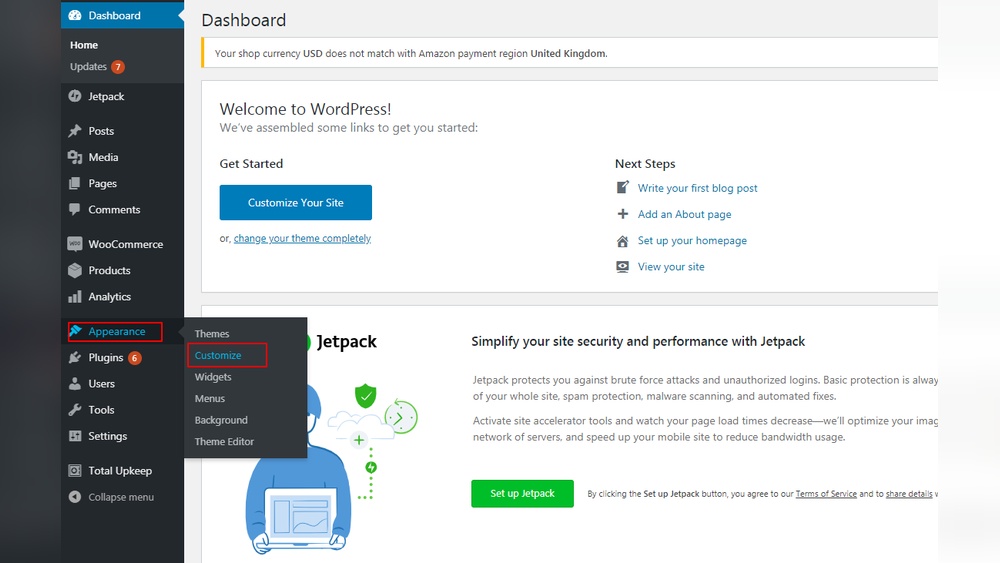
Accessing the WordPress Customizer is the first step to adding a link to your logo. This tool lets you change many parts of your site without coding. It shows a live preview of your changes, so you see results immediately. This saves time and avoids errors.
Using the Customizer is easy. You can find it in your WordPress dashboard. It is a user-friendly way to edit your theme’s settings.
Open Your WordPress Dashboard
Log in to your WordPress admin area. Use your username and password. The dashboard is the control center for your website. From here, you can access all settings and tools.
Navigate To Appearance Menu
Look at the left sidebar. Find the “Appearance” option. Click on it to expand the menu. This section controls your site’s look and feel.
Select The Customize Option
Under “Appearance,” click “Customize.” This opens the WordPress Customizer. A new panel appears with many settings. Your website preview is on the right side.
Explore The Customizer Panel
Inside the Customizer, find the section for your logo. It may be under “Site Identity” or “Header.” Here, you can upload and edit your logo. Some themes allow setting a link directly here.
Upload Your Logo
Uploading your logo is the first step to personalize your WordPress site. A clear and well-placed logo builds brand trust. WordPress makes it simple to upload your logo without coding.
This section shows how to upload your logo quickly. Follow these easy steps to get your logo on the site.
Access The WordPress Dashboard
Log in to your WordPress admin area. Use your username and password to enter the dashboard. The dashboard controls all your site settings.
Open The Customizer
In the dashboard menu, click on “Appearance.” Then select “Customize.” The Customizer lets you change your site’s look live.
Find The Logo Upload Section
Look for the “Site Identity” or “Header” panel. The name varies by theme. This area usually holds logo upload options.
Upload Your Logo File
Click the “Select logo” or “Change logo” button. Choose your logo image from your computer. Make sure your logo file is clear and the right size.
Save And Publish Changes
After uploading, click “Publish” at the top. This saves your logo to the site. Refresh your homepage to see the new logo.
Credit: www.wpbeginner.com
Add Link To Logo
Adding a link to your logo in WordPress helps visitors return to your homepage easily. It improves user experience and navigation. There are simple ways to link your logo without complex coding.
This section explains three easy methods to add a link to your logo. Choose the method that suits your skills and theme.
Using Theme Customizer
Most WordPress themes allow logo linking through the Theme Customizer. Go to Appearance > Customize in your dashboard. Find the Site Identity or Header section. Upload your logo and check if it links to the homepage automatically. Some themes add the link by default. If not, look for a setting to enable logo linking. Save changes and preview your site.
Editing Header.php File
Editing the header.php file adds a custom link around the logo. Access your site files via FTP or the WordPress theme editor. Locate header.php in your active theme folder. Find the logo image code, usually wrapped in a tag with your desired URL, like your homepage URL. Save the file and refresh your site to see the linked logo.
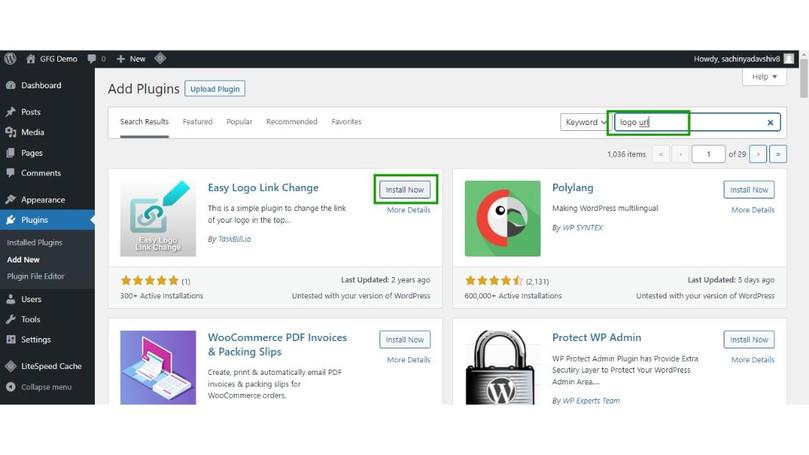
Using A Plugin
Plugins simplify adding links without touching code. Search for plugins like “Logo Link” or “Header Link” in the WordPress plugin directory. Install and activate the plugin. Follow the plugin instructions to set the URL for your logo. This method is great for beginners who prefer not to edit theme files. It keeps your site safe and easy to update.
Test The Logo Link
Testing the logo link is a crucial step after adding it to your WordPress site. It ensures visitors can click the logo and reach the intended page. A working logo link improves site navigation and user experience.
Without testing, broken links can confuse visitors and harm your site’s credibility. Testing also helps catch errors early before your audience finds them.
Check The Logo Link On Different Devices
Open your website on a computer, tablet, and phone. Click the logo on each device to confirm it leads to the right page. Different devices may display links differently.
Verify The Link Url In The Browser
Click the logo and look at the browser’s address bar. The URL should match the page you set for the logo link. A wrong URL means you need to fix the link settings.
Use Browser Developer Tools
Right-click the logo and select “Inspect” or “Inspect Element.” This opens developer tools showing the HTML code. Check the tag to confirm the correct link is added.
Test The Link In Incognito Mode
Open an incognito or private browser window. Visit your site and click the logo. This prevents cache or login status from affecting the test results.
Ask Someone Else To Test
Have a friend or colleague check the logo link. They can find issues you might miss. Fresh eyes help ensure the link works smoothly for all users.
Troubleshoot Common Issues
Troubleshooting common issues helps keep your logo link working well. Problems can stop visitors from clicking your logo or seeing it clearly. Fixing these issues improves user experience and site navigation. Here are solutions for frequent problems.
Link Not Working
Check the URL set for the logo link. Make sure it starts with “http://” or “https://”.
Clear your browser cache. Sometimes old data blocks changes from showing.
Test the link in different browsers. This shows if the problem is browser-specific.
Disable plugins one by one. Some plugins may conflict with your logo link.
Verify the theme supports clickable logos. Some themes need extra steps.
Logo Not Displaying Correctly
Ensure the logo file is uploaded correctly in WordPress.
Check the image format. PNG and JPG work best for logos.
Resize your logo to recommended dimensions. Large files load slowly or get cut off.
Look at your theme settings. Some themes crop logos automatically.
Clear any image optimization cache. Cached images may appear broken or outdated.
Optimize Logo For Better Ux
Optimizing your logo enhances user experience on your WordPress site. A well-optimized logo improves brand recognition and site navigation. It should look good and work well on all devices.
Mobile Responsiveness
Make sure your logo scales correctly on small screens. A logo that is too big or too small can confuse visitors. Use responsive design techniques to keep it clear. Test the logo on different devices to ensure visibility.
Loading Speed
Choose a lightweight image format for your logo. Large files slow down your website and hurt user experience. Compress the logo without losing quality. Fast loading logos help keep visitors engaged longer.

Credit: www.geeksforgeeks.org
Frequently Asked Questions
How Do I Add A Link To My Logo In WordPress?
To add a link to your logo, go to Appearance > Customize > Site Identity. Upload your logo, then set the logo link URL in the header or theme options. Save changes to make your logo clickable and redirect visitors to your chosen page.
Can I Link My Logo To A Custom Url In WordPress?
Yes, you can link your logo to any custom URL. Use your theme’s settings or add a small code snippet in the header. php file. This flexibility allows you to direct users to your homepage or any external page you prefer.
Will Linking My Logo Improve Website Navigation?
Yes, linking your logo improves navigation. Visitors expect the logo to link back to the homepage. This practice enhances user experience and reduces bounce rates by making site navigation intuitive and efficient.
Is Coding Required To Link A Logo In WordPress?
Not always. Most modern WordPress themes provide a built-in option to link logos without coding. However, if your theme lacks this feature, a small PHP code edit in header. php may be needed.
Conclusion
Adding a link to your logo in WordPress helps visitors easily return home. It improves site navigation and user experience. The process is simple and takes only a few steps. You can customize your site without coding skills. Try it on your WordPress site today.
This small change makes your website more user-friendly and professional. Keep your visitors engaged and help them explore your content quickly.


