

Are you looking to make your WordPress site stand out? Adding a header image is a simple way to grab your visitors’ attention the moment they land on your page.
A well-chosen header image not only enhances your site’s look but also helps share your story instantly. In this guide, you’ll learn exactly how to add a header image to your WordPress site—step by step, with clear instructions you can follow right now.
Keep reading, and you’ll have a stunning header that makes your site unforgettable.

Credit: kinsta.com
Choosing The Right Header Image
Choosing the right header image is a key step for your WordPress site. It sets the first impression for visitors. A good header image can make your site look professional and inviting. Think about what message you want to send. The image should match the style and purpose of your website. This way, visitors feel connected and interested.
Image Size And Dimensions
Pick an image size that fits well in your header area. WordPress themes often suggest specific dimensions. Use these to avoid stretched or cut-off images. A common header size is 1200 x 400 pixels. Keep the image wide and not too tall. This shape works well on desktops and phones. Large files slow down your site. Resize images before uploading to keep your site fast.
Image Format And Quality
Choose the right format for clear images. JPEG works well for photos with many colors. PNG is best for images with text or logos. Avoid blurry or pixelated pictures. Save images with good quality but small file size. This keeps your site loading quickly. Use tools to compress images without losing detail. Clear, sharp images look more trustworthy and nice.
Selecting Images That Reflect Your Brand
Your header image should show your brand’s personality. Use photos or graphics that match your business style. For a blog, choose images related to your topics. A travel site can use scenic photos. A tech site might use clean, modern designs. Consistent colors and themes help visitors recognize your brand. This builds trust and makes your site memorable.
Preparing Your Image For WordPress
Preparing your image before uploading it to WordPress is essential. It helps your website load faster and look professional. Proper preparation ensures your header image fits well and does not slow down your site. This section explains how to resize, crop, and optimize your image for the best results.
Resizing And Cropping
Resize your image to match your theme’s recommended header size. Large images can slow down your site. Use cropping to remove unwanted parts. Focus on the main subject of the image. This keeps your header clean and clear. A well-sized image fits perfectly without distortion.
Optimizing For Fast Loading
Compress your image to reduce file size. Smaller files load faster and use less bandwidth. Choose formats like JPEG or WebP for good quality and small size. Avoid very large images that take time to load. Fast loading improves user experience and SEO rankings.
Using Image Editing Tools
Use simple tools like Paint, Canva, or Photoshop to edit your image. Crop, resize, and adjust brightness or contrast if needed. Save your image in the right format and quality. Many tools offer easy options to optimize images for the web. Editing tools help make your header image clear and attractive.
Adding A Header Image Via WordPress Customizer
Adding a header image in WordPress helps make your site more attractive. The WordPress Customizer offers a simple way to do this. It lets you see changes live, so you know exactly how your header looks.
This method works well for all skill levels. It requires no coding and gives you control over the image’s position and size. Follow these easy steps to add a header image using the Customizer.
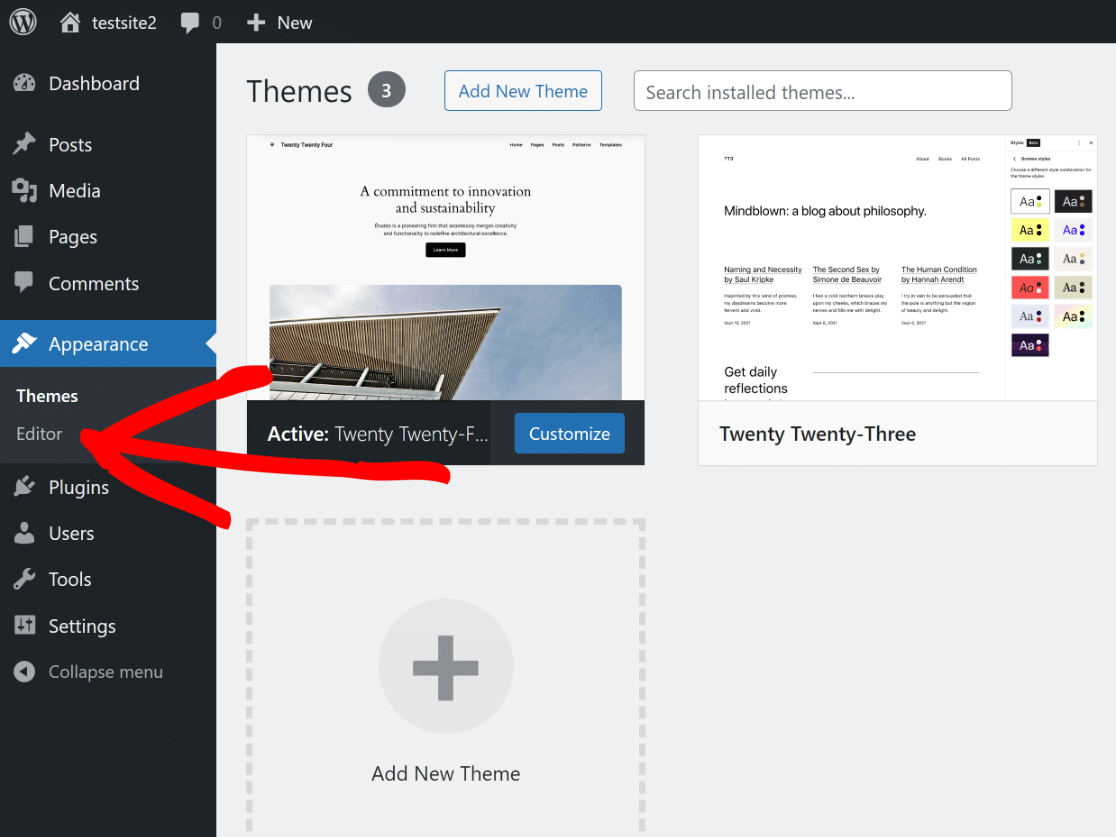
Accessing The Customizer
Log in to your WordPress dashboard. Find the “Appearance” menu on the left side. Click on “Customize” to open the Customizer panel. This panel controls many parts of your site’s look. You will see a live preview of your site on the right side. This preview updates as you make changes.
Uploading Your Header Image
In the Customizer, look for the “Header Image” section. Click it to open options for your header. Click the “Add new image” button. This opens your media library and upload options. Choose an image from your computer or existing library. Select the image, then click “Choose and Crop” if needed. Cropping lets you adjust the image shape to fit the header space. If cropping is not needed, skip this step.
Adjusting Image Position And Size
After uploading, check how the image appears in the preview. Some themes let you move or resize the header image here. Use the controls to position the image so it looks right. Make sure the important parts of the image are visible. Save your changes by clicking “Publish” at the top. Your new header image is now live on your site.
Using Themes With Built-in Header Image Support
Using themes with built-in header image support makes adding a header easy. These themes come ready to accept header images without extra plugins. You just upload your image and adjust settings. This saves time and effort. It also ensures the header looks good on all devices.
Finding Compatible Themes
Start by searching for themes that mention header image support. You can use the WordPress theme directory for this. Filter themes by features or search for “header image” in descriptions. Check demo sites to see how the header looks. Pick a theme that fits your style and supports header images.
Configuring Theme Header Settings
Once the theme is active, go to the WordPress Customizer. Find the section named “Header Image” or similar. Upload your chosen image here. Adjust its position or size if the theme allows. Some themes let you add text or overlays on the header image. Save your settings after finishing changes.
Previewing Changes Before Publishing
Use the preview option to see how your header looks on the site. Check the image on different screen sizes. Make sure it does not cover important content. Adjust the image or settings again if needed. Only publish after you are satisfied with the header’s appearance.
Adding Header Image Using Page Builders
Adding a header image in WordPress using page builders is a simple way to improve your website’s look. Page builders let you design headers visually without coding. You can place images exactly where you want them. This method works well for beginners and those who want more control over design.
Popular Page Builder Plugins
Several page builder plugins are popular for WordPress. Elementor is widely used for its ease and many features. Beaver Builder offers a smooth drag-and-drop experience. Divi Builder includes ready-made templates for quick design. These plugins help add header images quickly and easily.
Inserting Header Images With Drag And Drop
Drag and drop makes adding header images fast. Open your page builder and select the header area. Choose the image element and drag it to the header section. Upload your picture or pick one from the media library. Adjust the size and placement with simple controls.
Customizing Header Layouts
Customizing header layouts is easy with page builders. Move the image to left, right, or center positions. Add text or buttons next to the header image. Change background colors or add overlays for style. Save your layout and preview it on different devices.
Credit: www.greengeeks.com
Troubleshooting Common Header Image Issues
Adding a header image in WordPress can sometimes bring unexpected challenges. These issues might stop your header from looking right or slow down your site. Knowing how to fix common problems saves time and keeps your site neat. Below are simple solutions for frequent header image issues.
Image Not Showing Or Cropped Incorrectly
Sometimes the header image does not appear or looks cut off. This often happens because the image size does not fit the header space. Use an image with the recommended dimensions from your theme. Check your theme settings for header image size rules.
Clear your browser cache to see the updated image. Also, disable plugins one by one to check if any cause conflicts. Upload the image again if it still does not show properly.
Slow Loading Header Images
Large header images can slow your site speed. Use tools to reduce the image file size before uploading. Choose JPEG or WebP formats for faster loading. Avoid very high-resolution images unless needed.
Enable caching plugins to help images load faster for visitors. Test your website speed after making changes to ensure improvement.
Mobile Responsiveness Problems
Header images may look fine on desktop but not on mobile devices. This happens if the image does not resize automatically. Use responsive images that adjust to screen size.
Check your theme options for mobile header settings. Preview your site on different devices to catch issues early. Adjust image cropping or use CSS to improve mobile display.
Enhancing Header Design With Additional Elements
Enhancing the header design with extra elements makes your site look more professional. These additions catch visitors’ eyes and improve the user experience. Simple changes can create a strong impact without cluttering the layout.
Using text, transparency, or buttons in your header adds style and function. Each element helps guide visitors and supports your site’s message. These small touches work well with your header image to create a polished look.
Adding Text Overlays
Text overlays add clear messages right on your header image. Use short, bold phrases to highlight offers or site purpose. Choose readable fonts and colors that stand out against the image. Text overlays help visitors understand your site quickly.
Using Transparent Header Images
Transparent header images blend smoothly with the background. This technique creates a clean, modern look. It also lets other design elements shine through. Use PNG files with transparency to keep image quality high.
Incorporating Call-to-action Buttons
Call-to-action (CTA) buttons encourage visitors to take action. Place buttons in the header for easy access. Use clear labels like “Contact Us” or “Shop Now.” Bright colors and simple shapes make CTAs stand out.
Credit: wpforms.com
Frequently Asked Questions
How Do I Add A Header Image In WordPress?
To add a header image, go to Appearance > Header in your WordPress dashboard. Upload or select an image from your media library and save changes. This updates your site’s header with the chosen image quickly and easily.
Can I Customize The Header Image Size In WordPress?
Yes, WordPress allows header image size customization. You can crop or resize images during upload. Some themes also offer specific size settings in the Customizer under Appearance > Customize > Header Image.
What Image Formats Are Supported For WordPress Header Images?
WordPress supports JPEG, PNG, and GIF formats for header images. JPEG is best for photographs, PNG for images needing transparency, and GIF for simple animations. Choose high-quality, web-optimized files for faster loading and better appearance.
Will Adding A Header Image Affect My Site’s Loading Speed?
A large header image can slow your site. Optimize images by compressing them before uploading. Use formats like JPEG and tools like TinyPNG to reduce file size while maintaining quality for faster load times.
Conclusion
Adding a header image in WordPress is simple and quick. It helps your website look better and feel more personal. Choose an image that matches your site’s style and message. Follow the steps carefully, and your header will stand out.
Regular updates keep your site fresh and inviting. Try different images to see what works best for you. Enjoy customizing your WordPress site with ease and confidence.


