
If you want to make your WordPress site more visible on Google, adding a Google Site Verification code is a must. This simple step proves that you own your website and unlocks powerful tools like Google Search Console.
But if you’re wondering how to add this code without messing up your site, you’re in the right place. In this guide, you’ll learn exactly what to do—step by step—with clear instructions that anyone can follow. By the end, your site will be verified, setting you up for better search rankings and more visitors.
Let’s get started!
Why Add Google Site Verification
Adding Google Site Verification to your WordPress site is an important step. It confirms that you own the website. Google uses this verification to provide you with valuable data and tools. These tools help improve your site’s visibility and performance in search results.
Verification is a simple process but has many benefits. It opens up opportunities to manage your site better through Google services. Understanding why to add Google Site Verification can encourage you to complete this step quickly.
Benefits For Seo
Google Site Verification helps improve your SEO efforts. It allows Google to recognize your site as authentic. This can lead to better indexing of your pages. Your site can appear more often in search results. You get data about how Google views your site. This data helps fix errors that may hurt your ranking. Verified sites often get priority in search features.
Access To Google Tools
Verification grants access to Google Search Console. This tool shows important insights about your site’s performance. You can see keywords people use to find your site. It also alerts you to security issues or manual penalties. Google Analytics integration works better with verification. You get reports on traffic, user behavior, and more. These tools help you make informed decisions to improve your site.
Credit: wordpress.com
Get Your Verification Code
To add Google site verification code in WordPress, first get the code from Google Search Console. This code proves you own the website. It helps Google trust your site and shows your site data in Search Console.
Follow simple steps to find the verification code. Copy it exactly as shown. You will paste this code into your WordPress site later.
Sign In To Google Search Console
Go to the Google Search Console website. Use your Google account to sign in. If you don’t have an account, create one. It is free and quick.
After signing in, add your website as a new property. Enter your website URL carefully. Choose the correct URL format (with or without “www”).
Locate The Html Tag Code
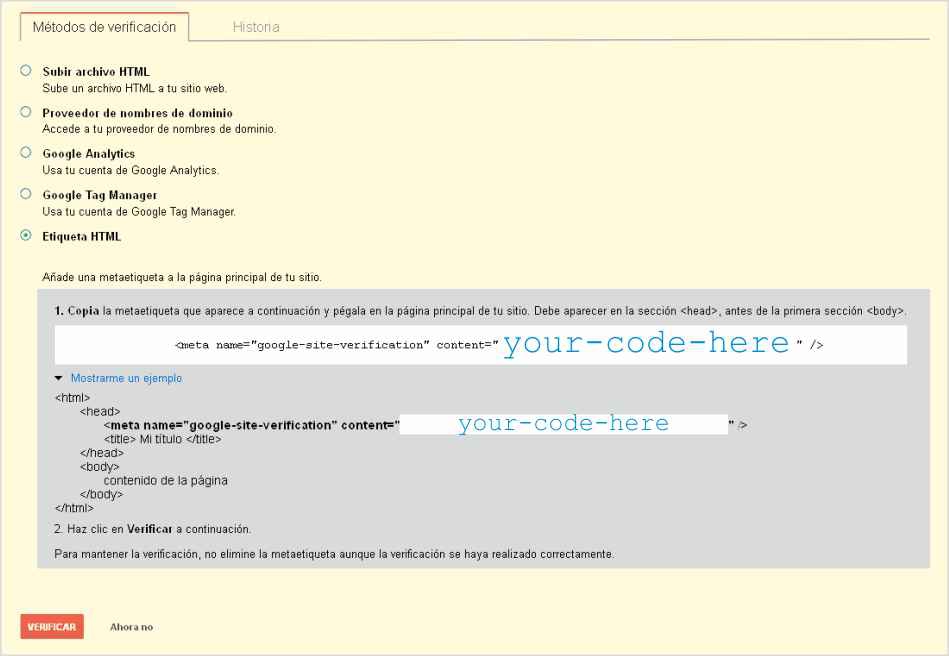
After adding your site, Google shows verification methods. Choose the “HTML tag” option. Google gives a code snippet starting with .
Copy this entire code. Do not change anything. This code will go into your website’s header section.
Add Verification Code Using A Plugin
Adding the Google site verification code through a plugin is an easy way to verify your website. It saves time and avoids editing theme files directly. Plugins help insert the code safely without risk.
Using a plugin is ideal for beginners. It requires no coding skills. The plugin handles where to place the code for Google to find it. Follow the steps below to add the verification code using a plugin.
Choose A Suitable Plugin
Select a plugin designed for header and footer code management. Popular choices include “Insert Headers and Footers” or “Header and Footer Scripts.” Check the plugin ratings and reviews. Pick one with good user feedback and recent updates.
Install And Activate The Plugin
Go to your WordPress dashboard. Navigate to Plugins > Add New. Search for your chosen plugin by name. Click “Install Now” and wait for the process to finish. Press “Activate” to enable the plugin on your site.
Insert The Verification Code
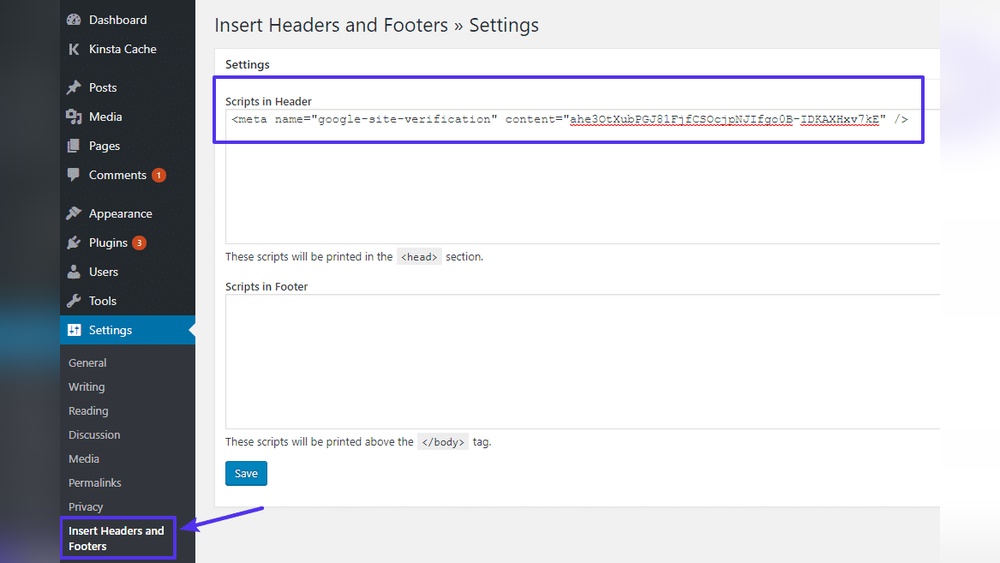
Find the plugin settings in the WordPress dashboard menu. Open the section for adding code to the header. Paste your Google site verification code exactly as given. Save the changes to update your website.
Google can now detect the code on your site. This confirms your ownership quickly and easily.
Add Verification Code Manually
Adding the Google site verification code manually is a direct way to prove your website ownership. It involves editing your theme files in WordPress. This method is quick and does not require extra plugins. Follow these clear steps to add the code safely.
Access WordPress Theme Editor
Log in to your WordPress dashboard first. Go to Appearance and then Theme Editor. You may see a warning about editing files. Proceed carefully to avoid mistakes. On the right side, find the header.php file. This file controls the header area of your website.
Paste Code In Header File
Open the header.php file. Look for the tag. Paste the Google verification code just before the closing tag. The code usually starts with . Make sure not to change any other code in this file.
Save And Verify
Click the Update File button to save changes. Return to your Google Search Console account. Click the Verify button to check your site ownership. If successful, Google confirms your site is verified. If not, recheck the code placement and try again.
Verify Your Site With Google
Verifying your WordPress site with Google is an important step for site ownership confirmation. It helps you use Google services like Search Console. Verification proves that you control the website. This allows you to access valuable data about your site’s performance and indexing.
The process is simple and fast. You only need to add a small code to your website. Google will then check for this code to confirm your ownership. After verification, you can improve your site’s visibility and fix issues found by Google.
Submit Verification Request
First, log in to Google Search Console. Enter your website URL and select the HTML tag method. Google will provide a unique verification code. Copy this code carefully.
Next, go to your WordPress dashboard. Navigate to Appearance > Theme Editor or use a header plugin. Paste the verification code inside the section of your site.
Save the changes and return to Google Search Console. Click the “Verify” button to submit your request. Google will check your site for the code. If found, the verification will succeed immediately.
Troubleshoot Common Issues
Verification can fail if the code is missing or misplaced. Ensure the code is within the tags. Avoid placing it in the body or footer sections.
Clear your WordPress cache after adding the code. Cached pages may prevent Google from seeing the new code. Use a cache plugin or your hosting panel to clear cache.
Check for plugin conflicts that may remove header codes. Disable plugins that alter headers and try again. Also, verify that you copied the code exactly as given by Google.
Credit: www.joanmiquelviade.com
Alternative Verification Methods
Google offers several ways to verify your WordPress site. The verification code method is common. Still, some users prefer other options. These alternative methods can be easier or fit different needs. Choose the one that works best for your setup.
Using Dns Record
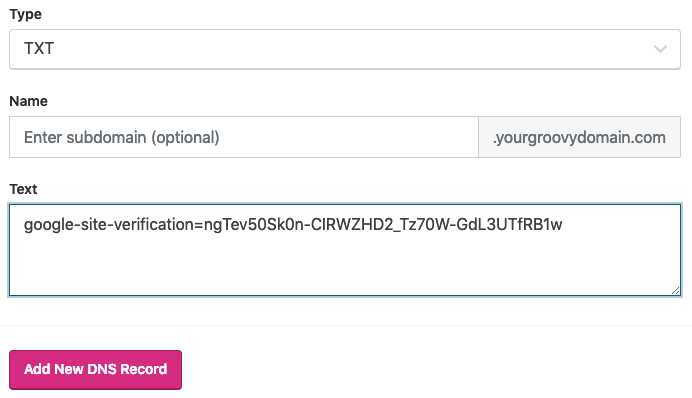
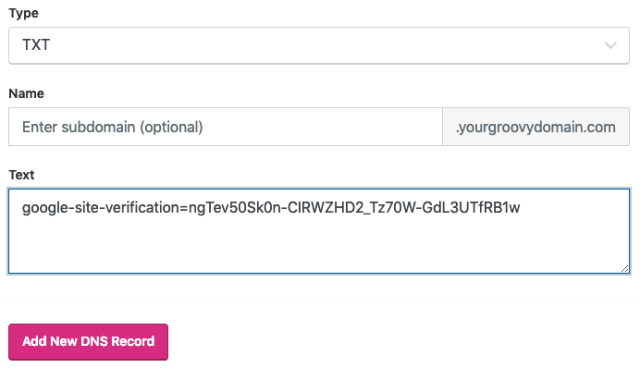
This method involves adding a specific TXT record to your domain’s DNS settings. It proves that you own the domain without editing your WordPress files. Log in to your domain registrar’s dashboard. Find the DNS management section. Add the TXT record provided by Google Search Console. Save changes and wait for the update to take effect. Then, click “Verify” in Search Console. This method is reliable and secure.
Uploading Html File
Google gives you an HTML verification file to upload to your website’s root folder. Download the file from Search Console. Use an FTP client or your hosting file manager. Upload the file to the main directory where WordPress is installed. After uploading, visit the provided URL to confirm the file is accessible. Go back to Search Console and click “Verify.” This method is simple and does not require code editing.
Credit: wordpress.com
Frequently Asked Questions
How Do I Find My Google Site Verification Code?
Log in to Google Search Console. Add your website URL. Choose HTML tag verification. Copy the meta tag with your unique code for WordPress.
Where To Add Google Verification Code In WordPress?
Add the Google verification code in the
section. Use a theme’s header.php file or install a plugin like “Insert Headers and Footers” for easy insertion.Can I Verify My Site Without Editing WordPress Files?
Yes, use a WordPress SEO plugin like Yoast SEO. Paste the Google verification code in the plugin’s Webmaster Tools settings to verify without code editing.
How Long Does Google Verification Take To Work?
Google site verification is usually instant. After adding the code, click “Verify” in Search Console. It may take a few minutes to confirm.
Conclusion
Adding a Google site verification code in WordPress helps prove your website ownership. This step improves your site’s presence on Google Search Console. Follow simple instructions to insert the code correctly. Verify your site quickly to access important tools and reports.
Stay confident knowing your website is recognized by Google. Keep your site updated and monitored for better performance. This small task brings big benefits for your online visibility.


