
If you want to understand how visitors interact with your WordPress site, adding Google Analytics is a must. But maybe you’re wondering how to set it up without getting lost in complicated steps.
Don’t worry—this guide will walk you through simple, clear methods to connect Google Analytics to your WordPress site. Whether you prefer using a plugin or adding the tracking code manually, you’ll learn exactly what to do. By the end, you’ll have powerful insights at your fingertips, helping you grow your website smarter and faster.
Ready to unlock your site’s full potential? Let’s get started!
Create Google Analytics Account
Creating a Google Analytics account is the first step to track your WordPress site’s visitors. This process sets up your account, property, and data stream. It gives you a unique Measurement ID to link your website with Google Analytics. Follow these simple steps to start.
Sign Up For Google Analytics
Go to the Google Analytics website. Click on the “Start for free” button. Use your Google account to sign in or create one. Enter your account name. Choose your data sharing settings. Click “Next” to continue.
Set Up Property And Data Stream
Enter your website name as the property name. Select your reporting time zone and currency. Click “Next” to add details about your business. Choose your industry category and business size. Click “Create” to finish the setup.
Next, create a data stream. Select “Web” for your website type. Enter your website URL and stream name. Click “Create stream” to generate tracking details.
Find Your Measurement Id
After creating the data stream, you will see your Measurement ID. It starts with “G-” followed by numbers and letters. Copy this ID carefully. You will need it to connect Google Analytics to your WordPress site.
Credit: www.monsterinsights.com
Add Analytics Using Plugin
Adding Google Analytics to your WordPress site using a plugin is a simple and effective way to track your website traffic. Plugins handle the technical details and make integration easy. This method suits users who prefer not to edit code directly. Follow these clear steps to add Google Analytics using a plugin.
Choose A Google Analytics Plugin
First, pick a reliable Google Analytics plugin. Popular options include MonsterInsights, Site Kit by Google, and Analytify. These plugins offer easy setup and useful reports inside your WordPress dashboard. Choose one that matches your needs and has good reviews.
Install And Activate Plugin
Go to your WordPress dashboard and open the Plugins menu. Click “Add New” and search for the plugin you want. Click “Install Now” and then “Activate” to enable the plugin on your site. The plugin will then appear in your dashboard menu.
Enter Measurement Id In Plugin Settings
Next, find your Google Analytics Measurement ID from your Google Analytics account. It starts with “G-” followed by letters and numbers. Open the plugin settings in your WordPress dashboard and paste the Measurement ID into the required field. This connects your site to Google Analytics.
Save And Publish Changes
After entering the Measurement ID, save your settings. The plugin will start tracking your website visits. Visit your site and check if the plugin shows active tracking. Your Google Analytics data will update as visitors explore your site.
Manual Code Integration
Manual code integration allows you to add Google Analytics directly to your WordPress site. This method involves inserting the tracking code into your theme files. It gives you full control without relying on plugins. Follow these simple steps to do it right.
Get Full Tracking Code Snippet
Log in to your Google Analytics account. Go to the Admin section and select your property. Under Data Streams, choose your web stream. Find the Global Site Tag (gtag.js) code snippet. Copy the entire code starting with and ending with .
Access WordPress Theme Files
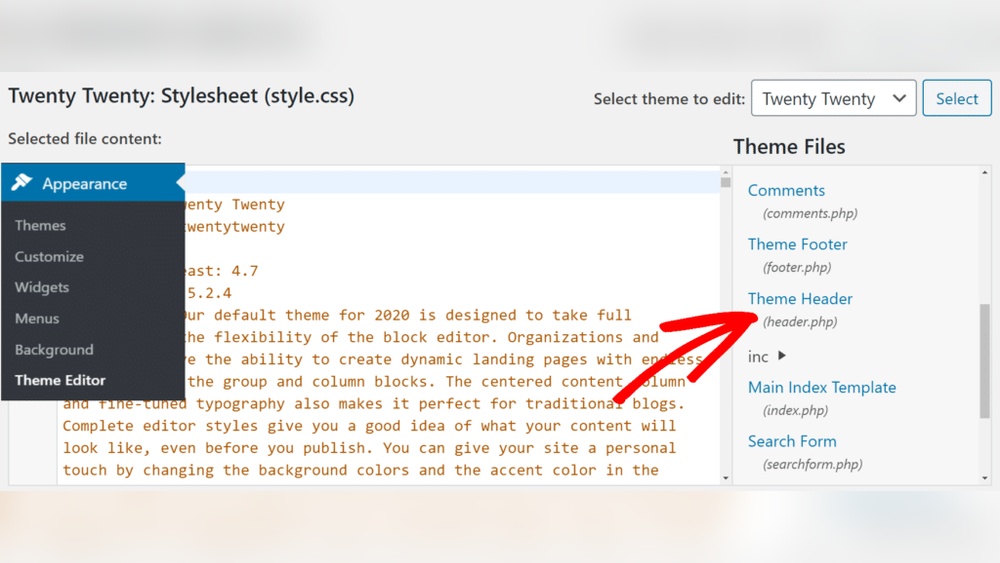
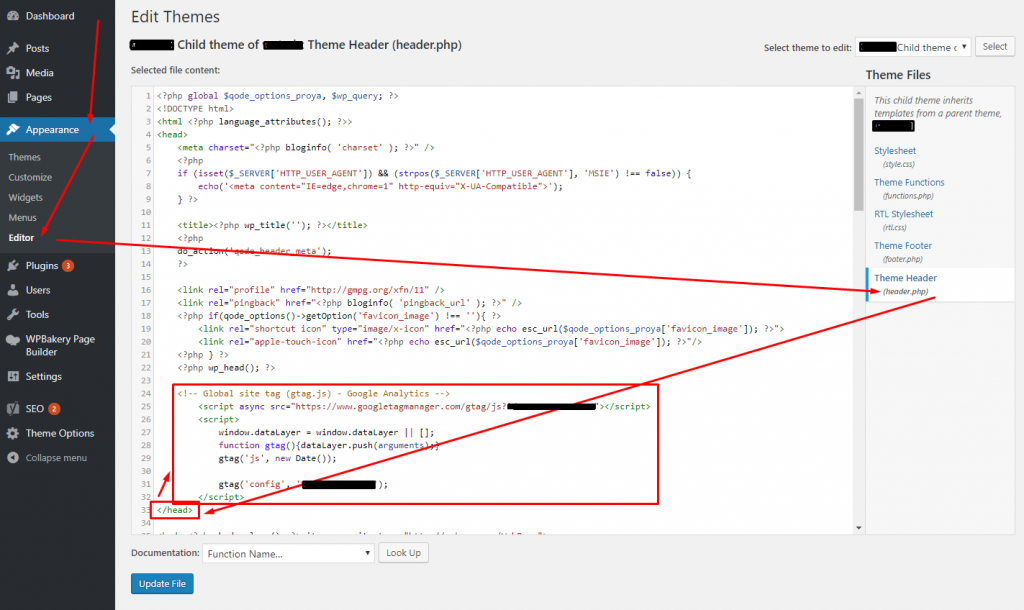
Log in to your WordPress dashboard. Go to Appearance > Theme Editor. Look for the theme files on the right side. Find the header.php file. This file controls the header area of your website. Be careful when editing theme files to avoid errors.
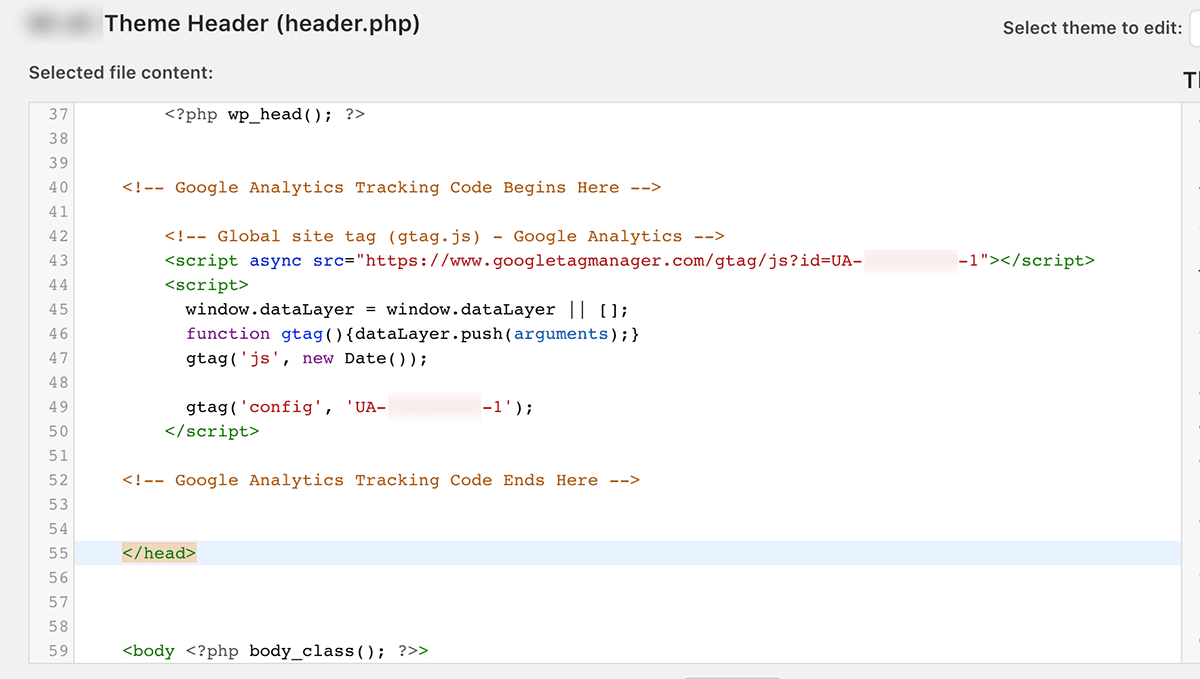
Paste Code Into Header.php
Open the header.php file in the editor. Locate the closing tag. Paste the Google Analytics tracking code snippet just before this tag. Make sure the code is complete and not broken.
Save And Update Files
Click the Update File button to save your changes. Clear your website cache if you use a caching plugin. Visit your site and check the source code to confirm the tracking code is present. Google Analytics will start collecting data within 24 hours.
Credit: deeperlook.com.au
Use Google Tag Manager
Using Google Tag Manager (GTM) simplifies adding Google Analytics to WordPress. GTM lets you manage all tracking codes in one place. This method avoids editing your website’s code directly. It also gives flexibility for adding more tags later.
Follow these clear steps to set up GTM with Google Analytics on your WordPress site. The process is fast and requires no coding skills.
Set Up Google Tag Manager Container
First, create a GTM account at tagmanager.google.com. Then, add a new container for your WordPress site. Choose “Web” as the target platform. GTM will give you two code snippets to add to your site.
Insert the first snippet in the section and the second after the opening tag. You can do this by editing your theme files or using a plugin that allows custom scripts.
Create Google Analytics Tag
In your GTM workspace, click “Add a new tag.” Select “Google Analytics: GA4 Configuration” as the tag type. Paste your Google Analytics Measurement ID, which starts with “G-”.
This tag will send page view data to your Google Analytics account. Name the tag clearly, such as “GA4 – Page View.”
Configure Triggers For Page Views
Next, set the trigger for the tag. Choose “All Pages” to track visits on every page. This ensures you get data on all user activity across your WordPress site.
Save the trigger settings. Now your Google Analytics tag is ready to fire on each page load.
Publish Container Changes
Finally, click “Submit” in GTM to publish your container changes. Add a version name and description for reference. This activates the Google Analytics tag on your WordPress site.
Check your Google Analytics real-time reports to verify the data is coming through. GTM makes managing tracking simple and clean.
Verify Analytics Installation
After adding Google Analytics to your WordPress site, verifying the installation is crucial. This step ensures data flows correctly from your website to Google Analytics. Without verification, you might miss important visitor information or see inaccurate data. Simple methods help confirm the setup works as expected. Use tools and reports to check if tracking is active. Fix any issues early to avoid long-term errors.
Check Real-time Reports
Open Google Analytics and go to the Real-Time section. Visit your website in another browser tab or device. Watch the real-time report to see if your visit appears immediately. If it shows your activity, the tracking code is working well. This quick check confirms data is sent to Analytics as visitors browse your site.
Use Browser Extensions
Install a browser extension like Google Tag Assistant or GA Debugger. These tools scan your site for the Analytics tracking code. They highlight any errors or missing tags. Extensions display if the code loads correctly on every page. Use them during testing to spot problems fast. They make verification easier without digging into site code.
Troubleshoot Common Issues
Sometimes tracking does not work as planned. Clear your browser cache and reload the site to rule out old data. Check that you copied the correct Measurement ID from Analytics. Make sure the tracking code is inside the
section of your theme. Disable other plugins that might block Analytics scripts. Fixing these common errors helps your tracking run smoothly.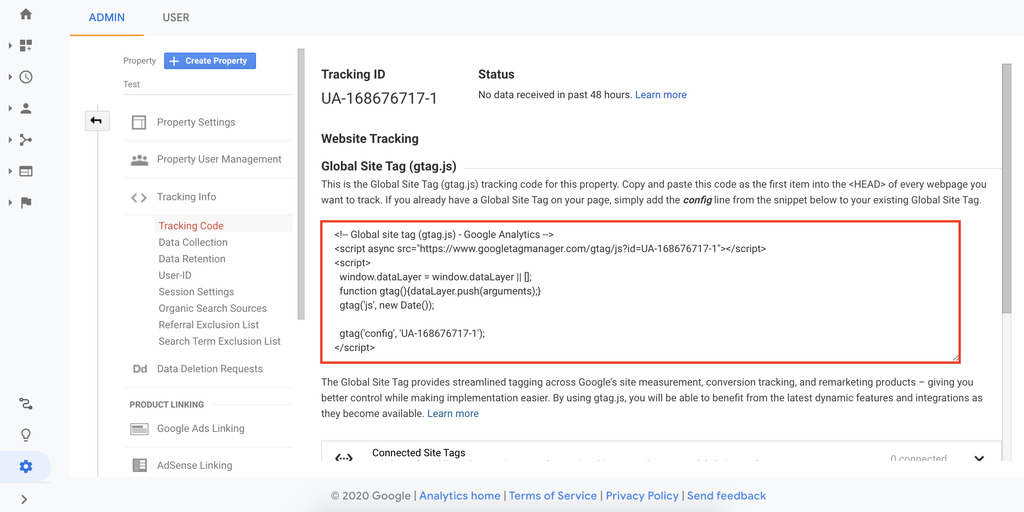
Credit: www.hostinger.com
Optimize Analytics For WordPress
Optimizing Google Analytics for WordPress helps you gather clear and useful data. This ensures you understand your visitors’ behavior and improve your site effectively. Simple settings can make your analytics more accurate and detailed.
Enable Enhanced Measurement Features
Enhanced measurement tracks user interactions automatically. It records page views, scrolls, outbound clicks, site search, and video engagement. This data helps you see what visitors do on your site. Turn on this feature in your Google Analytics data stream settings. It saves time and gives more insights without extra code.
Exclude Admin Traffic
Admin visits can skew your data and give false results. Exclude your own visits to keep reports clean. Use filters in Google Analytics to block traffic from your IP address. This step ensures your data shows real visitor behavior, not your actions on the site. Check your IP address and add it to the exclude list.
Set Up Goals And Events
Goals and events track specific actions visitors take. Examples include form submissions, button clicks, or purchases. Set goals in Google Analytics to measure conversions. Use events to capture interactions like video plays or downloads. Proper setup helps you understand which parts of your site work best. It guides your decisions to boost engagement and sales.
Frequently Asked Questions
How To Add Google Analytics To WordPress Without A Plugin?
Create a Google Analytics account and get your Measurement ID. Edit your WordPress theme’s header.php file. Paste the tracking code inside the
tag. Save the changes and upload the file. This method adds Google Analytics without using a plugin.How Do I Add Google Analytics To My Website?
Create a Google Analytics account and property. Copy your Measurement ID. Add it to your website’s settings, plugin, or paste tracking code in the
section. Save and publish your site to activate tracking.What Is The Best Google Analytics Plugin For WordPress?
MonsterInsights is the best Google Analytics plugin for WordPress. It offers easy setup, real-time stats, and advanced tracking features. It integrates seamlessly and suits beginners and experts alike.
How To Add Web Analytics In WordPress?
Create a Google Analytics account and get your Measurement ID. Install a plugin like MonsterInsights or manually add the tracking code to your WordPress theme’s header. Save changes and publish your site to activate web analytics tracking.
Conclusion
Adding Google Analytics to your WordPress site helps track visitor behavior easily. It gives useful data to improve your website. You can use a plugin or add code manually. Both ways work well and are simple to follow. Regularly check your analytics to understand your audience better.
This small step can make a big difference for your site’s growth. Start now and watch your website progress with clear insights.


