

Are you looking to make your WordPress site stand out with unique fonts? Choosing the right font can change the entire look and feel of your website.
But how do you add custom fonts to your WordPress theme without breaking a sweat? In this guide, you’ll discover simple, step-by-step methods to add fonts that match your style and boost your site’s appeal. Keep reading, and you’ll soon have a website that not only looks great but also keeps visitors hooked.
Credit: www.hostinger.com
Choosing The Right Fonts
Choosing the right fonts is key to a great website design. Fonts affect how visitors feel and read your content. The right font makes your site clear and appealing. It also helps show your brand’s personality.
Fonts can guide visitors’ eyes and make important parts stand out. Picking fonts that fit your style and message keeps your site professional. It builds trust and keeps people on your page longer.
Popular Font Types For Web Design
Serif fonts have small lines at the ends of letters. They look classic and formal. Good for blogs and news sites.
Sans-serif fonts are simple and clean without extra lines. They work well for modern sites and mobiles.
Script fonts look like handwriting. Use them for invitations or creative sites.
Display fonts are bold and unique. Best for headlines or logos, not long texts.
Matching Fonts With Your Brand
Think about your brand’s mood. Friendly brands suit round, soft fonts. Serious brands need strong, clear fonts.
Match fonts to your brand colors and style. This keeps your website consistent.
Choose fonts that show your brand’s voice. Are you formal, casual, or playful?
Font Pairing Tips
Use two or three fonts max. Too many fonts make your site messy.
Pair a serif font with a sans-serif for balance. One for headings, one for text.
Check font sizes and spacing. Make sure text is easy to read.
Test fonts on different devices. Make sure they look good everywhere.
Preparing Fonts For WordPress
Preparing fonts for your WordPress theme is a crucial step. Fonts impact your site’s look and readability. Proper preparation ensures fonts load fast and display correctly across devices. Follow the steps below to prepare your fonts efficiently.
Downloading And Licensing Fonts
Choose fonts that fit your website style. Download from trusted sources like Google Fonts or font foundries. Check the font license carefully. Some fonts are free for personal use only. Others allow commercial use. Make sure your license covers your website’s needs. Keep a copy of the license for reference.
Converting Fonts For Web Use
Fonts must be in web-friendly formats to work well. Common formats include WOFF, WOFF2, TTF, and EOT. Use online converters to change formats if needed. WOFF and WOFF2 are best for performance. They load quickly and support modern browsers. Test fonts after conversion to ensure quality.
Organizing Font Files
Create a dedicated folder for your font files in your theme directory. Use clear and simple file names. Organize by font family and style, like regular, bold, or italic. This helps you manage fonts easily. It also speeds up theme updates and troubleshooting.
Using Theme Customizer For Fonts
The Theme Customizer in WordPress lets you change fonts easily. It offers built-in font options without coding. You can see your changes live before saving them. This method is perfect for beginners and quick edits.
Accessing The Theme Customizer
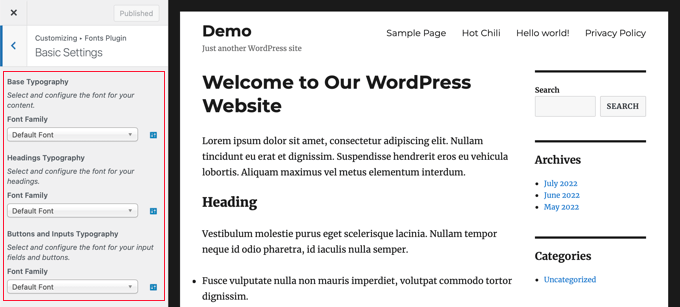
Log in to your WordPress dashboard. Look for the “Appearance” menu on the left side. Click on “Customize” to open the Theme Customizer. This panel shows all the design options your theme supports. Fonts settings are usually under “Typography” or “Fonts.”
Selecting Fonts From Built-in Options
Inside the Customizer, find the font section. You will see a list of font families and styles. Choose the font you want for your headings and body text. The preview updates immediately, showing how your site looks. Pick fonts that match your site’s style and are easy to read.
Applying Changes To Your Site
After choosing your fonts, review the live preview carefully. Make sure the text looks clear on all devices. Click the “Publish” button at the top to save your changes. Your new fonts will now appear on your website. You can return anytime to adjust fonts again.
Credit: www.greengeeks.com
Adding Google Fonts Manually
Adding Google Fonts manually to your WordPress theme lets you control your site’s style. It helps your website stand out with unique typography. This process involves selecting fonts, embedding them in your theme, and sometimes using plugins. Below are clear steps to guide you through.
Finding Google Fonts
Visit the Google Fonts website to browse available fonts. You can search by style, popularity, or language support. Click a font to see its details and available styles. Select the styles you want to use for your website. Google Fonts generates a code snippet you will need later.
Embedding Fonts Via Theme Code
Copy the code snippet from Google Fonts. Open your WordPress theme folder and find the header.php or functions.php file. Paste the snippet inside the
section or enqueue it properly in functions.php. Save the file and refresh your site to see the new font in action.Using Plugins For Google Fonts
Several plugins can add Google Fonts without editing code. Install a plugin like “Easy Google Fonts” or similar from the WordPress plugin directory. Activate the plugin and go to its settings page. Choose your fonts and assign them to different parts of your site. Save changes and check your website’s new look.
Uploading Custom Fonts To WordPress
Uploading custom fonts to WordPress lets you create a unique look for your site. It helps your website stand out with special typography. This process involves adding font files directly to your WordPress theme. You do not need advanced coding skills to do this.
Custom fonts improve your site’s design and user experience. They give your content a fresh and personal touch. Follow these steps to upload fonts easily and use them on your website.
Installing Font Upload Plugins
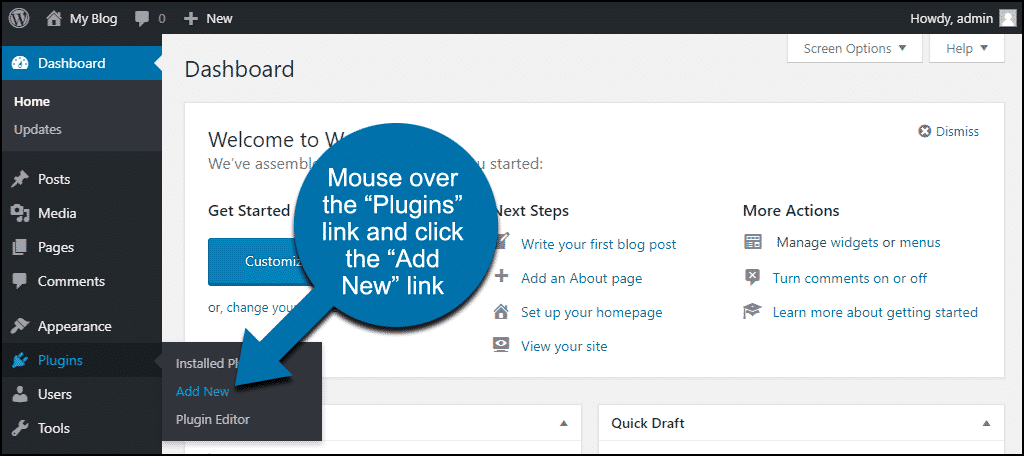
Start by installing a font upload plugin. These plugins let you add fonts without editing code. Go to your WordPress dashboard. Click on Plugins > Add New. Search for “custom font uploader” or similar terms. Choose a plugin with good reviews and install it. Activate the plugin to start using it.
Uploading Font Files
Next, upload your font files through the plugin. Fonts come in formats like .woff, .ttf, and .otf. Make sure your font files are ready on your computer. Open the font uploader plugin interface. Select the option to add new fonts. Upload each font file and give it a name. Save the changes once the files are uploaded.
Assigning Fonts To Elements
After uploading, assign fonts to your website elements. This step changes the font style for headers, paragraphs, or menus. Use the plugin settings or your theme customizer. Choose the font you uploaded from the dropdown menu. Apply the font to the parts of your site you want to change. Save your settings and preview your website. Your new fonts should now appear live.
Credit: www.wpbeginner.com
Editing Css For Font Integration
Editing CSS is a key step to add custom fonts to your WordPress theme. CSS controls how fonts appear on your site. You can use CSS to link new fonts and style text. This process helps your website look unique and professional. It also improves readability and user experience.
To start, find your theme’s main CSS file. Then write rules to load your fonts. Finally, adjust font styles like size and weight. This guide walks you through these simple steps.
Locating Your Theme’s Stylesheet
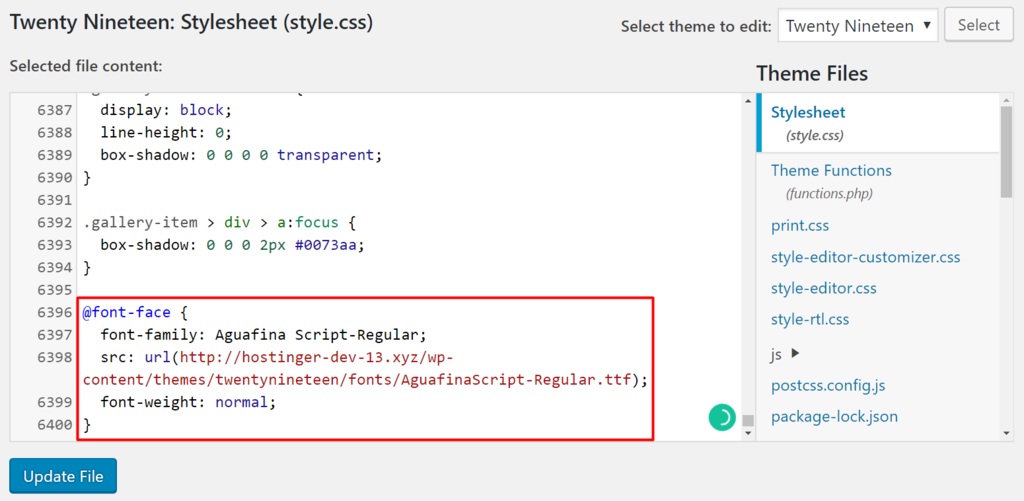
Your theme’s stylesheet is usually called style.css. It is in the theme folder. You can find it using the WordPress dashboard. Go to Appearance > Theme Editor. Look for style.css in the list on the right. This file controls your site’s look.
Back up this file before making changes. Editing here lets you add font code. Save changes to see the new fonts on your site.
Writing @font-face Rules
The @font-face rule tells browsers to load custom fonts. You need the font files in formats like .woff or .ttf. Upload these files to your server or theme folder. Then write the code in your stylesheet.
Example:
@font-face { font-family: 'CustomFont'; src: url('fonts/customfont.woff') format('woff'); font-weight: normal; font-style: normal; } This code names the font and points to its file. Adjust the file path to match your upload location.
Customizing Font Styles With Css
After loading your font, use CSS to style text. Change font family, size, color, and more. Apply styles to tags like body, h1, or classes.
Example:
body { font-family: 'CustomFont', Arial, sans-serif; font-size: 16px; color: 333; } This code sets your custom font as the main text style. Add more rules to style headings or buttons.
Optimizing Fonts For Performance
Optimizing fonts for performance is key to a fast, smooth website. Fonts affect how quickly your pages load. Large or poorly loaded fonts slow down user experience. Proper font optimization makes your WordPress theme faster and more responsive.
Optimized fonts also improve SEO rankings. Search engines favor sites that load quickly. Let’s explore how to make fonts work well without hurting speed.
Minimizing Font File Sizes
Large font files take longer to download. Use only the font styles and weights you need. Remove extra characters or glyphs not used on your site. Tools like Font Squirrel or Transfonter can help shrink font files.
Choose modern font formats like WOFF2. They are smaller and load faster than older types. Smaller files mean quicker page loads and happier visitors.
Using Font Display Strategies
Fonts can block page rendering, causing delays. The font-display CSS property controls how fonts load and show up. Use font-display: swap; to show fallback fonts first, then swap the custom font once loaded.
This method prevents blank text areas. Users see content fast, even if fonts take time to load. It improves perceived speed and user experience.
Caching And Cdn Options
Caching stores font files on user devices for faster repeat visits. Set proper cache headers for font files in your server. This reduces the need to download fonts again.
Use a Content Delivery Network (CDN) to serve fonts from servers near your visitors. CDNs speed up font delivery worldwide. Many font services like Google Fonts use CDNs by default.
Troubleshooting Font Issues
Fonts can bring life to your WordPress site. But sometimes, they don’t show up as expected. Troubleshooting font issues helps keep your site looking good and professional. It also improves readability for visitors.
Let’s explore common font problems and easy ways to fix them. Also, learn how to make fonts work well on all browsers.
Common Font Loading Problems
Fonts may fail to load due to slow internet or server issues. Missing font files can cause blank text or default fonts to appear. Incorrect font URLs in your theme can block font loading. Using too many fonts can slow down the site and cause errors.
Fixing Font Display Errors
Check that font files are correctly uploaded to your server. Verify the font URL in your CSS matches the file location. Clear your browser cache to see recent changes. Use web-safe fonts as fallback in your CSS for better display. Test your site on different devices to spot errors.
Ensuring Cross-browser Compatibility
Fonts may look different across browsers like Chrome, Firefox, and Safari. Use font formats like WOFF and TTF for wider browser support. Add multiple font formats in your CSS to cover more browsers. Avoid custom fonts that only work on certain browsers. Regularly test your site on major browsers to ensure consistency.
Frequently Asked Questions
How Do I Add Custom Fonts To My WordPress Theme?
To add custom fonts, use plugins like Easy Google Fonts or edit your theme’s CSS. Upload font files to your server and link them via @font-face rules in your stylesheet. This method ensures your site loads unique fonts smoothly and looks professional.
Can I Use Google Fonts With Any WordPress Theme?
Yes, Google Fonts work with all WordPress themes. You can add them through plugins or manually enqueue the fonts in your theme’s functions. php file. This flexibility allows you to enhance your website’s typography without theme restrictions.
What Is The Easiest Way To Add Fonts In WordPress?
The easiest way is using a font plugin like Easy Google Fonts. It offers a user-friendly interface to select and apply fonts without coding. This method saves time and is perfect for beginners who want quick font customization.
Will Adding Fonts Affect My Website Speed?
Adding fonts can slightly impact load times if not optimized. Use only necessary font weights and formats. Host fonts locally or use fast CDN services like Google Fonts for better performance and faster page loading.
Conclusion
Adding fonts to your WordPress theme is simple and quick. Choose fonts that match your website style. Use plugins or manual code to add them easily. Test your site to see how fonts look on different devices. Changing fonts can improve your site’s readability and appeal.
Keep your font choices clear and consistent. This helps visitors enjoy your content more. Try different fonts to find what fits best. Your website will look more professional and inviting. Don’t forget to back up your site before making changes.
Enjoy customizing your WordPress site with new fonts!


