
Are you looking to supercharge your WordPress website with powerful insights about your audience’s behavior? Adding Facebook Pixel to your WordPress theme might just be the game-changer you need.
Imagine understanding exactly how visitors interact with your site and using that information to enhance your marketing strategies. With Facebook Pixel, you can track user actions and optimize your ad campaigns like never before. In this guide, we’ll walk you through the simple steps to seamlessly integrate Facebook Pixel into your WordPress theme.
Whether you’re a seasoned marketer or just starting out, this easy-to-follow process will empower you to unlock valuable data and drive your business growth. Ready to dive in and see how this powerful tool can elevate your digital presence? Let’s get started!
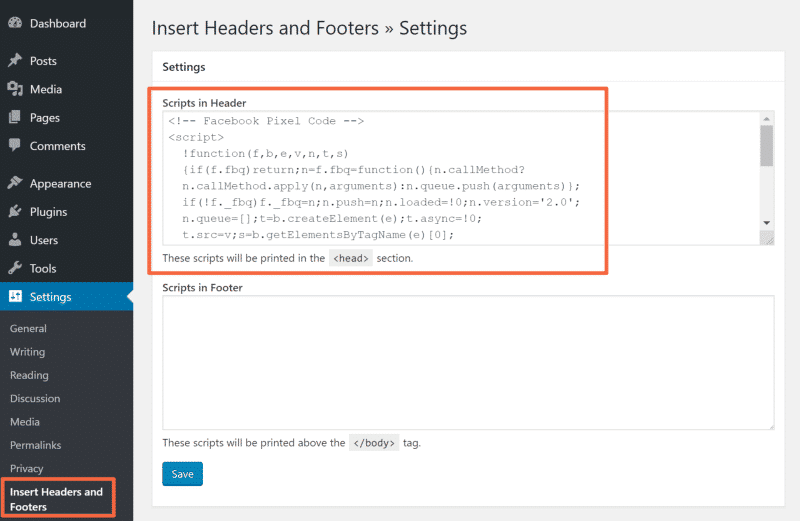
Credit: wp-rocket.me
What Is Facebook Pixel?
Facebook Pixel is a small piece of code. It helps track visitors on your website. This tool helps in understanding user behavior. It tells which pages they visit. It also shows how long they stay. This information is crucial for targeted ads.
Businesses use Facebook Pixel for better marketing. It helps in creating more effective ads. These ads reach the right audience. This results in better return on investment. Facebook Pixel is essential for online marketing success.
Credit: themeisle.com
Benefits Of Using Facebook Pixel
Understanding audience becomes easier. Facebook Pixel helps track visitor actions. This tracking allows for better ad targeting. Conversion rates improve with precise targeting. Ad performance can be measured effectively. This helps in making data-driven decisions. Budget optimization is possible with accurate data. Facebook Pixel provides insights into user behavior. Retargeting ads become more efficient. These ads remind users of your site. Boosts brand visibility and awareness. Custom audiences can be created. Tailor ads to specific users. Track actions like page views and cart activity. Analyzing this data is crucial. Marketing strategies can be refined with this information.
Creating A Facebook Pixel
Start by logging into your Facebook account. Go to the Facebook Ads Manager. Find the “Pixels” option in the Events Manager. Click on it. Then, click on the “Create a Pixel” button. This will open a new window. Enter a name for your pixel. Use a name that is easy to remember. Click “Continue” to proceed. Next, you will see some options to connect your pixel. Choose the most suitable one for your needs.
Facebook will provide a pixel code. This code is very important. You will add it to your WordPress theme later. Keep this code safe. Do not share it with others. You are now ready to move to the next step.
Accessing Your Facebook Pixel Code
First, visit your Facebook Ads Manager account. Look for the menu icon at the top. Click it and find the option labeled Pixels. Choose the pixel you need. You will see a button that says Set Up. Click it to open a new window.
A pop-up will show your unique pixel code. Copy this code carefully. This code is vital for tracking users on your site. Keep this code safe. You will paste it into your WordPress theme later.
If there are issues, check Facebook’s help section. They offer guides and support for pixel setup. Always ensure you are logged into the correct account.
Adding Pixel To WordPress With A Plugin
Select a plugin that suits your needs. WordPress has many options. Look for plugins with good reviews. Check if it gets updated often. This ensures it works well. Popular plugins often have great support.
Begin by downloading the plugin. Upload it to your WordPress site. Find it in your dashboard. Activate the plugin. This makes it ready to use. Follow the instructions. They are usually simple.
Go to settings in your dashboard. Find the plugin settings. Enter your Facebook Pixel ID. Adjust other settings if needed. The plugin will guide you. Save changes to apply settings.
Manually Adding Pixel Code To WordPress Theme
Access your WordPress dashboard and navigate to Appearance. Click on Theme Editor. Locate the header.php file on the right side. This file controls the header section. Be cautious while editing it.
Find the tag in the code. This is where the Facebook Pixel code goes. Paste your pixel code just before this tag. Make sure it’s the correct code.
Ensure your changes are saved. Click the Update File button. Now, the Facebook Pixel code is active on your site. Check your site to ensure it loads fine. The pixel tracks visitor actions effectively now.
Verifying Facebook Pixel Installation
The Facebook Pixel helps track site visits and conversions. After adding it to your WordPress theme, it’s important to ensure it’s working. Open your web browser and visit your site. Right-click on the page and select “Inspect”. You should see a panel with a tab called “Console”.
Look for the word “Pixel” in the console. If you see it, your pixel is installed correctly. Another way to check is using the Facebook Pixel Helper extension for Chrome. This tool shows if your pixel is active and working.
If the pixel is not working, retrace your steps. Ensure the code is correctly placed in the theme’s header. Double-check any settings or configurations on Facebook. Proper pixel installation is key for tracking and analysis.
Common Troubleshooting Tips
Check if your Facebook Pixel is working. Use the Pixel Helper tool. This tool helps find problems. Ensure the Pixel ID is correct. A wrong ID stops tracking. Inspect your theme code. Sometimes, mistakes happen. Look for missing script tags. These tags are important. Clear your browser cache. Old data can cause issues. Test your site again after changes.
Verify your WordPress plugins. Some plugins block pixels. Disable plugins one by one. Identify the plugin causing trouble. Update outdated plugins. New versions fix errors. Seek help from support forums. Many people face similar issues. Sharing solutions helps everyone.
Best Practices For Using Facebook Pixel
Facebook Pixel helps track visitor actions. It gives useful data. You can see which pages they like. This helps in improving your website. Use this tool to make better ads. Ads become smarter with data.
Install the Pixel code in the header. This ensures it loads on every page. Use a child theme for changes. This keeps the main theme safe. Always test the Pixel after adding it. Make sure it works.
Respect your visitor’s privacy. Inform them about the Pixel. Offer ways to opt-out. Keep their data safe. Following rules is important. This builds trust with users.

Credit: themeisle.com
Frequently Asked Questions
What Is Facebook Pixel In WordPress?
Facebook Pixel is a code you add to your WordPress site. It helps track user interactions and conversions. This data improves ad targeting and effectiveness. Installing Facebook Pixel is crucial for businesses that use Facebook ads to reach their audience.
It provides valuable insights into user behavior.
How Do I Install Facebook Pixel On WordPress?
To install Facebook Pixel, first, create your pixel in Facebook Ads Manager. Next, copy the pixel code. Then, access your WordPress theme editor. Paste the code into the header section. Save your changes to activate the pixel. Ensure it’s working using Facebook’s Pixel Helper tool.
Why Should I Use Facebook Pixel?
Facebook Pixel helps optimize ad campaigns by tracking user actions. It provides insights into audience behavior, enabling better targeting. This leads to increased conversions and improved ad spend efficiency. Businesses can tailor their ads based on user interactions, making them more relevant and effective.
Can I Verify Facebook Pixel Installation?
Yes, use Facebook’s Pixel Helper extension for Chrome. It checks if the pixel is installed correctly on your site. Install the extension, then visit your website. The tool will show if the pixel is active and working. It also highlights any errors or issues for troubleshooting.
Conclusion
Adding Facebook Pixel to your WordPress theme enhances tracking. This tool helps understand visitor actions. You can then optimize your content and strategies. The process is straightforward. Follow each step carefully to ensure success. Every click matters for better marketing insights.
Start small and build your knowledge. With consistent monitoring, you improve engagement. Effective tracking leads to smarter decisions. Always check your Pixel’s status regularly. Keep your theme updated for smooth operation. Learning is continuous. Stay informed with updates from Facebook.
Your site’s performance can improve with the right tools.


