
If you want to track your website visitors and boost your Facebook ads’ performance, adding the Facebook Pixel to your WordPress site is a must. But maybe you’re wondering how to do it without messing up your site or spending hours on complicated steps.
Don’t worry—you’re in the right place. You’ll learn exactly how to add the Facebook Pixel code to your WordPress site quickly and easily. By the end, you’ll have powerful insights to grow your business and make every ad dollar count.
Keep reading to unlock this game-changing tool!
What Is Facebook Pixel
Facebook Pixel is a small piece of code. It helps track visitors on your website. This tool collects data about user actions. It shows how people interact with your site.
Facebook Pixel helps improve ad targeting. It allows you to see who visits your pages. You can also track purchases or sign-ups. This data helps create better ads for your audience.
What Does Facebook Pixel Do?
The Pixel tracks user behavior on your site. It records actions like page views and clicks. You get insights about your visitors’ interests. This helps tailor your Facebook ads to real needs.
Why Use Facebook Pixel?
Using the Pixel improves your marketing results. You can measure ad performance clearly. It shows which ads bring visitors or sales. This helps save money by focusing on effective ads.
How Facebook Pixel Works
After adding Pixel code, it starts collecting data. It sends information back to Facebook in real time. Facebook uses this data to optimize your ads. It also helps create custom audiences for campaigns.
Credit: wp-rocket.me
Why Use Facebook Pixel On WordPress
Facebook Pixel helps you understand how visitors interact with your WordPress site. It tracks user actions to improve your marketing efforts. You get clear data on who visits, what they do, and when they leave.
This tool is essential for businesses wanting better online results. It shows which ads bring visitors and which pages perform best. You can target ads more precisely and save money on campaigns.
Enhance Ad Targeting
Facebook Pixel collects data on visitor behavior. It helps create audiences based on actions like clicks or purchases. This makes your ads reach the right people at the right time. Better targeting means higher chances of sales.
Track Conversions Accurately
Pixel lets you see which ads lead to sales or sign-ups. You can measure the return on investment for each campaign. This helps you spend advertising budget wisely and improve future ads.
Optimize Website Performance
Data from Pixel shows how users move through your site. You learn which pages cause visitors to leave early. Fixing these pages can keep users longer and increase sales or leads.
Retarget Visitors Easily
Pixel allows you to retarget users who visited but did not convert. You can show ads reminding them to return and complete an action. This increases the chance of turning visitors into customers.
Create A Facebook Pixel
Creating a Facebook Pixel is the first step to track visitors on your WordPress site. It helps you understand user actions and improve your ads.
The process is simple and takes only a few minutes. You do not need any special skills to set it up.
Create A Facebook Business Manager Account
Start by creating a Facebook Business Manager account. This tool manages your ad accounts and Pixels in one place.
Go to business.facebook.com and follow the sign-up steps. Use your Facebook personal account to log in.
Navigate To Events Manager
Inside Business Manager, find the Events Manager section. This is where you create and manage your Pixels.
Click the menu icon on the top left, then choose Events Manager from the dropdown list.
Create Your Pixel
Click the “Connect Data Sources” button and select “Web.” Then, choose “Facebook Pixel” and click “Connect.”
Give your Pixel a clear name. Add your website URL to link it to your WordPress site.
Get Your Pixel Code
After creating the Pixel, Facebook will provide a Pixel ID and code snippet. Copy this code carefully.
You will need this code to add the Pixel to your WordPress site later.
Credit: www.monsterinsights.com
Install Pixel Using A Plugin
Installing the Facebook Pixel using a plugin is an easy way to track your website visitors. You do not need to touch any code. Plugins handle the technical part for you. This method is perfect for WordPress users who want a quick setup.
Choose The Right Plugin
Several plugins help add Facebook Pixel to WordPress. Look for a plugin with good reviews and regular updates. Popular options include “PixelYourSite” and “Facebook for WordPress.” Pick one that fits your needs and is easy to use.
Install And Activate Plugin
Go to your WordPress dashboard. Click on “Plugins” then “Add New.” Search the plugin name you chose. Click “Install Now” and wait a few seconds. After installation, click “Activate” to enable the plugin.
Add Pixel Id In Plugin Settings
Open the plugin settings in your dashboard. Find the field for “Facebook Pixel ID.” Enter your Pixel ID from your Facebook Ads Manager. Save the settings. The plugin will now add the Pixel code to your website automatically.
Add Pixel Manually In WordPress
Adding the Facebook Pixel code manually in WordPress helps track visitors and improve ad targeting. This method works well for those who prefer direct control over their site’s code. It requires access to your theme files and a small snippet of code from Facebook.
Follow simple steps to insert the Pixel code in your site header. This ensures the pixel loads on every page and collects valuable data for your ads.
Access Theme Editor
Log in to your WordPress dashboard. Go to “Appearance” and then select “Theme Editor.”
Choose the theme you currently use from the right-hand side. Look for the “header.php” file in the list of theme files.
Before editing, back up your site to avoid any issues. Editing theme files directly can affect site performance if done incorrectly.
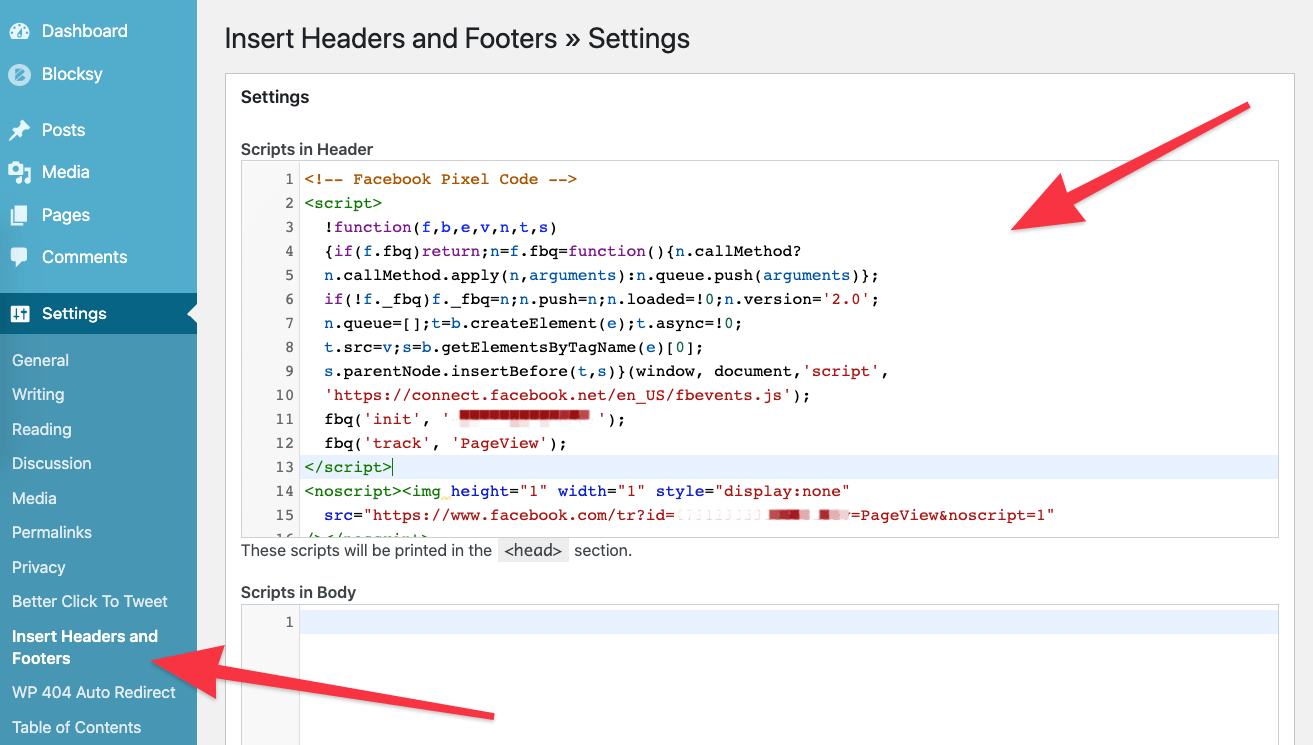
Insert Pixel Code In Header
Open the “header.php” file. Find the closing tag near the top.
Paste your Facebook Pixel base code just above this closing tag. Ensure the entire code snippet is inserted without changes.
This placement loads the pixel early, capturing visitor actions from the start.
Save And Publish Changes
Click the “Update File” button to save your changes. WordPress will now add the Facebook Pixel to all pages.
Clear any caching plugins or browser cache to see changes immediately. Test your pixel using Facebook’s Pixel Helper tool.
Manual insertion keeps your site lean and lets you control pixel placement precisely.
Credit: creativethemes.com
Verify Pixel Installation
After adding the Facebook Pixel code to your WordPress site, checking its installation is essential. This step ensures your pixel tracks visitors correctly. A working pixel helps you gather valuable data for ads and website analysis.
Use Facebook Pixel Helper Tool
The Facebook Pixel Helper is a free browser extension. It shows if your pixel is working on your website. Open your site in Chrome, then click the extension icon. It will display the pixel status and any errors. This tool highlights pixel activity and helps fix problems fast.
Check Pixel Status In Events Manager
Go to Facebook Events Manager to see detailed pixel data. Here, you can check if your pixel is active and sending events. The dashboard shows recent activity and any warnings. Confirming pixel status in Events Manager gives you peace of mind that tracking works properly.
Track Key Events With Pixel
Tracking key events with Facebook Pixel helps you understand user actions on your website. These actions include purchases, sign-ups, and page views. Knowing these events improves your ad targeting and campaign results. Facebook Pixel captures this data by using events. Events tell Facebook what users do after clicking your ads. Setting up events correctly is important for accurate tracking and better marketing decisions.
Set Up Standard Events
Standard events are predefined actions Facebook recognizes automatically. Examples include Add to Cart, Purchase, and Lead. You can add these events by inserting specific code snippets into your WordPress site. Use plugins or manually edit your theme files to place the code where the event happens. This setup allows Facebook to track common actions without extra work. Make sure the event code matches the action users take on your site. This helps Facebook collect useful data for your ads.
Create Custom Conversions
Custom conversions track specific user actions beyond standard events. You define these actions based on URL visits or parameters. For example, track visits to a thank-you page after form submission. Create custom conversions in Facebook Events Manager. Enter the URL or event data to set the rule. Custom conversions provide flexibility to measure unique goals. They help you see how well your ads drive important actions. Use clear names and descriptions to keep your conversions organized.
Troubleshoot Common Issues
Adding the Facebook Pixel code to WordPress may cause some issues. These problems can stop your pixel from tracking data correctly. Troubleshooting common issues helps fix errors fast. It also ensures your pixel works well for your ads and site analytics.
Pixel Not Firing
The pixel may not fire if the code is not placed correctly. Check that you added the pixel code to the header section of your WordPress site. Some themes or plugins block scripts in the header. Disable conflicting plugins to see if the pixel starts working.
Clear your browser cache and test the pixel using Facebook’s Pixel Helper tool. The tool shows if the pixel fires on your pages. Also, confirm your pixel ID matches the one in your Facebook Events Manager. Small typos can stop the pixel from working.
Duplicate Pixel Problems
Duplicate pixel code means the pixel runs twice on the same page. This causes inaccurate data and inflated event counts. Check your site’s source code to find repeated pixel scripts. Remove extra copies from plugins or theme files.
Using multiple plugins that add the pixel can cause duplication. Use only one method to add the pixel code. Test your site with the Facebook Pixel Helper to ensure only one pixel is active. Fixing duplicates improves your tracking accuracy.
Frequently Asked Questions
What Is Facebook Pixel And Why Use It On WordPress?
Facebook Pixel is a tracking code that collects data on website visitors. It helps improve Facebook ad targeting and measure campaign effectiveness on WordPress sites.
How Do I Install Facebook Pixel In WordPress Manually?
To install manually, copy the Pixel code from Facebook Events Manager. Paste it into the header.php file before the closing tag in your WordPress theme.
Can I Add Facebook Pixel Using WordPress Plugins?
Yes, plugins like “PixelYourSite” or “Facebook for WordPress” simplify Pixel installation. They allow easy setup without editing code.
How To Verify If Facebook Pixel Works On WordPress?
Use Facebook Pixel Helper Chrome extension to check Pixel status. It shows if the Pixel fires correctly on your WordPress pages.
Conclusion
Adding Facebook Pixel to WordPress helps track website visitors easily. It lets you see how people interact with your site. This data guides you to improve ads and grow your business. The process is simple and takes just a few steps.
Once set up, you can start collecting valuable insights right away. Keep your pixel updated to ensure accurate tracking. Start using this tool today to better understand your audience and improve your marketing results.


