
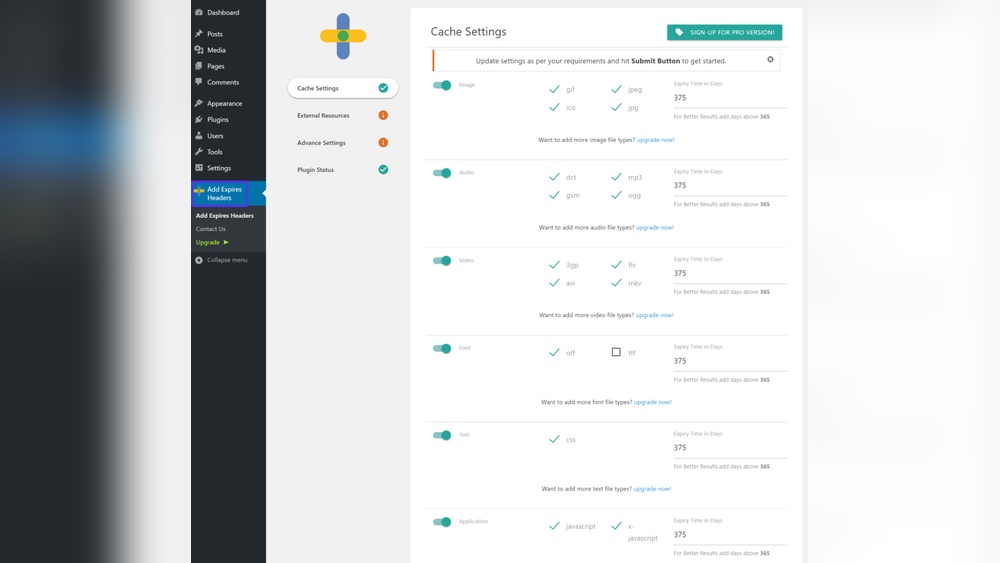
If your WordPress site feels slow or your visitors leave too quickly, adding expires headers can be a game-changer. You might wonder what expires headers are and why they matter.
Simply put, they tell browsers how long to keep certain files, like images and scripts, saved before downloading them again. This means faster loading times for your visitors and better performance for your site. In this post, you’ll learn exactly how to add expires headers in WordPress, step by step, so your site runs smoother and keeps visitors coming back.
Let’s dive in and boost your site’s speed together!
Why Expires Headers Matter
Expires headers are important for managing how browsers cache your website files. They tell browsers how long to keep images, scripts, and styles before checking for updates. This small setting can greatly improve your website’s speed and performance. Understanding why expires headers matter helps you see their value in WordPress sites.
Impact On Page Load Time
Expires headers reduce the number of requests to your server. Browsers load cached files instead of downloading them again. This makes your pages load faster for returning visitors. Faster load times keep visitors on your site longer and reduce bounce rates.
Effect On Seo Rankings
Search engines value fast websites. Sites with quick load times rank higher in search results. Using expires headers can improve your site’s loading speed. This boost can help your site appear above competitors in Google rankings.
User Experience Benefits
Visitors expect quick access to your content. Slow websites cause frustration and lost visitors. Expires headers help pages load quickly and smoothly. This creates a better experience and encourages users to return.
Expires Headers Basics
Expires headers are a key part of website speed and performance. They tell browsers how long to keep files like images, CSS, and JavaScript before fetching new versions. This helps reduce loading times for repeat visitors. Understanding the basics of expires headers is important to optimize your WordPress site effectively.
What Are Expires Headers
Expires headers are instructions sent from the server. They tell the browser when a file should be considered old. The browser stores files locally until the expiration time passes. This prevents repeated downloads of the same files. It saves bandwidth and speeds up page loading.
How Browsers Use Them
Browsers check expires headers each time a page loads. If the file is still fresh, the browser uses the local copy. If the file expired, the browser asks the server for a new version. This process helps avoid unnecessary network requests. It makes websites feel faster to users.
Common Expiry Timeframes
Expiry times depend on the file type and update frequency. Images and fonts often have long expiry times, like one month or more. CSS and JavaScript files might have shorter times, such as one week. Setting appropriate expiry times balances speed with fresh content. Choose times based on how often you update your files.
Check Current Expires Headers
Checking the current expires headers on your WordPress site helps you understand how your browser caching is set up. This step shows whether your site tells browsers how long to keep files like images, scripts, and stylesheets. Knowing this helps improve your site speed and user experience.
You can check expires headers using simple tools. These tools show if your site uses expires headers and how long the expiration time is set. This section explains how to check using browser tools and online testers, and how to read the results.
Using Browser Developer Tools
Open your website in a browser like Chrome or Firefox. Press F12 to open Developer Tools. Click the “Network” tab and reload the page. Click on any file, like an image or script. Look at the “Headers” section. Find the “Expires” or “Cache-Control” header. This shows the expiration time set for that file.
Online Testing Tools
Use free tools like GTmetrix, Pingdom, or WebPageTest. Enter your website URL and run the test. These tools scan your site files and report expires header status. They highlight files without expires headers and suggest improvements. This method is quick and easy for beginners.
Interpreting Results
Expires headers tell browsers how long to keep files. A future date means files are cached for that time. No expires header means browsers reload files every visit. Longer cache times improve speed but may delay updates. Use results to adjust your expires headers wisely.

Credit: www.youtube.com
Add Expires Headers Via .htaccess
Adding expires headers via the .htaccess file helps speed up your WordPress site. It tells browsers how long to keep files before asking for new ones. This reduces load time and saves bandwidth. Editing the .htaccess file is a simple way to set these headers on your server.
The process involves locating the .htaccess file in your WordPress root folder and adding code that defines expiry times for different file types. This method works well with Apache servers and improves user experience by making your site faster.
Locate And Edit .htaccess File
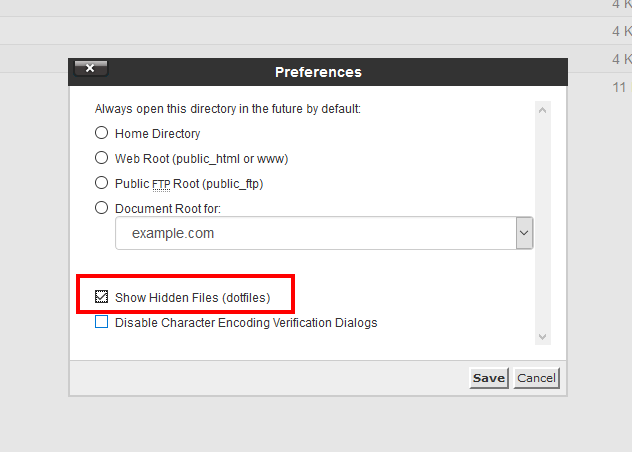
Find the .htaccess file in your WordPress root directory. Use an FTP client or file manager in your hosting control panel. The file may be hidden, so enable “show hidden files” if needed. Always create a backup before editing to avoid errors. Open the file with a plain text editor to make changes.
Sample Code For Common File Types
Add the following code inside the .htaccess file to set expires headers:
ExpiresActive On ExpiresByType image/jpg "access plus 1 year" ExpiresByType image/jpeg "access plus 1 year" ExpiresByType image/gif "access plus 1 year" ExpiresByType image/png "access plus 1 year" ExpiresByType text/css "access plus 1 month" ExpiresByType text/javascript "access plus 1 month" ExpiresByType application/javascript "access plus 1 month" ExpiresByType application/pdf "access plus 1 month" ExpiresByType application/x-shockwave-flash "access plus 1 month" ExpiresByType image/x-icon "access plus 1 year" This code sets different expiry times for images, CSS, and JavaScript files. Adjust the times as needed for your site.
Testing Changes
After saving the .htaccess file, test your changes. Use online tools like GTmetrix or Pingdom to check expires headers. You can also check in your browser’s developer tools under the network tab. Look for the “expires” or “cache-control” headers. Confirm they match the times you set. Clear your browser cache to see fresh results.
Use WordPress Plugins
Using WordPress plugins is a simple way to add expires headers on your site. Plugins handle technical tasks without coding. They make your site faster and improve user experience. Many plugins offer easy setup to control browser caching and expires headers.
Top Plugins For Expires Headers
Several plugins help set expires headers quickly. WP Rocket is popular for caching and performance. W3 Total Cache offers detailed control over expires headers. Another choice is Hummingbird, which improves speed and caching. These plugins support expires headers by setting expiration times for files.
Setup And Configuration
After installing, go to the plugin’s settings page. Find the section for browser caching or expires headers. Enable the feature and select expiration times for images, CSS, and JavaScript files. Save changes and clear your cache. Some plugins apply settings automatically. Always check your site speed after setup.
Pros And Cons Of Plugins
Plugins simplify expires headers setup with no coding needed. They save time and reduce errors. Some plugins offer extra tools for site speed. But plugins can slow your site if too many are active. They may conflict with other plugins or themes. Always choose trusted plugins and update regularly.
Add Headers With Functions.php
Adding expires headers in WordPress helps speed up your site. It tells browsers how long to keep files before checking for new ones. One way to add these headers is by editing the functions.php file. This method uses custom code to set expiration times for different file types.
Editing functions.php is a direct way to control headers. It works well for those who want a simple, plugin-free solution. This method can improve loading times and reduce server load by controlling caching.
Custom Code Snippets
You can add code snippets to set expires headers for images, CSS, and JavaScript files. The code uses PHP to send expiration rules in HTTP headers. For example, you can set images to expire after one month. This tells browsers to keep images in cache for 30 days.
Here is a simple snippet example you can use:
function add_expires_headers() { header('Expires: ' . gmdate('D, d M Y H:i:s', time() + 2592000) . ' GMT'); // 30 days } add_action('send_headers', 'add_expires_headers');Where To Add Code
The best place to add code is the active theme’s functions.php file. You can find this file inside your theme folder. Use a child theme to avoid losing changes during updates. Access the file via WordPress dashboard or FTP.
Paste the code at the end of the file. Save changes and clear your browser cache. Then check if headers are working using online tools like GTmetrix or WebPageTest.
Ensuring Compatibility
Test your site after adding code to avoid conflicts. Some plugins or server settings may override expires headers. Check for errors or broken features on your site. If problems occur, disable the code or restore the original functions.php.
Use simple, tested snippets for best results. Always backup your site before editing any files. This keeps your site safe and easy to restore.
Combine With Other Speed Tips
Adding expires headers helps speed up your WordPress site. Combine this with other simple steps to boost performance further. These tips work well together for faster page loading.
Leverage Browser Caching
Browser caching stores site files on a visitor’s computer. This reduces the need to reload files on repeat visits. Set cache duration for images, CSS, and scripts. It lowers server load and speeds up the site.
Minify Css And Javascript
Minifying removes extra spaces and comments from code. This makes CSS and JavaScript files smaller. Smaller files load faster and improve user experience. Use plugins or tools to minify your site’s files easily.
Use A Content Delivery Network
A Content Delivery Network (CDN) stores your site files on servers worldwide. It delivers content from the nearest server to the visitor. This cuts down loading time, especially for global audiences. CDNs work well with expires headers for better speed.
Credit: blog.hubspot.com
Troubleshooting Common Issues
Troubleshooting common issues when adding expires headers in WordPress can save time and frustration. These problems may stop your headers from working as expected. Knowing how to fix them helps your site load faster and improves user experience.
Headers Not Applying
Expires headers might not apply due to incorrect code placement. Make sure you add the code in the right file, such as the .htaccess file for Apache servers. Clear your browser cache to see changes. Use online tools to check if headers are active. Sometimes, a simple restart of the server helps.
Conflicts With Caching Plugins
Caching plugins may override expires headers settings. Disable all caching plugins temporarily to test if headers apply. Check plugin settings for options about expires headers. Some plugins offer built-in controls for cache expiry. Adjust these settings carefully to avoid conflicts.
Server Configuration Limits
Server settings can block expires headers from working. Shared hosting may have restrictions on modifying .htaccess or server files. Contact your hosting provider for help. Use server logs to find errors related to headers. Switching to a different server or plan might solve this issue.

Credit: kinsta.com
Frequently Asked Questions
What Are Expires Headers In WordPress?
Expires headers tell browsers how long to cache files. They improve site speed by reducing server requests. In WordPress, adding expires headers helps load pages faster and enhances user experience by storing static content locally.
How Do Expires Headers Improve WordPress Speed?
Expires headers reduce repeated file downloads. This cuts server load and speeds up page loading. WordPress sites with expires headers deliver content faster, boosting SEO rankings and visitor retention through improved performance.
Can I Add Expires Headers Without Plugins?
Yes, you can add expires headers via. htaccess or server config. Editing these files requires care to avoid errors. This method is lightweight and avoids extra plugin load on WordPress sites.
Which Files Should Have Expires Headers Set?
Set expires headers for images, CSS, JavaScript, and media files. These static resources benefit most from caching. Properly setting expiry times reduces bandwidth and improves WordPress site speed.
Conclusion
Adding expires headers in WordPress helps your website load faster. It tells browsers when to keep files stored. This reduces the number of requests to your server. Visitors enjoy smoother and quicker browsing experiences. You can add headers using plugins or by editing files.
Choose the method that fits your skill level best. Keep your site updated to maintain good speed and performance. Fast sites keep visitors happy and improve search rankings. Start adding expires headers today for better website speed.



