
Ever landed on a website and been captivated by its striking typography? That’s the power of custom fonts.
They can transform a mundane site into something truly memorable. If you’re eager to give your WordPress theme a unique twist, adding a custom font is an excellent step. But where do you start? The good news is, it’s simpler than you might think.
Imagine your website standing out, leaving a lasting impression on every visitor. By the end of this article, you’ll have the tools and know-how to make that happen. Ready to enhance your site’s visual appeal and make it unmistakably yours? Let’s dive in and unlock the secrets to adding that perfect custom font to your WordPress theme.

Credit: www.youtube.com
Choosing The Right Font
Picking a font is important. Fonts give your site a unique look. Choose a font that matches your brand. A playful site might need a fun font. A serious site needs a more formal font. Think about your audience too. Make sure the font is easy to read. Some fonts look cool but are hard to read.
Many websites offer fonts. Google Fonts is free and popular. It has many options. Adobe Fonts gives high-quality fonts. You need an account to use it. Font Squirrel is another good choice. It offers free fonts for many uses.
Preparing Font Files
Fonts come in different formats like TTF, OTF, and WOFF. Each format works differently with browsers. TTF and OTF are standard but might not support older browsers. WOFF is web-friendly and often recommended. Check your theme’s compatibility with these formats. Compatibility ensures the font displays correctly across devices.
Download font files from trusted sources. Keep all files organized in a separate folder. Name folders clearly for easy access. This helps in locating files quickly. Organizing files saves time during installation. Messy folders can cause confusion later.
Uploading Fonts To WordPress
Log into your WordPress dashboard. Go to Appearance and click on Customize. Look for the Fonts or Typography section. Here, you can add a custom font. Click on Add Font and upload your font file. Supported formats include .ttf and .otf. Save your changes and check your site. The new font should be visible now.
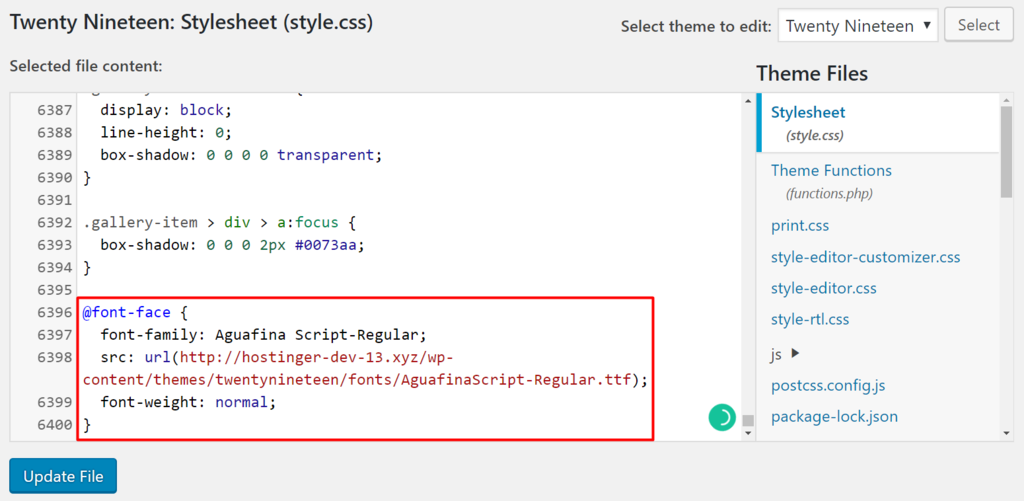
Open your FTP client. Connect to your website server. Navigate to the wp-content/themes directory. Open your theme folder. Create a new folder named fonts. Upload your font files here. Next, open the style.css file. Add a @font-face rule to link your font. Specify the font-family and src attributes. Save changes and refresh your site.
Credit: www.hostinger.com
Editing Theme’s Css
To add a custom font to your WordPress theme, edit the theme’s CSS file. First, upload the font files to your server. Then, include the font in your CSS with the @font-face rule. Finally, apply the font to elements by specifying it in the CSS font-family property.
Locating The Stylesheet
First, open the WordPress dashboard. Go to Appearance and click on Theme Editor. Look for the file named style.css. This is the stylesheet. It controls how your site looks. Make sure you have permission to edit it. Always backup your files before changes. This keeps your site safe.
Adding Custom Font Code
Find a custom font you like. Use Google Fonts or another site. Copy the font’s link or @import code. Go back to the style.css file. Paste the link in the header section. Use the font-family property to apply the font. Make sure to save your changes. Now, check your site. The new font should show up.
Using @font-face Rule
@font-face helps you use custom fonts. It is a CSS rule. First, declare the font. Use font-family to name it. Then, link to the font file. Use src to do this. You can link to a URL or a local file. Always provide a format. Use format('woff') or similar.
Embedding fonts in CSS is easy. Add the @font-face rule in your stylesheet. It should be at the top. This makes the font available throughout the site. You can then use the new font family in your elements. Just call it like any other font. Enjoy making your website unique!

Credit: www.youtube.com
Applying Fonts To Elements
Adding custom fonts to a WordPress theme enhances its visual appeal. Upload the font files to your server. Then, use CSS to apply fonts to specific elements. This process ensures a unique look, making your site stand out.
Targeting Specific Elements
To add a custom font to a specific element, use CSS. First, you need the font’s URL or file. Then, open your WordPress theme’s stylesheet. Use the @font-face rule to define the font. Next, target the element with a CSS selector. For example, h1 or p. Set the font-family to the custom font name. This changes the text style for only that element.
Using Custom Fonts Site-wide
To apply a custom font to the whole site, use a similar process. First, define the font with @font-face. Then, apply it to the body selector in your CSS. This makes the font the default for all text. Ensure the font is readable. Not too big or too small. Test on different screens to see how it looks. This ensures a consistent style everywhere on your site.
Testing And Troubleshooting
Easily add custom fonts to your WordPress theme by editing the style. css file. Troubleshoot common issues by checking file paths and ensuring proper syntax. This enhances your site’s appearance and user experience, making your content more engaging.
Checking Compatibility
Check if your custom font works with your theme. Some themes might not support all fonts. Try different themes to see what works. Use a preview mode to avoid mistakes. Always save changes before testing. This keeps your site safe.
Common Issues And Fixes
Fonts not showing? Check the file paths. Make sure they are correct. Clear your browser cache to see changes. Use a browser inspector tool. This helps identify CSS problems. If the font looks strange, check your CSS code. Ensure the font name is spelled correctly. Try another font format if needed.
Maintaining Font Performance
Adding custom fonts to a WordPress theme boosts aesthetic appeal and performance. Use @font-face in CSS to integrate fonts smoothly. Upload font files to your server, ensuring compatibility across browsers.
Optimizing Load Times
Fonts can slow down a website. Large font files take time to load. Use lightweight fonts for faster pages. Google Fonts are a great choice. They are fast and reliable. Compress font files for better speed. Smaller files load quicker. Keep your site snappy and responsive.
Monitoring Site Performance
Check your site’s speed regularly. Slow sites lose visitors. Use tools like Google PageSpeed Insights. They help find speed issues. Fix problems to keep your site fast. Monitor font load times closely. Adjust settings if needed. Ensure visitors have a smooth experience.
Frequently Asked Questions
How Do I Upload A Custom Font To WordPress?
To upload a custom font, access your WordPress dashboard. Navigate to “Appearance” then “Theme Editor. ” Locate the “style. css” file. Upload your font files to the “fonts” directory. Add CSS code to reference your font. Save changes and your font will be applied.
Can I Use Google Fonts In WordPress?
Yes, you can use Google Fonts in WordPress. Go to the Google Fonts website, select your desired font, and copy the provided link. Paste this link into your theme’s “header. php” file. Add CSS to apply the font to your site.
It’s easy and integrates seamlessly.
Why Doesn’t My Custom Font Display?
If your custom font doesn’t display, check the file path and format. Ensure the font files are uploaded correctly to the server. Verify the CSS code references the correct file path. Clear your browser cache and refresh the page. These steps usually resolve the issue.
What Are The Best Practices For Using Custom Fonts?
Best practices for using custom fonts include using web-safe formats like WOFF or WOFF2. Limit the number of custom fonts to optimize load times. Ensure cross-browser compatibility. Test the font’s readability on different devices. Following these practices ensures a smooth user experience.
Conclusion
Adding custom fonts to your WordPress theme enhances your site’s appearance. Unique fonts can make your website stand out. They offer a personal touch to your content. Remember, choose fonts that fit your brand and are easy to read. Test them on different devices to ensure compatibility.
This simple change can improve user experience significantly. With the steps provided, customizing fonts becomes straightforward. Enjoy the creative freedom and give your site a fresh look. Your audience will appreciate the effort and style. Keep experimenting and make your website visually appealing.


