
Are you looking to customize your WordPress website without losing your changes every time the theme updates? Adding a child theme might be your answer.
Think of it as a safety net for your design tweaks, allowing you to make modifications while preserving the original theme’s integrity. This approach not only protects your customizations but also keeps your site future-proof. In this guide, you’ll discover just how easy it is to create and add a child theme to your WordPress site.
Imagine having the freedom to experiment and enhance your site’s design, all while ensuring everything remains secure and update-friendly. Dive in to learn the simple steps that will empower you to take full control of your website’s appearance.
Credit: happyaddons.com
What Is A Child Theme
A child theme is a special theme in WordPress. It lets you change parts of a main theme without touching the main theme’s files. This keeps the original theme safe. Updates do not remove your changes. It’s a smart way to make a site unique.
Creating a child theme is simple. You need two files: style.css and functions.php. Style.css changes the look of your site. Functions.php adds new features. Make a new folder for your child theme. Add these files to the folder. Now you can start editing your child theme.
Always use a child theme for changes. This way, you keep your site updated and safe. It’s like a magic box for website design.

Credit: developer.wordpress.org
Benefits Of Using A Child Theme
A child theme keeps your website safe. It protects your work. Even during updates, your changes stay intact. This is a big plus. You can make changes without worry. Your main theme stays untouched. This means your site stays stable.
Using a child theme makes customization easier. It is a safe way to change your site. You can test new ideas. If something goes wrong, you can fix it easily. No need to redo everything. This saves time and stress.
A child theme helps with learning. You can see how the parent theme works. This helps you understand WordPress better. It is a good way to practice coding. You learn without breaking your site. This builds confidence.
Prerequisites For Creating A Child Theme
Creating a child theme needs some basic steps. First, you need a working WordPress site. The site should have a theme installed. The main theme is called the parent theme. Also, you need access to the WordPress files. This is done through a file manager or FTP. A simple text editor is also required. Programs like Notepad or TextEdit work well.
Basic knowledge of HTML and CSS is helpful. This helps in making changes to the child theme. It is important to backup your site before starting. This keeps your data safe.
Creating A Child Theme Folder
Start by opening your WordPress installation folder. Find the wp-content directory. Inside, locate the themes folder. Here, create a new folder for your child theme. Name it something related to your parent theme. This helps in identifying it easily later. Ensure the name is all lowercase without spaces. Use dashes if needed.
Inside this folder, you need two files. The first is style.css. The second is functions.php. These are important for your child theme to work. The style.css will hold your custom styles. The functions.php will include any extra functions you want. Make sure both files are empty when you start. You will add content to them next.
Adding A Stylesheet
Child themes need a special file. This file is called stylesheet. It helps control the look of your site. To add it, create a file named style.css. Place it in your child theme folder. It’s important to link this file to your theme. Use the enqueue function in your code. This tells WordPress to use your styles.
Start by opening your functions.php file. Add the code to enqueue the stylesheet. This code is simple. It has two parts: the first is the function name, the second is the file path. The function should be clear. It helps others understand your code. Always check the path is correct. This will ensure your styles appear as expected.
Creating A Functions File
To start, create a new file named functions.php. This file will be in the child theme folder. It helps to add custom functions. Use a plain text editor for this. Avoid using a word processor. Word processors add extra formatting. This can cause problems.
Inside functions.php, you can add PHP code. PHP code tells WordPress what to do. Always add <?php at the beginning. This tells the server it is PHP code. Make sure to save your changes. Then, upload the file to your child theme folder.
Remember, changes here won’t affect the parent theme. This keeps your main theme safe. Your changes will stay even after updates. So, using a child theme is very smart.
Activating The Child Theme
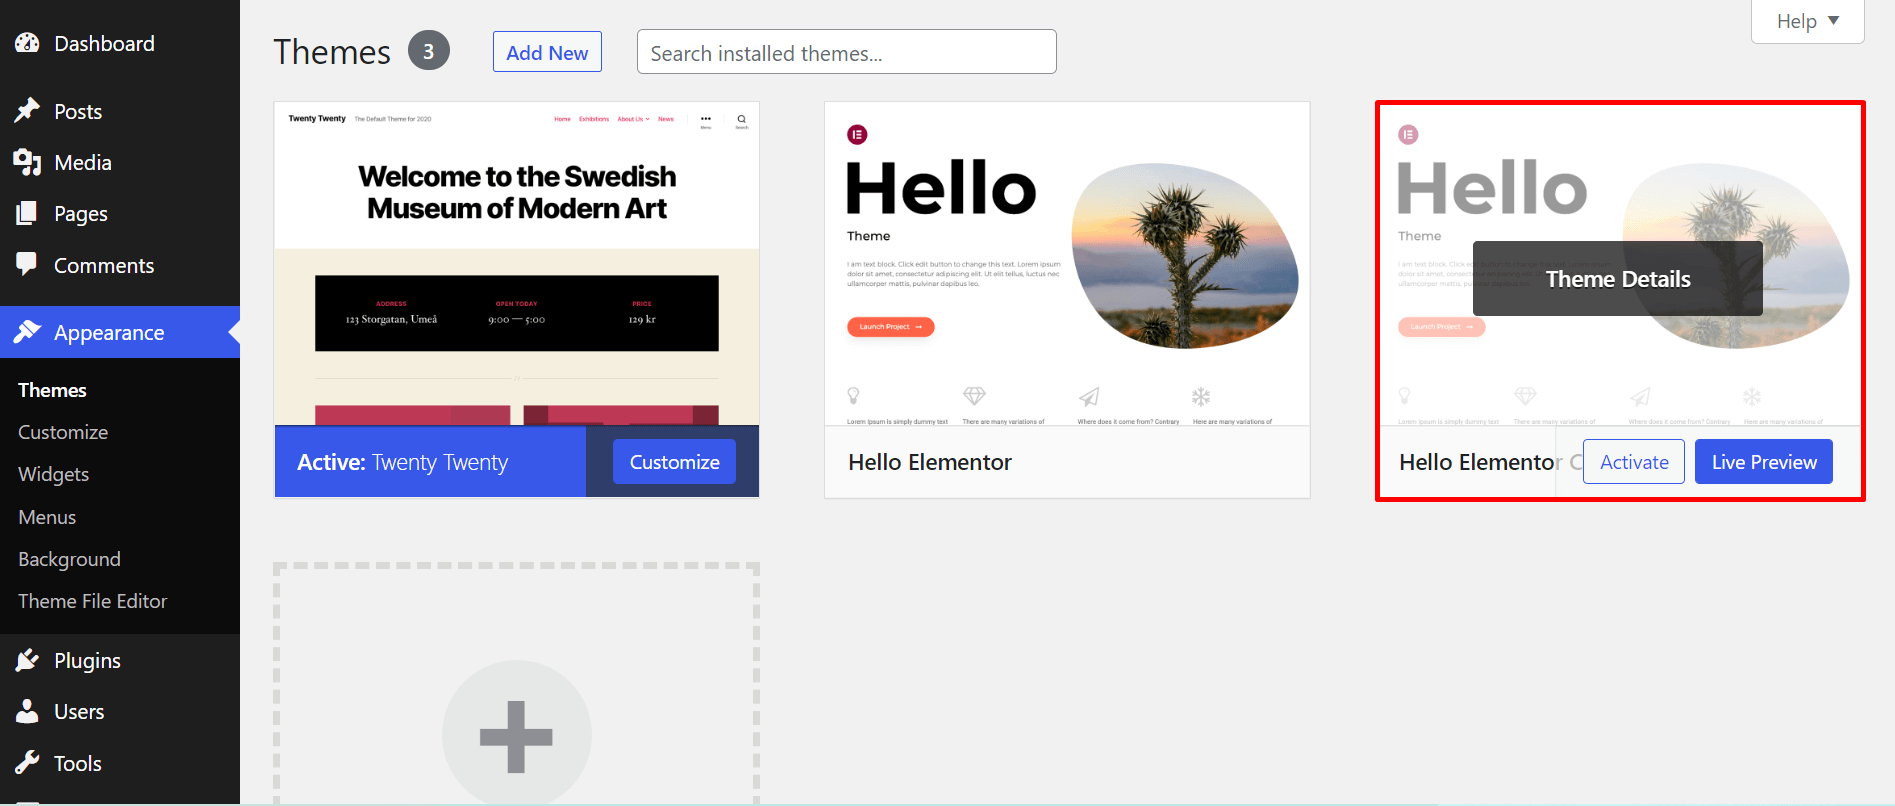
First, log into your WordPress dashboard. Find the Appearance section on the left side. Click on Themes. You will see a list of themes. Locate your child theme. Click on the Activate button. This makes the child theme active. It uses your parent theme’s features. The child theme lets you make changes safely. Your original theme stays the same. This way you can customize without risk. If things go wrong, you can switch back easily.
Check if your site looks good. Refresh your page to see changes. It is important to test your site. Make sure everything works correctly. Your site should look nice. If there are problems, you can adjust settings. Keep checking until everything is perfect.
Credit: elementor.com
Customizing The Child Theme
To change styles, edit the style.css file. This file is in the child theme folder. Add new styles or change existing ones. Use CSS rules to make changes. Save the file and check your website. New styles will show up.
Copy the template file from the parent theme. Paste it into the child theme folder. Change the file as needed. This keeps the parent file safe. Only the child theme file changes. Your website will use the child file instead.
Add custom code to the functions.php file. This file is in the child theme folder. Write your functions here. They add new features to your site. Save the file after adding the code. Check your site to see changes.
Testing The Child Theme
After creating a child theme, it’s important to test it. Open your WordPress dashboard. Navigate to Appearance and then Themes. You should see your new child theme listed there. If it is not there, check your files again.
Activate the child theme by clicking on the Activate button. Visit your website to see the changes. Ensure everything looks good. Check if your styles and functions are working. If something looks off, revisit your code. Ensure all files are correctly linked.
Testing helps find errors early. Fixing them now saves trouble later. A well-tested theme keeps your site running smoothly. Always back up before making big changes.
Troubleshooting Common Issues
Child themes can cause problems sometimes. The website might not look right. Styles may not apply as expected. This often happens if the parent theme updates. Always check if your child theme is active. Sometimes, changes are not visible because the browser cache. Clear the browser cache regularly. If styles still don’t show, check the functions.php file. Incorrect code can break the site. Ensure all paths and URLs are correct.
Plugins can cause conflicts too. Deactivate all plugins and see if issues resolve. Reactivate them one by one. This helps find the problem plugin. If the site is still broken, revert back to the parent theme. This helps identify if the child theme is the issue. Backup your site before making changes. This keeps your data safe.
Frequently Asked Questions
What Is A Child Theme In WordPress?
A child theme inherits styles and functions from a parent theme. It allows modifications without affecting the original theme. This is useful for customization while ensuring updates don’t overwrite changes. Child themes are ideal for maintaining design consistency and security.
Why Use A Child Theme In WordPress?
Using a child theme helps preserve customizations during parent theme updates. It allows easy experimentation without risking the main theme. Child themes enhance flexibility and protect your work, making site management more efficient.
How Do I Create A Child Theme?
Create a child theme by setting up a new directory in the themes folder. Include a style. css file with a header and import the parent theme’s styles. Add a functions. php file for custom functions. Activate the child theme via WordPress dashboard.
Can I Customize A Child Theme?
Yes, you can customize a child theme extensively. Modify styles, add custom functions, and tweak templates without affecting the parent theme. This enables unique design elements while maintaining the main theme’s integrity.
Conclusion
Creating a child theme in WordPress boosts site flexibility. You can customize without losing original designs. It ensures a safer update process. Avoid direct theme changes. Keep your website running smoothly with a child theme. This method protects your customizations.
It’s straightforward and beginner-friendly. Explore the endless possibilities of design tweaks. Your site remains unique and functional. Follow steps carefully for successful implementation. Enjoy the benefits of a more personalized WordPress experience. Happy designing!


