
Are you looking to make your online store easier to navigate and boost your sales? Adding a cart icon to your WordPress header is one of the smartest moves you can make.
It lets your visitors see their cart at a glance and speeds up the checkout process. You’ll learn simple, step-by-step methods to add a clear, clickable cart icon to your site’s header — no coding skills needed. Keep reading to discover how this small change can create a big impact on your user experience and sales.
Choose The Right Plugin
Choosing the right plugin is key to adding a cart icon in your WordPress header. The plugin affects how the cart looks and works. Pick one that fits your site’s needs and style. A good plugin makes your site easier to use and can increase sales.
Popular Cart Plugins
Several cart plugins work well with WordPress. WooCommerce is the most popular choice. It offers many features and is easy to customize. Another option is Easy Digital Downloads. It works great for selling digital products. WP Simple Cart is good for small stores. It is simple and fast to set up.
Plugin Compatibility
Check if the plugin works with your theme and WordPress version. Compatibility avoids errors and slow loading times. Make sure it supports your payment methods. Look for plugins that update often. Updated plugins keep your site secure and stable.
Credit: funnelkit.com
Install And Activate Plugin
Adding a cart icon to your WordPress header starts with installing and activating the right plugin. Plugins make it simple to add features without coding. Follow clear steps to install and activate the plugin properly. This ensures your cart icon works smoothly and looks great.
Plugin Installation Steps
First, log in to your WordPress dashboard. Go to the “Plugins” menu on the left side. Click on “Add New” to open the plugin search page. Type the name of the cart icon plugin in the search box. Find the plugin from the list and click “Install Now.” Wait a few seconds while WordPress downloads and installs the plugin. After installation, the “Install Now” button changes to “Activate.”
Activating The Plugin
Click the “Activate” button to enable the plugin on your site. Activation allows the plugin to work with your theme. Some plugins add a new menu item in the dashboard after activation. Check for any setup instructions or options to customize the cart icon. Save your settings to make sure the cart icon appears in the header. Your site is now ready to display the cart icon for your visitors.
Configure Cart Settings
Configuring your cart settings is key to a smooth shopping experience. This step lets you control how the cart icon looks and works on your site. Proper setup helps visitors find and use the cart easily. It also encourages more sales by making checkout simple.
Customize Cart Icon
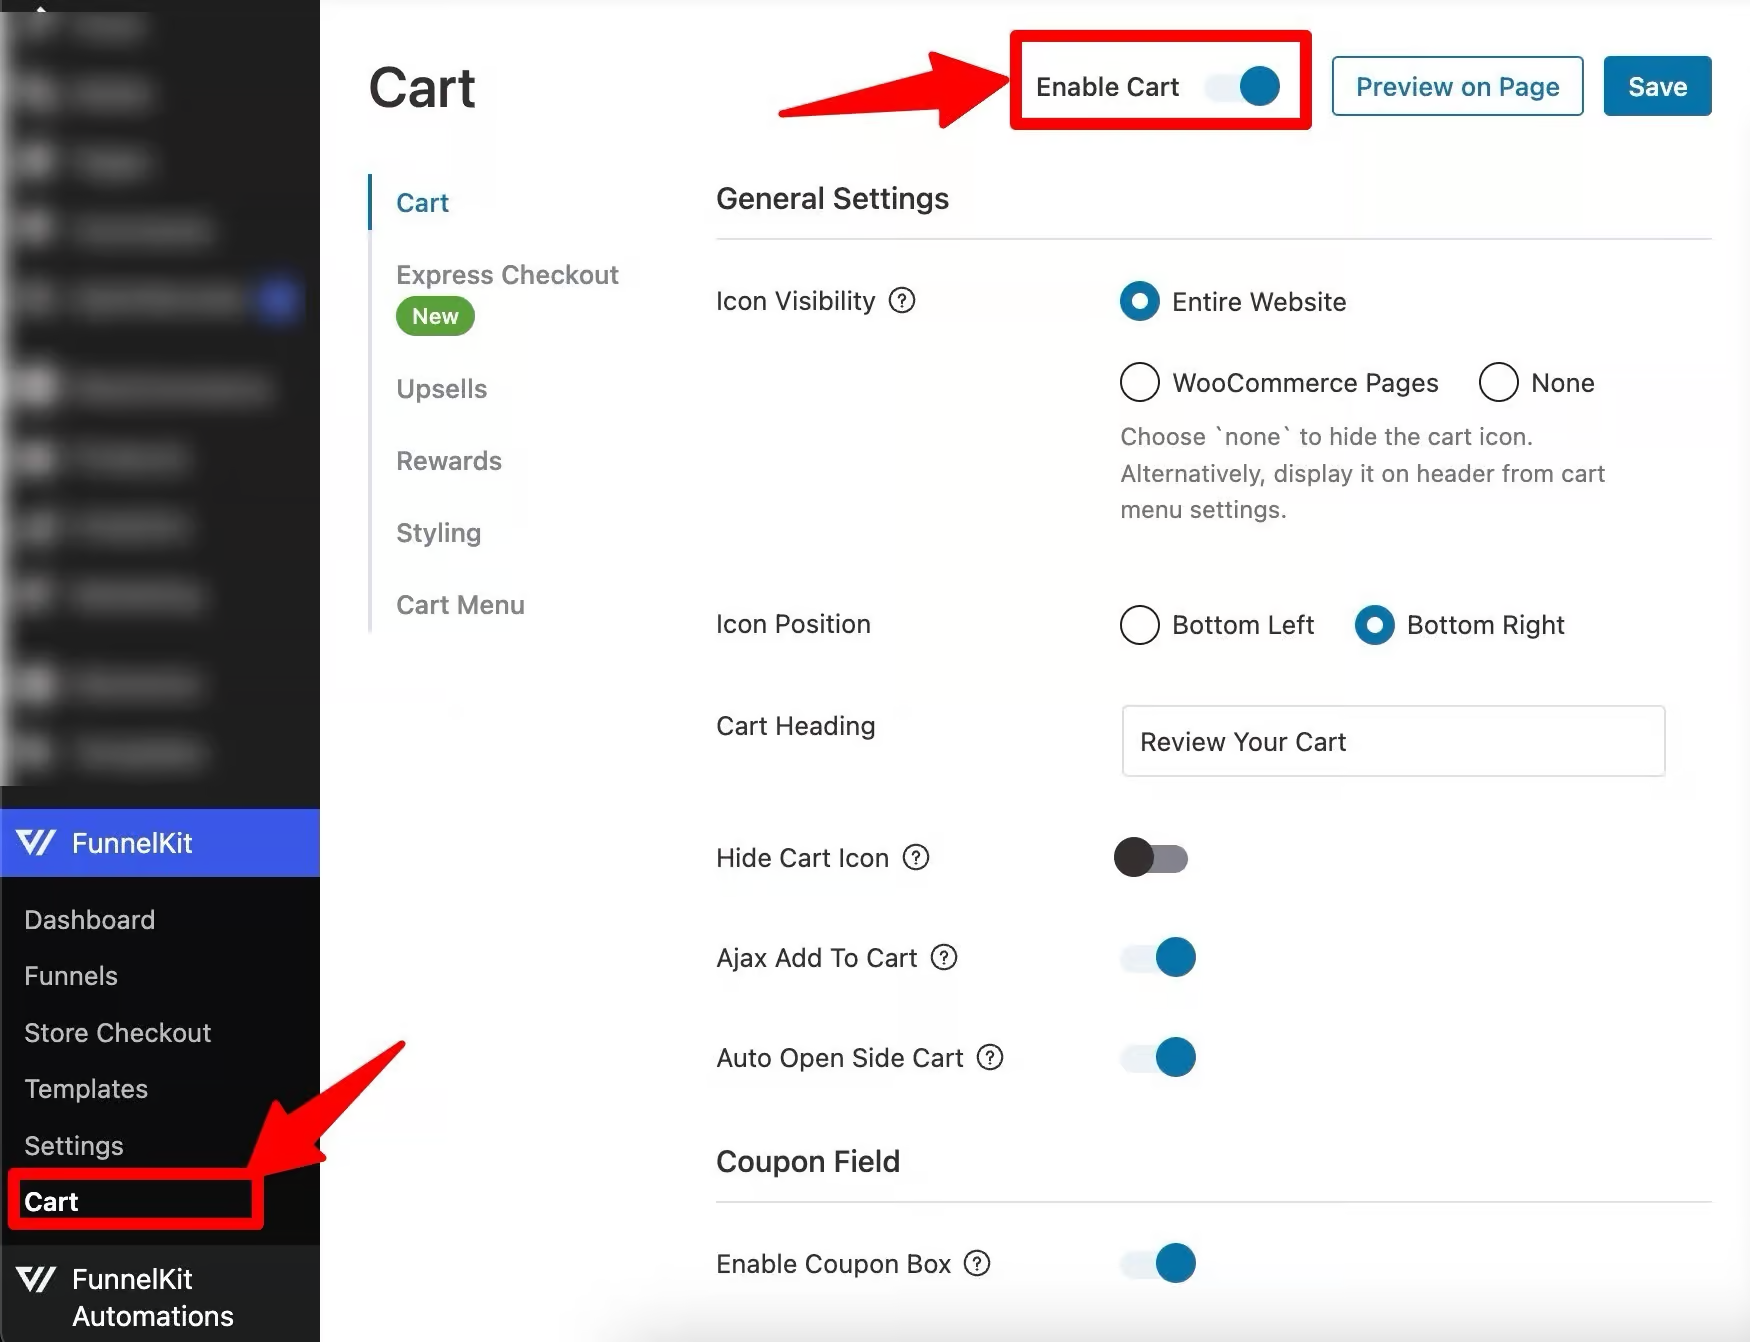
Choose the style of your cart icon to match your website theme. You can pick from different shapes, colors, and sizes. Some themes have built-in icons, or you can upload your own image. Make sure the icon stands out but does not distract visitors.
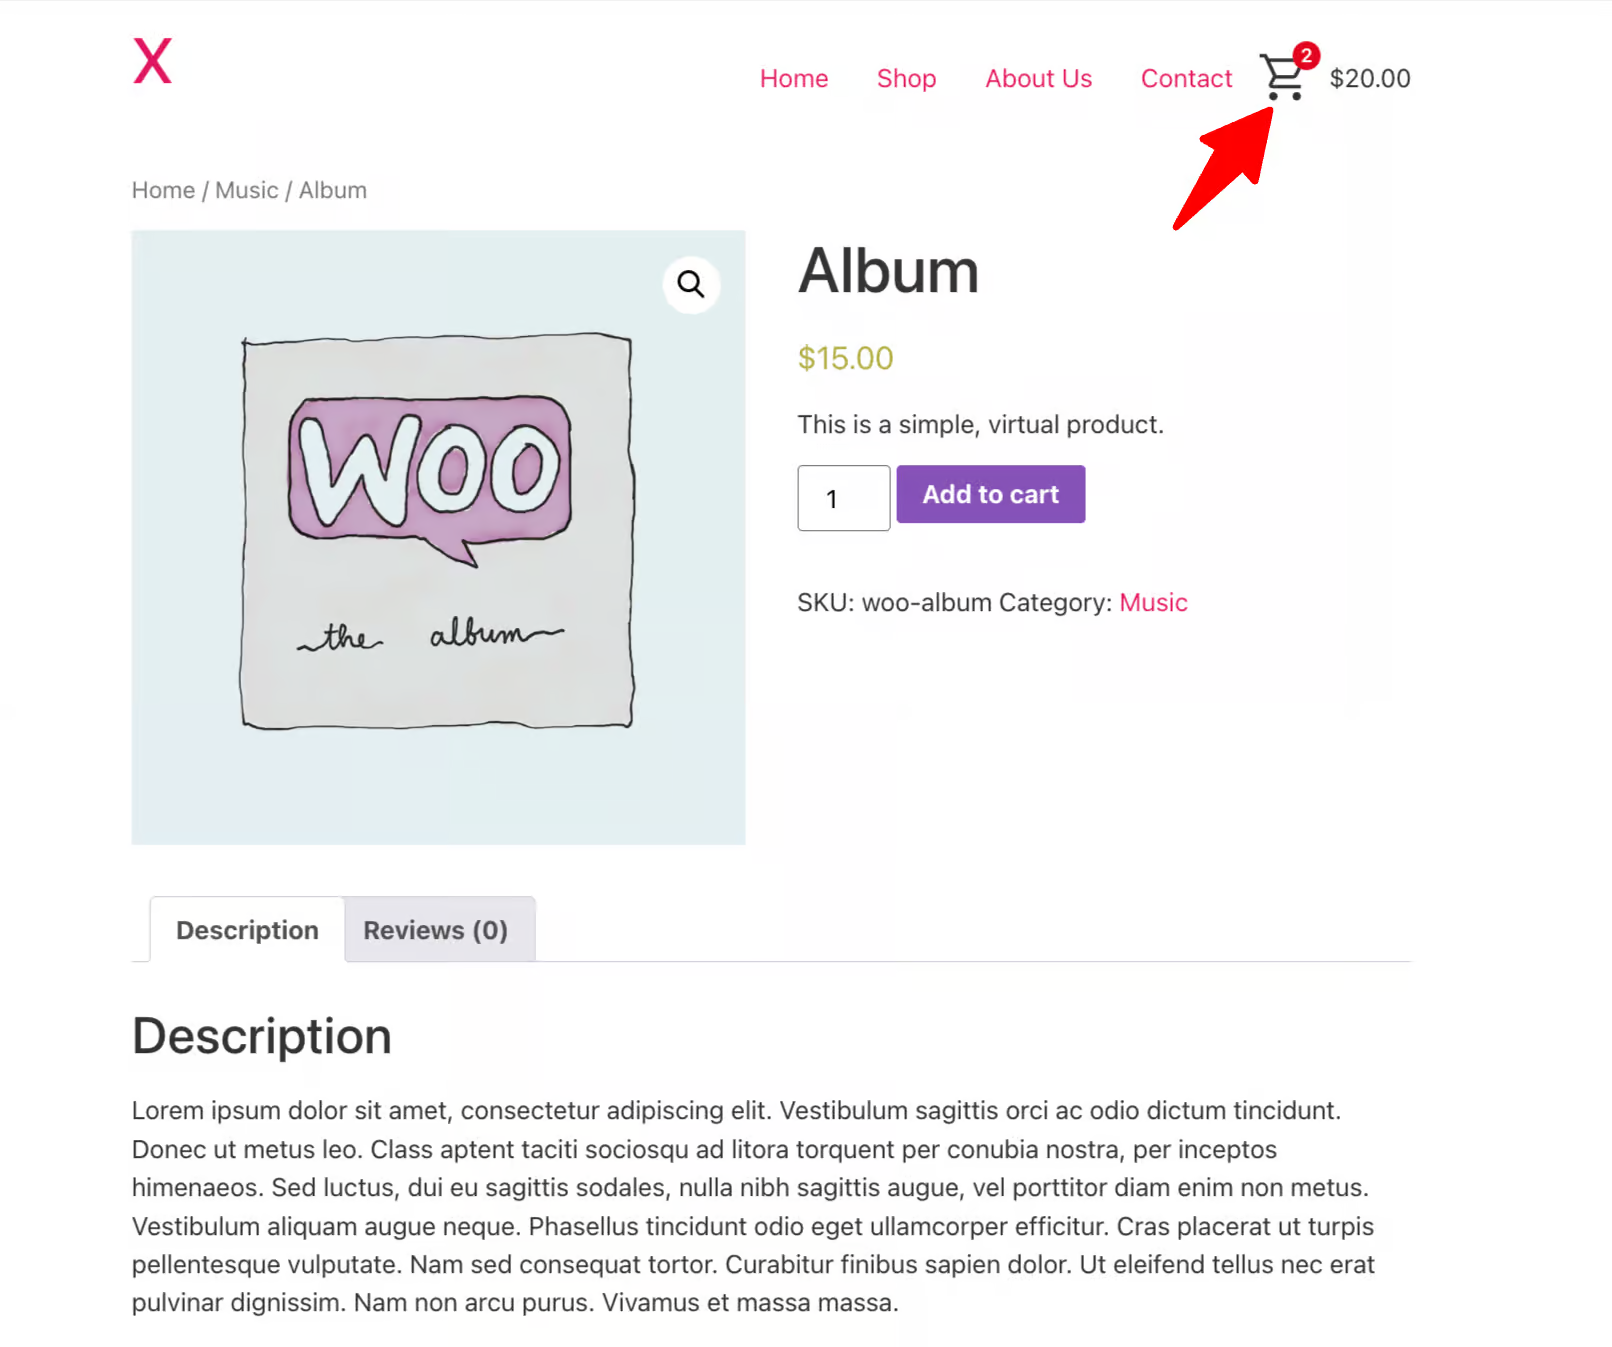
Adjust the icon position in the header. Common spots are the top right or left corners. Keep it visible on all pages for easy access. Some plugins allow you to add a small counter showing item numbers. This feature helps shoppers track their cart at a glance.
Set Cart Behavior
Decide what happens when users click the cart icon. You can link it to the cart page or open a mini cart dropdown. A dropdown keeps users on the current page, speeding up their shopping. The full cart page gives more details and options.
Choose if the cart updates automatically after adding items. Auto-updates save time and reduce confusion. Set the cart to show notifications or animations for better user feedback. These small touches improve the overall shopping flow.
Credit: funnelkit.com
Add Cart Icon To Header
Adding a cart icon to the header improves user experience on your WordPress site. Visitors can see their cart quickly. This makes shopping easier and faster. The cart icon also reminds users about items they want to buy.
There are simple ways to add this icon. You can use tools built into WordPress themes or add code manually. Both methods work well and suit different skill levels.
Using Theme Customizer
Many WordPress themes have a built-in option for the cart icon. Open your WordPress dashboard. Go to Appearance > Customize. Look for a section called Header or WooCommerce.
Find the setting to enable the cart icon. Turn it on with a single click. Save your changes. The cart icon will appear in the header automatically.
This method does not require coding. It is fast and safe. Great for beginners who want a quick solution.
Manual Code Integration
Adding the cart icon with code gives more control. You need basic knowledge of PHP and HTML. Access your theme’s header.php file through the WordPress editor or FTP.
Insert the WooCommerce cart code snippet inside the header area. Use this code: php echo do_shortcode('[woocommerce_cart_icon]'); ?. This will display the cart icon wherever you place it.
Save the file and refresh your site. The cart icon should now show in the header. This method allows customization of the icon’s position and style.
Test Cart Icon Functionality
Testing the cart icon functionality is important after adding it to your WordPress header. It ensures the icon works well and improves user experience. Proper testing helps avoid issues that may confuse visitors or stop them from buying.
This section explains how to check the cart icon visibility and verify cart operations. Follow these steps to confirm everything works as expected.
Check Icon Visibility
First, open your website on different devices like desktop and mobile. Look at the header to see if the cart icon shows clearly. Check if the icon size is right and matches your site design. Make sure it does not hide behind other elements or get cut off. Refresh the page several times to confirm the icon loads every time.
Verify Cart Operations
Next, add products to your cart and watch the cart icon update. Check if the item count changes correctly with each addition. Click on the cart icon to open the cart page or popup. Test removing items and see if the count decreases. Confirm the cart links lead to the right checkout page. These steps ensure the cart icon functions smoothly for users.
Troubleshoot Common Issues
Adding a cart icon to your WordPress header improves user experience. Sometimes, issues may arise with the icon or cart updates. Troubleshooting these common problems helps keep your site running smoothly. Here are simple fixes for frequent errors.
Icon Not Showing
Check if your theme supports cart icons in the header. Some themes need extra settings enabled. Clear your website cache after enabling the icon. Sometimes, caching stops changes from appearing.
Verify the icon code is correctly placed in the header file. Use a child theme to avoid losing changes after updates. Also, disable plugins one by one to find conflicts. One plugin may block the icon from showing.
Cart Not Updating
The cart icon may not update due to caching issues. Clear both browser and site cache regularly. Make sure your eCommerce plugin is up to date. Outdated plugins can cause sync problems.
Check AJAX settings in your cart plugin. AJAX allows the cart to update without page reloads. Disable caching for AJAX requests to ensure real-time updates. Test the cart on different devices and browsers to confirm the fix.
Optimize Cart Icon For Mobile
Optimizing the cart icon for mobile devices improves shopping ease. Mobile users expect fast access to their cart. A well-placed icon boosts user satisfaction. It helps users find their cart without hassle. This section covers key tips to optimize the cart icon for mobile.
Responsive Design Tips
Make the cart icon resize with the screen. Use relative units like percentages or em for size. Keep the icon large enough to tap easily. Avoid hiding the icon on smaller screens. Test the icon on different mobile devices. Ensure the icon stays visible and clear. Use CSS media queries to adjust icon placement.
Mobile User Experience
Place the cart icon where thumbs reach easily. Usually, the top right corner works best. Add a badge showing the number of items. This informs users without extra clicks. Use simple, clear icons that everyone understands. Avoid clutter around the icon to keep focus. Make sure the icon responds quickly to taps.

Credit: docs.presscustomizr.com
Frequently Asked Questions
How Do I Add A Cart Icon To My WordPress Header?
To add a cart icon, use a WooCommerce-compatible theme or plugin. Go to Appearance > Customize > Header and enable the cart icon option. Alternatively, use a shortcode or custom HTML in your header widget area.
Which Plugins Help Add Cart Icons In WordPress?
Popular plugins like WooCommerce, WP Menu Cart, and Cart Icon by WooCommerce help add cart icons easily. They offer customization options and integrate smoothly with most themes.
Can I Customize The Cart Icon In WordPress Header?
Yes, most themes and plugins allow customization. You can change the icon style, color, size, and position via theme settings or plugin options for a better user experience.
Is Adding A Cart Icon Important For Ecommerce Sites?
Yes, a cart icon improves navigation and user experience. It allows customers to quickly view their cart, boosting conversions and sales on your WordPress eCommerce site.
Conclusion
Adding a cart icon to your WordPress header helps visitors shop with ease. It makes your site look professional and user-friendly. You can follow simple steps to place the icon where it fits best. This small change improves the shopping experience and can boost sales.
Keep your site clear and easy to use for all visitors. Try adding the cart icon today and see the difference it makes.


