
Are you looking to make your WordPress menu stand out? Adding a button to your menu can grab your visitors’ attention and boost clicks on important links like “Contact,” “Buy Now,” or “Sign Up.” It’s a simple change that can make a big difference in how people interact with your site.
You’ll learn step-by-step how to add a stylish button to your WordPress menu—no coding skills needed. Keep reading, and by the end, you’ll have a menu that not only looks great but also drives action from your visitors.
Choose The Right Menu
Selecting the correct menu is key before adding a button in WordPress.
Each WordPress theme can have multiple menus for different areas.
Pick the menu that fits your site layout and user needs.
Select The Primary Menu
The primary menu usually appears at the top of your site.
It holds the main navigation links visitors use most.
Adding a button here makes it easy to highlight important actions.
Check Theme Menu Locations
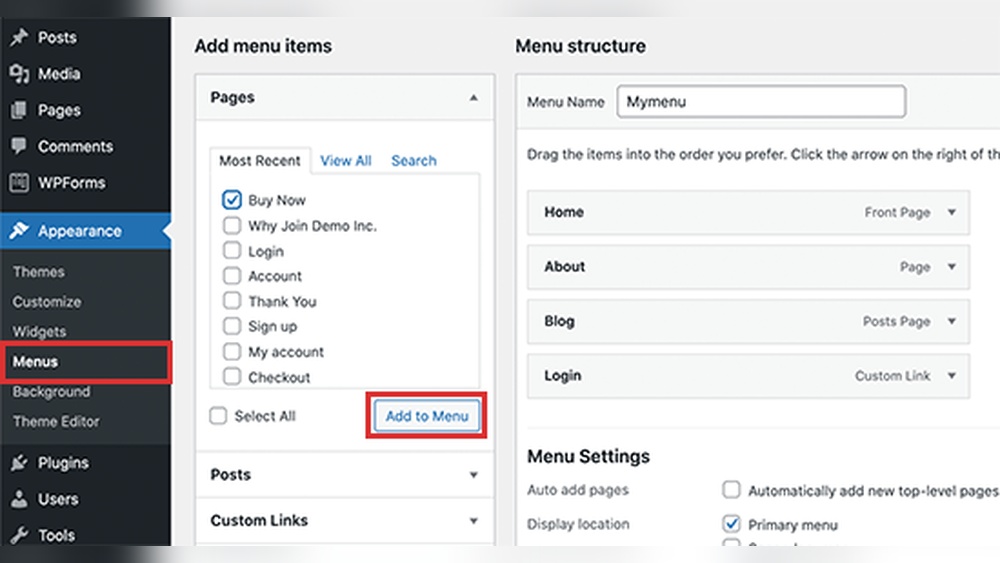
Go to Appearance > Menus to see available menu spots.
The theme shows where each menu appears on your site.
Choose the location that best fits the button’s purpose.
Create A New Menu If Needed
Create a new menu if existing ones don’t fit your needs.
This option gives you full control over menu items and placement.
Assign the new menu to a theme location before adding the button.

Credit: www.youtube.com
Access WordPress Menu Settings
Accessing the WordPress menu settings is the first step to adding a button to your menu. This area controls the navigation structure on your website. It allows you to organize links, pages, and now buttons.
Menus are easy to find inside your WordPress dashboard. Knowing where to go saves time and avoids confusion. Let’s explore how to open and use these settings.
Log Into Your WordPress Dashboard
Start by logging into your WordPress admin area. Use your username and password to access the dashboard. This is the control center for your website.
Locate The Appearance Section
On the left sidebar, find the “Appearance” tab. Click on it to reveal more options. This section manages the look and feel of your site.
Open The Menus Option
Within Appearance, click on “Menus.” This opens the menu settings page. Here, you can create new menus or edit existing ones.
Choose The Menu To Edit
Select the menu where you want to add a button. Use the dropdown list to pick the right menu. This step ensures changes affect the correct navigation area.
Create A Custom Link
Creating a custom link in WordPress lets you add a button to your menu that leads anywhere. You can link to an external website, a special page, or even a file. This feature gives you control over your navigation and helps visitors find important content quickly.
Custom links are easy to create and use. You just need the URL and the name of the button. This method works well for menus that need more than just standard page links.
Create A Custom Link In WordPress Menu
Go to your WordPress dashboard and open the Appearance section. Click on Menus to start editing your menu. Here, you can add new items to your navigation bar.
Enter The Url And Link Text
Find the Custom Links option in the menu editor. Enter the full URL of the page you want to link to. In the Link Text box, type the name you want to appear on the menu button.
Add The Custom Link To Your Menu
Click the Add to Menu button. Your custom link will appear in the menu structure. Drag and drop it to the position you want in the menu.
Save Your Menu Changes
After arranging your custom link, click Save Menu. Visit your website to see the new button in the menu. Test the link to make sure it works correctly.

Credit: www.youtube.com
Add Button To Menu
Adding a button to your WordPress menu makes it easy for visitors to find important links. Buttons stand out more than regular menu items. They can direct users to special pages like a shop, contact form, or signup page.
This guide explains simple steps to add a button to your menu. No coding skills needed. You can make your menu look modern and user-friendly.
Add A Custom Link
Go to your WordPress dashboard. Click on Appearance, then Menus. Choose the menu you want to edit. Select Custom Links from the left side. Enter the URL you want the button to link to. Type the button text in the Link Text box. Click Add to Menu to add it.
Style The Button
After adding the link, find it in the menu structure. Click the arrow to open options. In the CSS Classes field, enter a class name like “menu-button”. If you don’t see this field, click Screen Options at the top and check CSS Classes. Save the menu.
Add Css For The Button
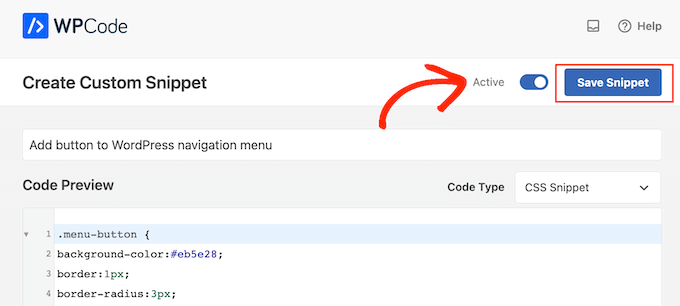
Go to Appearance, then Customize. Open Additional CSS. Add CSS code for the “menu-button” class. Use styles like background color, padding, and border radius. This makes the menu item look like a button. Save and publish your changes.
Style The Menu Button
Styling your menu button makes it stand out and match your website’s design. A well-styled button grabs attention and improves user experience. You can customize colors, shapes, and sizes to fit your brand style. Two easy ways to style your menu button are through theme options or custom CSS. Both methods give you control without needing complex coding.
Using Theme Options
Many WordPress themes offer built-in options to style buttons. Check your theme’s customization panel for menu button settings. You can usually change the button color, font, and border style here. Some themes also let you adjust button padding and hover effects. These options make styling quick and simple. No coding knowledge required.
Custom Css For Buttons
Custom CSS lets you style menu buttons with more detail. Use it to change colors, font size, and border radius. You can add shadows or transition effects for smooth hover changes. Write CSS rules targeting your menu button class or ID. Paste your code in the theme’s customizer under “Additional CSS.” This method gives total styling freedom. Adjust until the button looks perfect.
Test The Button Functionality
Testing the button functionality is a crucial step after adding a button to your WordPress menu. This ensures the button works correctly and leads visitors to the right place. Testing helps avoid broken links and improves user experience on your site.
Take time to check every aspect of the button. Confirm it looks good, clicks properly, and opens the correct page or performs the right action. A well-tested button makes your menu more useful and professional.
Check The Button Link
Click the button in your menu. See if it directs you to the correct page or URL. Make sure the link opens quickly and without errors. A wrong link confuses visitors and hurts your website.
Test Button Appearance On Different Devices
View your website on a phone, tablet, and desktop. Check if the button stays visible and easy to tap. The button should look good and fit well on all screen sizes. This keeps your site user-friendly.
Verify Button Behavior In Different Browsers
Open your website using popular browsers like Chrome, Firefox, and Edge. Click the button in each browser. Confirm it works the same way everywhere. Browser compatibility is key for all visitors.
Ensure Button Accessibility
Use keyboard navigation to reach the button. Press Enter or Space to activate it. Screen readers should announce the button clearly. Accessibility makes your website usable for everyone.
Troubleshoot Common Issues
Troubleshooting is key to successfully adding a button to your WordPress menu. Sometimes, the button may not appear or work as expected. This section helps you solve common problems fast.
Follow each step carefully. Fixing simple errors can save time and effort.
Check Theme Compatibility
Some WordPress themes do not support buttons in menus. Test by switching to a default theme like Twenty Twenty-Three. If the button shows there, your theme may block it. Consider updating or changing your theme.
Clear Cache And Refresh
Browser or site cache can stop new menu buttons from showing. Clear your browser cache. Also, clear any caching plugins on your WordPress site. Refresh the page to see changes.
Verify Menu Location
Buttons appear only in active menu locations. Ensure you assign the menu with the button to the correct spot in Appearance > Menus. Save the menu after adding the button.
Use Correct Css Classes
Buttons often need special CSS classes to display properly. Check your theme’s guide for required classes. Add these classes in the menu item’s CSS Classes field under Screen Options.
Disable Conflicting Plugins
Plugins can interfere with menu buttons. Temporarily deactivate plugins one by one. Check if the button appears after each deactivation. Identify and fix conflicts accordingly.
Review Menu Item Url
The button won’t work with an empty or incorrect URL. Double-check the link in your menu item. Use a valid URL or a custom link with “” for placeholder buttons.
Credit: www.wpbeginner.com
Use Plugins For Advanced Buttons
Using plugins lets you create advanced buttons for your WordPress menu. These buttons can have special styles and functions. Plugins make it easy to add buttons without coding. You can customize colors, shapes, and actions.
Plugins also help you add buttons that stand out. This draws visitors’ attention to important links like “Contact” or “Buy Now.” They improve the look and user experience of your site.
Recommended Plugins
Several plugins work well for menu buttons. “Max Mega Menu” allows adding buttons with custom styles. “WP Menu Cart” adds a shopping cart button to menus. “Buttonizer” creates floating and menu buttons easily. These plugins are popular and user-friendly.
Plugin Setup Steps
First, install the plugin from your WordPress dashboard. Go to Plugins > Add New, then search the plugin name. Click Install and Activate.
Next, open the plugin settings. Choose the button style and position for your menu. Customize colors, text, and size as needed.
After that, assign the button to a menu item or create a new one. Save your changes and check your website to see the button live.
Frequently Asked Questions
How Do I Add A Button To My WordPress Menu?
To add a button, create a custom link in Appearance > Menus. Style it using CSS or a plugin for a button look.
Can I Customize The Button Style In WordPress Menus?
Yes, you can customize button styles using CSS or plugins. Add custom classes in menu settings and style with CSS.
Is A Plugin Necessary To Add Buttons In WordPress Menus?
A plugin is not necessary but can simplify styling. You can add buttons manually with custom links and CSS.
How To Make Menu Buttons Mobile-friendly In WordPress?
Use responsive CSS or plugins that support mobile menus. Test buttons on different devices to ensure usability.
Conclusion
Adding a button to your WordPress menu is simple and effective. It helps visitors find important pages quickly. You only need a few steps to create one. This small change can improve your website’s look and usability. Keep your menu clear and easy to use.
Try adding a button today and see the difference. Your site will feel more professional and user-friendly. Give it a go and enjoy the results!


