
Are you looking to make booking appointments on your WordPress site easier and more professional? Adding Bookly to your WordPress page can transform how your visitors schedule services, saving you time and boosting your business.
If you want a simple, step-by-step guide to get Bookly up and running quickly, you’re in the right place. Keep reading, and you’ll discover exactly how to add Bookly to your WordPress page without any hassle. Your customers will thank you for the smooth experience, and you’ll love the extra convenience.
Let’s get started!
Credit: support.booking-wp-plugin.com
Installing Bookly Plugin
Installing the Bookly plugin on your WordPress site is simple and quick. This plugin helps you manage appointments and bookings easily. Follow these steps to get Bookly running on your website without trouble.
Finding Bookly In WordPress Repository
First, log in to your WordPress dashboard. Go to the “Plugins” menu on the left. Click on “Add New.” Use the search bar and type “Bookly.” Look for the Bookly plugin in the results. Check the details to confirm it is the right one. Click “Install Now” to start the installation.
Manual Upload And Installation
Download the Bookly plugin file from the official site if you have it saved. In your WordPress dashboard, go to “Plugins” and select “Add New.” Click the “Upload Plugin” button at the top. Choose the downloaded file from your computer. Click “Install Now” to upload and install the plugin manually.
Activating The Plugin
After installation, click the “Activate” button. This step enables Bookly on your website. Once activated, you can find the Bookly menu in your dashboard. Start setting up your booking system right away. Activation completes the installation process.

Credit: www.wikihow.tech
Initial Plugin Setup
Setting up Bookly on your WordPress site starts with the initial plugin setup. This stage ensures your booking system works smoothly. Follow simple steps to configure settings, add services, and adjust the calendar. This setup helps your visitors book appointments easily.
Configuring General Settings
Open the Bookly plugin dashboard to begin. Enter your business name and contact details. Set your time zone correctly for accurate booking times. Choose the currency for payments. Enable or disable email and SMS notifications. Save changes before moving to the next step.
Setting Up Services And Staff
Create services your customers can book. Add service names, duration, and prices. Include a short description for each service. Next, add staff members who will provide these services. Assign services to staff for clear scheduling. Upload staff photos to build trust with clients.
Adjusting Calendar Preferences
Set working hours for each staff member. Block holidays and breaks to avoid double bookings. Choose the calendar view style that fits your site. Enable buffer time between appointments for preparation. Set the minimum and maximum booking time allowed. These settings keep your schedule organized and easy to manage.
Creating A Booking Form
Creating a booking form is the first step to accept appointments on your WordPress site. Bookly makes this process simple and quick. A well-designed form helps visitors book services with ease. Follow these steps to create a booking form that fits your needs.
Selecting Form Layout
Choose a layout that matches your website style. Bookly offers several form designs. Pick one that is clean and easy to navigate. A clear layout helps users complete the booking faster. Consider the number of steps you want in the form. A simple form often leads to more bookings.
Customizing Fields
Adjust the form fields to collect the right information. You can add, remove, or edit fields like name, phone, and service type. Make sure to keep required fields clear and short. Avoid asking for too much information to prevent user drop-off. Custom fields help tailor the booking experience to your business.
Saving Form Templates
Save your form as a template for future use. This feature saves time if you create multiple booking forms. Templates keep your style and settings consistent across pages. You can update templates anytime without starting over. This makes managing bookings easier and more efficient.
Adding Bookly To A WordPress Page
Adding Bookly to a WordPress page allows visitors to book appointments easily. Bookly integrates smoothly with WordPress. You can place it in many ways to fit your site design. Each method works well for different needs and skill levels.
Using Shortcodes
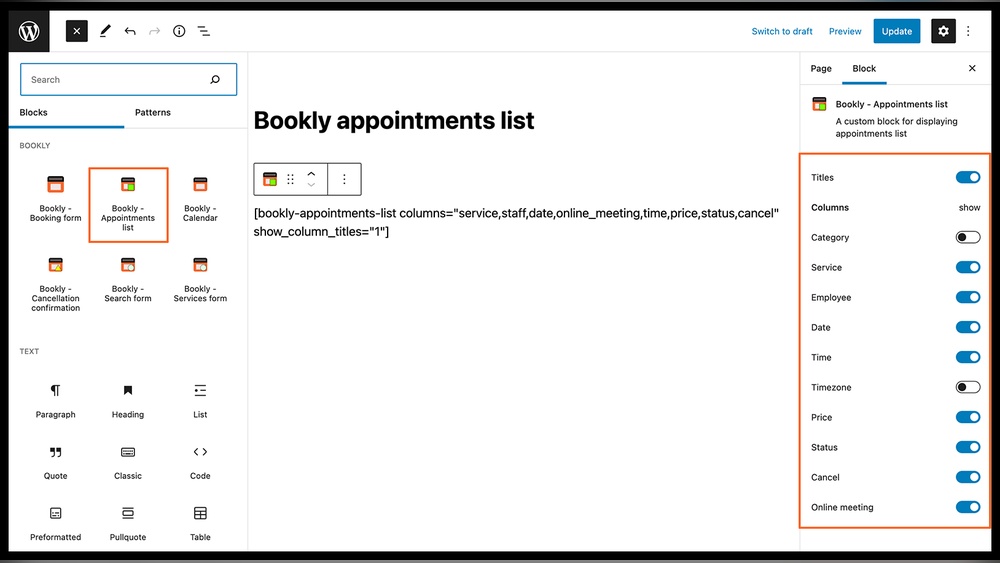
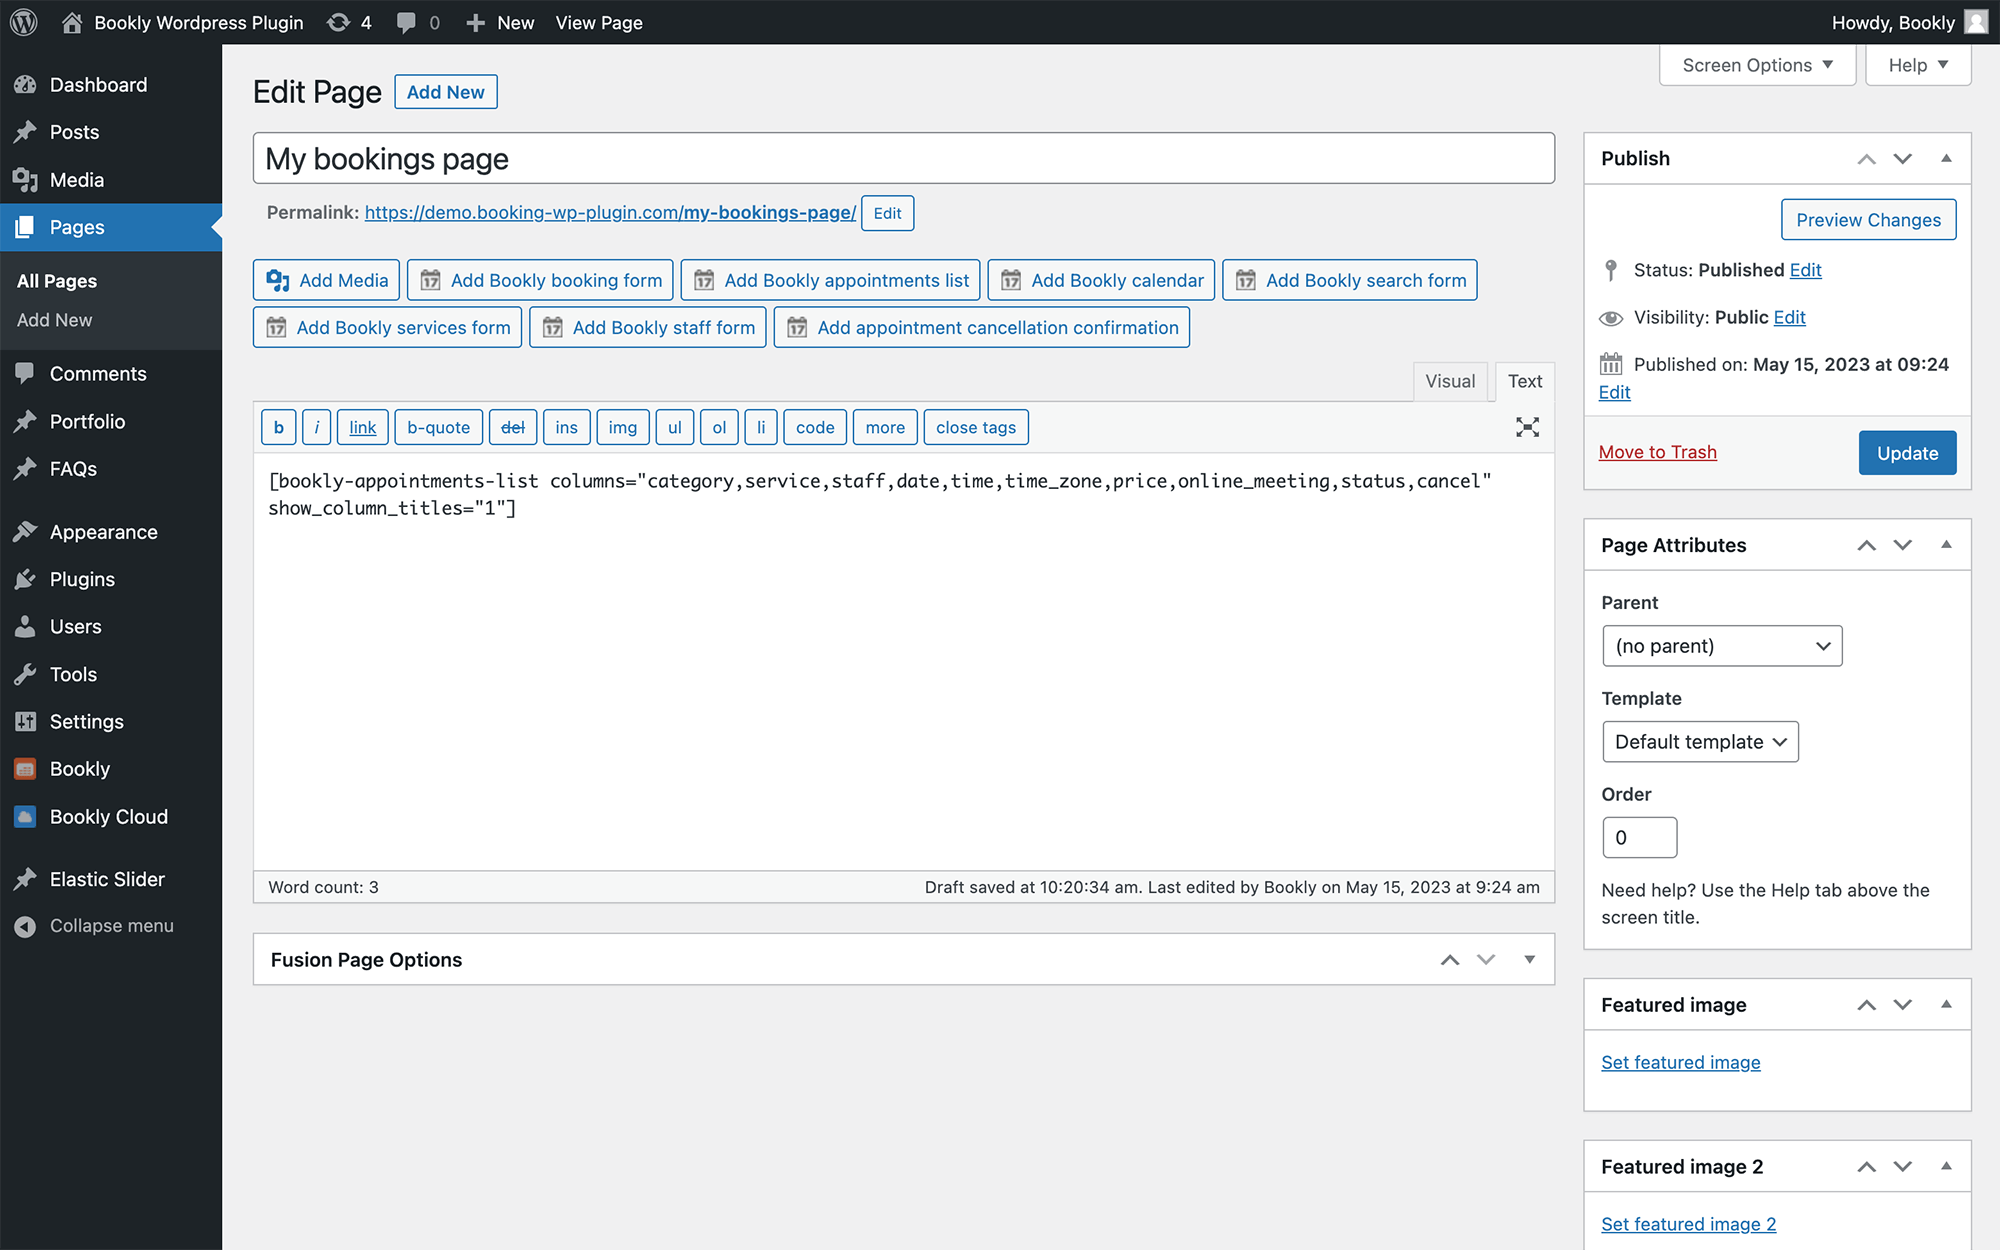
Bookly provides shortcodes for easy embedding. Copy the shortcode from the Bookly plugin settings. Paste it into the WordPress page editor where you want the booking form. Shortcodes are simple and quick to use. They keep your page clean and organized.
Embedding Via Gutenberg Block
WordPress’s Gutenberg editor supports Bookly blocks. Open your page in the Gutenberg editor. Click the plus (+) icon to add a new block. Search for the Bookly block and select it. The booking form appears instantly on the page. This method is visual and user-friendly.
Placing Bookly In Widgets
Widgets let you add Bookly to sidebars or footers. Go to Appearance > Widgets in your WordPress dashboard. Drag the Bookly widget to the widget area you want. Configure the widget settings to show the booking form. Widgets help display Bookly on many pages at once.
Testing The Booking System
Testing the booking system ensures your Bookly plugin works properly on your WordPress page. It helps find any problems early. This step improves user experience and trust. Checking all functions makes sure customers can book without trouble.
Making A Test Appointment
Start by opening your booking page on WordPress. Choose a service and pick a date and time. Enter the required details like name and contact. Submit the appointment request. Watch for confirmation messages on the screen. This confirms the booking process works smoothly.
Checking Email Notifications
Next, check the email linked to your booking system. Confirm you receive notification emails for new appointments. Look for emails sent to both customer and admin. Open each email to verify correct information. Proper notifications keep everyone informed and organized.
Troubleshooting Common Issues
If the booking form does not submit, reload the page and try again. Clear your browser cache to fix display problems. Verify email settings in the Bookly plugin for notification errors. Check for plugin conflicts by deactivating other plugins temporarily. Correct these issues to keep your booking system reliable.
Enhancing Bookly Features
Enhancing Bookly features improves your booking system on WordPress. It helps create a smoother experience for your clients. You can make the system more useful and professional. The right tools and settings can make a big difference.
Integrating Payment Gateways
Accept payments directly through your booking page. Bookly supports many popular payment gateways. This allows customers to pay safely and quickly. PayPal, Stripe, and others can be connected easily. It reduces no-shows by requiring payment upfront. You manage your bookings and payments in one place.
Using Add-ons For Extra Functionality
Bookly offers various add-ons for more features. Add-ons let you customize the booking process. Some add-ons include SMS notifications and Google Calendar sync. Others help with group bookings or online meetings. Installing add-ons is simple and fast. They help tailor Bookly to your exact needs.
Customizing Appearance
Match Bookly’s look to your website style. Change colors, fonts, and button shapes easily. A consistent design makes your site look professional. You can edit forms to show only needed fields. Customization helps clients feel comfortable while booking. It creates a smooth and friendly user experience.
Credit: www.booking-wp-plugin.com
Frequently Asked Questions
How Do I Install Bookly On My WordPress Site?
To install Bookly, go to your WordPress dashboard. Navigate to Plugins > Add New, search for “Bookly,” and click “Install Now. ” After installation, activate the plugin to start configuring your booking system.
Can I Customize Bookly Booking Forms Easily?
Yes, Bookly allows easy customization of booking forms. Use the plugin’s drag-and-drop editor to add or remove fields. You can also tailor colors and texts to match your website’s style.
How To Embed Bookly Booking On A WordPress Page?
Embed Bookly by copying its shortcode from the plugin settings. Paste this shortcode into the WordPress page editor where you want the booking form to appear. Update or publish the page to see it live.
Is Bookly Compatible With WordPress Themes?
Bookly is compatible with most WordPress themes. It integrates smoothly without conflicts. For best results, use a well-coded and regularly updated theme alongside Bookly.
Conclusion
Adding Bookly to your WordPress page is simple and quick. Follow the steps carefully, and you will see your booking system live. It helps visitors schedule appointments without hassle. This tool improves your website’s functionality and user experience. Keep your site updated for the best performance.
Try it today and watch how smoothly your bookings run. Your WordPress site deserves this easy upgrade.


