

Are you struggling to make your blog posts easy to find on your WordPress site? Adding your blog posts to your menu can be a game changer.
It helps your visitors quickly access your latest content without hunting around. You’ll learn simple, step-by-step ways to add blog posts to your WordPress menu. By the end, your site will be more user-friendly and keep readers coming back for more.
Let’s get started and make your blog easier to navigate right now!
Access WordPress Dashboard
Accessing the WordPress dashboard is the first step to add blog posts to your menu. This dashboard is the control center of your website. It allows you to manage posts, pages, menus, and more.
Knowing how to get to the dashboard helps you make changes quickly. It saves time and makes your website management easier.
Open Your Web Browser
Start by opening your favorite web browser. This can be Chrome, Firefox, Safari, or any other browser you use.
Enter Your Website Url
Type your website address in the browser’s address bar. Add “/wp-admin” at the end of your URL. For example, www.yoursite.com/wp-admin.
Log In To WordPress
Enter your username and password on the login page. These are the details you set up during installation.
Click the “Log In” button to enter the dashboard. If your details are correct, you will see the WordPress dashboard.
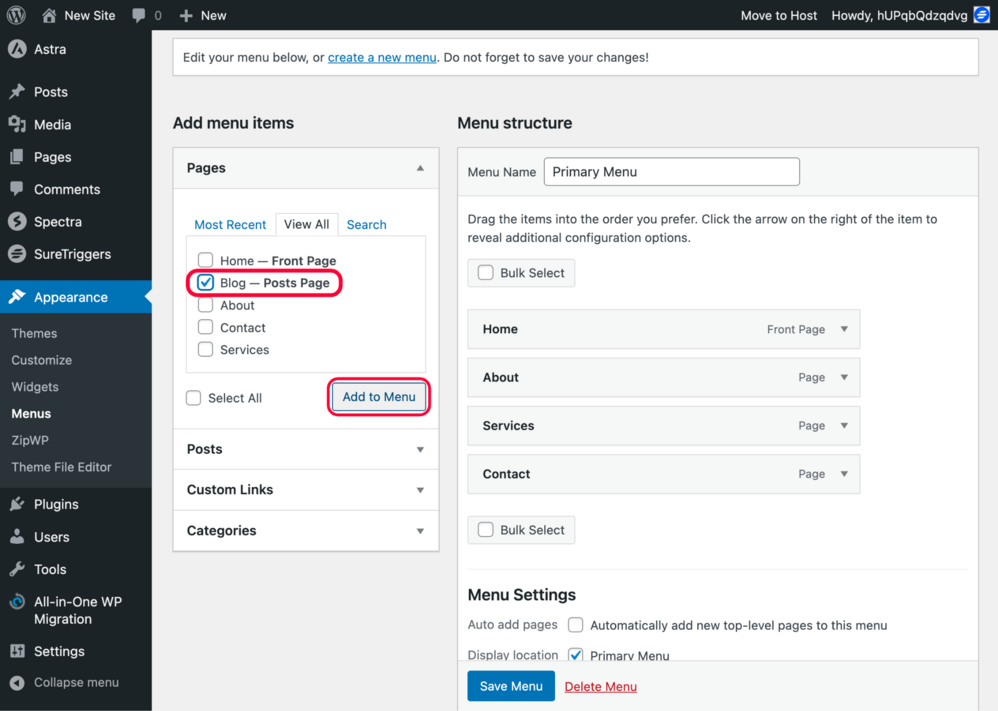
Credit: zipwp.com
Navigate To Menus Section
To add blog posts to your WordPress menu, start by navigating to the Menus section. This area lets you control which items appear in your site’s navigation. Knowing how to find it makes editing menus easier.
Accessing the Menus section is simple. It is part of the WordPress dashboard and is where you manage links to pages, posts, and other content.
Log In To Your WordPress Dashboard
Enter your username and password to access the dashboard. This is the control center for your site.
Find The Appearance Tab
Look for the “Appearance” option on the left side menu. It controls how your site looks and feels.
Click On Menus
Under Appearance, select “Menus.” This opens the menu editor where you can add or remove items.
Select Or Create A Menu
Selecting or creating a menu is the first step to add blog posts to your WordPress site’s navigation. Menus help visitors find important pages quickly. WordPress allows you to manage menus easily from the dashboard.
You can use an existing menu or create a new one. This choice depends on your site structure and design. Creating a new menu gives you full control over its items.
Select An Existing Menu
Go to the WordPress dashboard and open the Appearance section. Click on Menus. Here, you will see a list of menus already created. Choose the menu you want to edit from the dropdown menu. Click the Select button to load it. This menu will show in your site’s navigation bar.
Create A New Menu
In the Menus page, find the link that says “create a new menu.” Click it to start fresh. Give your menu a clear name like “Main Menu” or “Blog Menu.” Click the Create Menu button to save. Now you have a new empty menu ready for items.
Set Menu Location
After selecting or creating a menu, set where it appears on your site. WordPress themes offer various menu locations. Look for the Menu Settings box below the menu items. Choose a location such as Primary Menu or Header Menu. Save your changes to apply the menu to your site.
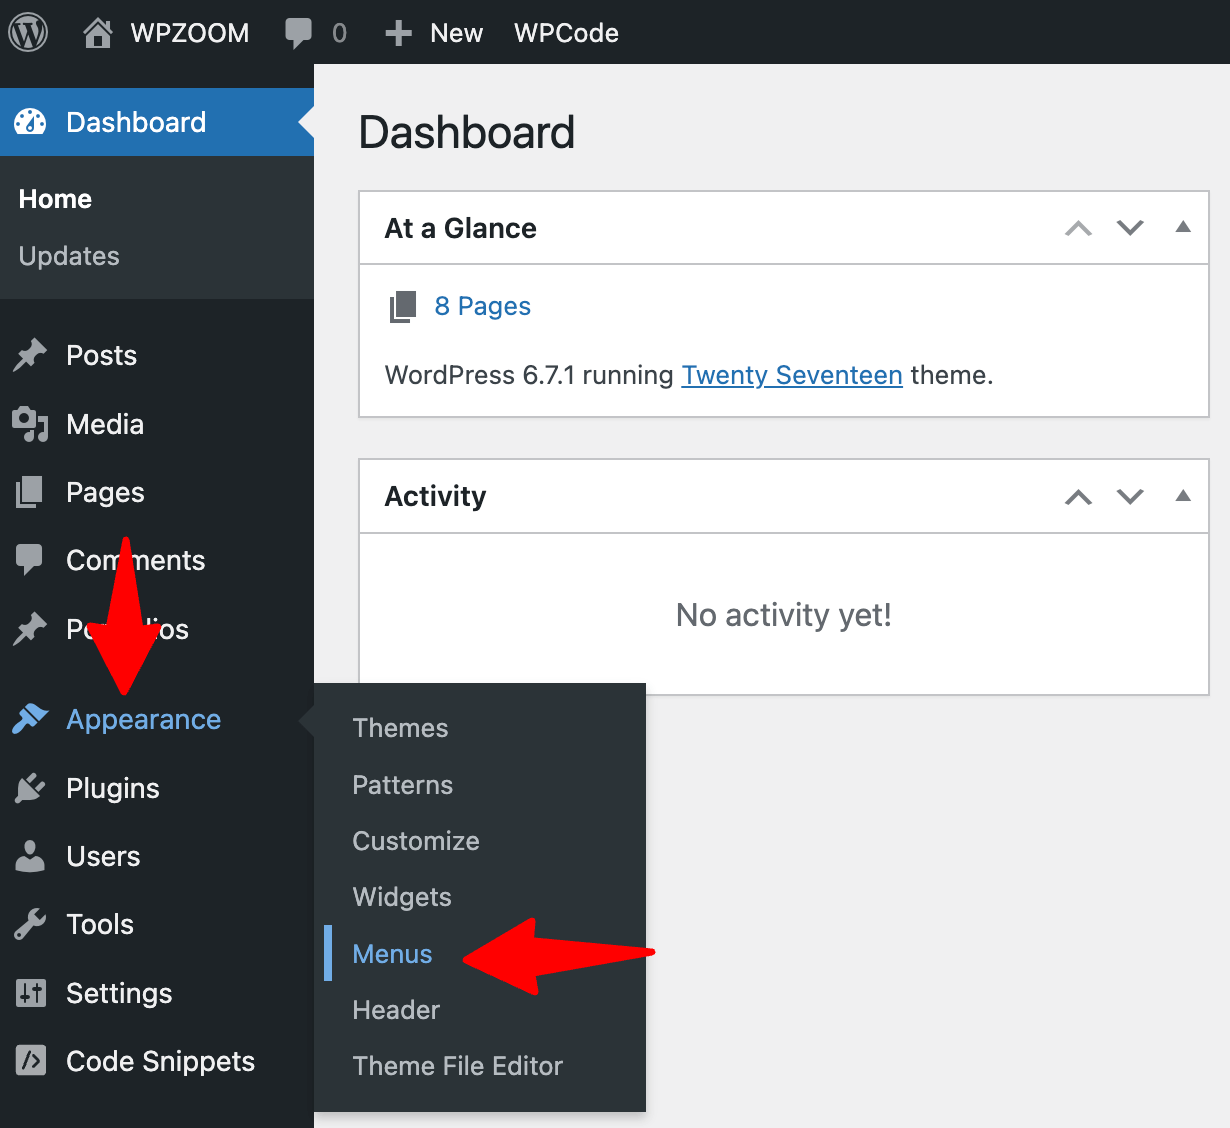
Credit: www.wpzoom.com
Add Blog Posts To Menu
Adding blog posts to your menu helps visitors find your latest content quickly. It improves site navigation and keeps readers engaged. WordPress makes this process simple with built-in options to include posts in your menu.
Enable Posts Panel
First, go to the WordPress dashboard. Navigate to Appearance and then select Menus. On the menu editor screen, find the Screen Options tab at the top right. Click it to open a panel with options. Check the box labeled Posts. This action enables the Posts panel in the menu editor.
Choose Posts To Add
After enabling the Posts panel, scroll down to find it on the left side. You will see a list of your recent blog posts. Use the search box to find specific posts quickly. Select the posts you want to add by clicking their checkboxes. This step lets you pick the exact posts for your menu.
Add Selected Posts
Once you select the posts, click the Add to Menu button below the list. The chosen posts appear in the menu structure on the right. Drag and drop to arrange the posts as needed. Finally, click Save Menu to apply the changes. Your blog posts now show in your site’s menu.
Organize Menu Items
Organizing menu items helps visitors find blog posts quickly. A well-structured menu improves site navigation and user experience. WordPress allows easy customization of menu order and hierarchy. This section explains how to arrange items effectively.
Drag And Drop Items
WordPress lets you move menu items by dragging and dropping. Click and hold a menu item to move it up or down. Place items in the order you want them to appear. This method is simple and fast for organizing menus. It helps keep related posts together and easy to find.
Create Submenus
Submenus group related blog posts under a main menu item. Drag a menu item slightly to the right under another item to create a submenu. Submenus appear as dropdowns on your site’s menu. They make your menu cleaner and easier to navigate. Visitors can explore topics without clutter.
Save And Preview Menu
Saving and previewing your menu ensures your blog posts appear correctly. It helps confirm that the menu works as expected. This step avoids mistakes before visitors see your site.
After adding blog posts to your menu, saving is essential. Without saving, changes do not apply. Previewing lets you see the menu in action. You can check the layout and links.
Save Your Menu Changes
Click the “Save Menu” button at the bottom right. WordPress stores all changes immediately. Avoid closing the page before saving. Unsaved changes will be lost.
Preview The Updated Menu
Use the “Manage with Live Preview” option for a quick look. It opens your site in a new window. Check if blog post links lead to the right pages. Notice how the menu looks on different devices.
Test Menu Navigation
Click on each blog post link in the menu. Ensure the pages load without errors. Test on desktop and mobile to confirm responsiveness. Good navigation improves user experience.
Troubleshoot Common Issues
Troubleshooting common issues helps you add blog posts to your WordPress menu smoothly. Problems may stop posts from showing up. Fixing these issues keeps your site user-friendly and professional.
Missing Posts Panel
The posts panel may disappear in the menu editor. This happens if screen options are not set correctly. Click “Screen Options” at the top right of the page. Check the box next to “Posts” to make it visible again. If this does not work, clear your browser cache and reload the page.
Menu Not Showing
Your menu might not appear on the site after adding posts. This can occur if the menu is not assigned to a location. Go to Appearance > Menus, then select the correct menu location. Save changes and refresh your site. Also, check your theme settings to ensure menus are enabled.
Permalink Problems
Permalink issues can stop posts from linking properly in menus. Reset permalinks by going to Settings > Permalinks. Choose your preferred structure and click “Save Changes.” This refreshes the permalink settings and fixes broken links. Always test your menu links after this step.
Use Plugins For Advanced Menus
Using plugins for advanced menus in WordPress makes managing blog posts easier. Plugins offer extra features beyond the default menu options. They help create dynamic, interactive, and stylish menus. This lets visitors find blog posts faster and improves site navigation.
Plugins suit users who want more control over menu design and structure. They work well for sites with many blog posts or categories. These tools save time and reduce the need for coding skills.
Popular Menu Plugins
Several plugins stand out for building advanced menus. Max Mega Menu helps create large, multi-column menus. It supports images, icons, and widgets inside menus. WP Mega Menu offers drag-and-drop menu building. It includes ready-made themes and customizable styles. Responsive Menu focuses on mobile-friendly menus that work well on phones and tablets. These plugins fit different needs and skill levels.
Benefits Of Plugins
Plugins add flexibility and creativity to menus. They let you organize blog posts into clear categories. This improves user experience and reduces bounce rates. Plugins also support animations and icons to catch attention. Some offer SEO-friendly features to help search engines understand your site. Using plugins means less manual work and faster updates. They keep your menu fresh and easy to use.

Credit: www.youtube.com
Frequently Asked Questions
How Do I Add Blog Posts To WordPress Menu?
Go to Appearance > Menus in your WordPress dashboard. Select Posts from the left panel, choose your posts, then click Add to Menu. Arrange them as needed and save your menu to display blog posts in your menu.
Can I Add Specific Blog Posts To The Menu?
Yes, you can add individual blog posts to the menu. Use the Posts section under Menus, select desired posts, add them to the menu, and save changes for specific posts to appear in your navigation.
How To Organize Blog Posts Within The WordPress Menu?
After adding posts to the menu, drag and drop them into your preferred order. You can also create sub-menu items by slightly indenting posts under a main menu item for better organization.
Will Adding Blog Posts To Menu Affect Seo?
Adding blog posts to your menu improves site navigation and user experience. Better navigation helps search engines crawl your site efficiently, potentially boosting your SEO rankings.
Conclusion
Adding blog posts to your WordPress menu helps visitors find content fast. It improves your site’s navigation and keeps readers engaged. Just follow simple steps to create or edit your menu. Choose the blog posts you want to add, then save your changes.
Check your site to see the new menu items. This small change can make your site easier to use. Keep updating your menu as you add more posts. It helps your site stay organized and user-friendly. Give it a try today and see the difference!


