
Are you looking to make your WordPress site visually appealing and more engaging? Adding a banner image to your WordPress theme can do just that.
A well-chosen banner image not only enhances the aesthetic appeal of your site but also helps convey your brand message effectively. But how do you add a banner image without getting lost in the maze of WordPress options and settings?
You’re not alone if you’ve felt overwhelmed by the idea. Many WordPress users share your concerns, and that’s why we’re here to guide you through the process step-by-step. Imagine transforming your website with a stunning banner image that captivates your audience’s attention from the moment they land on your page. By the end of this article, you’ll have the knowledge and confidence to add that perfect banner image to your WordPress theme effortlessly. Let’s dive in and unlock the potential of your website together!
Choosing The Right Banner Image
Picking the right banner image is important. It should match your website’s theme. A good image tells a story. It draws people in. Choose a picture that is clear and bright. Avoid dark or blurry pictures. They can make your site look bad. It’s good if the image is related to your content. This helps visitors understand your site quickly. Images with people can be very engaging. They create a connection.
Banner images need to be the right size. Too big or small looks bad. Most themes have suggested sizes. Check your theme’s guide for this. Common sizes are 1200×600 pixels. This size fits most screens well. Images should also load fast. Big files slow your site down. Use tools to reduce file size. But keep quality high.
Credit: www.library.illinois.edu
Preparing The Image For Upload
Editing Tools make images look better. Use tools like Photoshop or GIMP. These tools help adjust size and colors. Cropping removes unwanted parts. Try to focus on important details.
Keep the image size small. This makes it load faster. Use the right dimensions for your theme. Check the theme’s documentation for size details.
Saving In The Correct Format
Save the image in the right format. JPEG and PNG are common choices. PNG is good for images with text. JPEG is great for photos. Choose the format based on image type.
Reduce file size without losing quality. Use online tools like TinyPNG. Smaller files help your site load faster. Faster sites keep visitors happy.
Accessing The WordPress Dashboard
First, open your web browser. Type your website’s URL. Then add /wp-admin at the end. Press enter. You will see the login page. Enter your username and password. Click the Log In button. Now, you are inside the dashboard. This is where all the magic happens. You control everything from here.
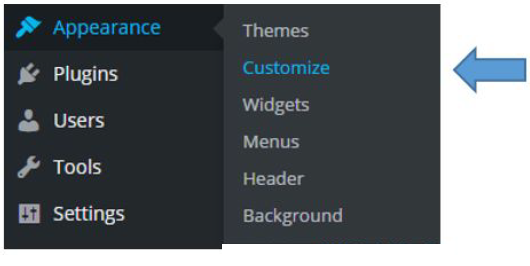
Look on the left side. See the menu? Find the Appearance tab. Click on it. A new menu will pop up. Select Customize. This opens a new screen. Here, you can change your site’s look. Choose the Header Image option. Now, you can add a banner image. Make your site look beautiful.
Uploading The Banner Image
Adding a banner image to your WordPress theme enhances visual appeal. Navigate to the WordPress dashboard and select ‘Customize’. Choose ‘Header Image’ and upload your desired banner. Adjust the size for a perfect fit.
Using The Media Library
First, go to your WordPress dashboard. Click on Media then Add New. Choose your banner image from your computer. Upload it to the library. After uploading, click on the image. Note the URL of the image. You need this URL later. Now, go to the page or post where you want the banner. Click on Edit and find the area for the banner. Paste the image URL there. Save your changes. The banner is now on your page.
Direct Upload Via Theme Options
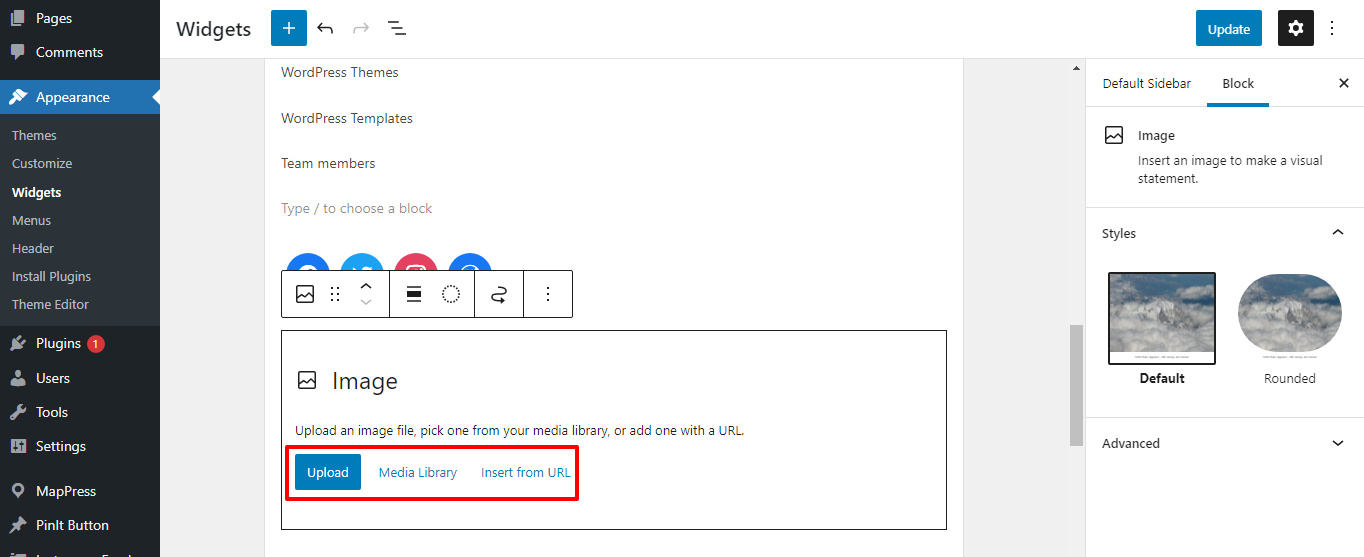
Some themes offer a direct way to upload banners. Go to Appearance then Customize. Find the Header or Banner section. Click to change the image. Choose Upload or Select from Media Library. Pick your banner image. Save changes to see it live. Each theme might look different. Follow the steps given by your theme. Your banner should fit well and look great.
Setting The Banner Image
Begin with opening your WordPress dashboard. Navigate to the Appearance section. Select the Header option. Here, you can upload a new image. Ensure the image is of high quality. It should fit the theme’s size requirements. Once uploaded, click Save to apply changes.
Go to the Customize option in the dashboard. This area lets you tweak the banner. You can adjust size, position, and more. Select Header Image to begin. Choose your preferred image. Adjust settings to match your design needs. Hit Publish to see updates live.
Credit: ltheme.com
Troubleshooting Common Issues
Struggling to add a banner image to your WordPress theme? Follow easy steps to upload and customize your banner. Fix common issues like image size and alignment for a perfect fit.
Image Not Displaying
Images not showing can be frustrating. Check if the image file is uploaded correctly. Verify the file path in the theme settings. Ensure the image format is supported. Common formats are JPEG and PNG. Some themes require specific image sizes. Review theme documentation for size requirements. Clear the browser cache to see updates. Enable image display settings in WordPress.
Cropping And Size Problems
Incorrect cropping affects display. Use image editing tools for adjustments. Keep the aspect ratio consistent. WordPress may automatically crop images. Review theme settings for cropping options. Resize images before uploading. This ensures proper display. Large images slow down websites. Reduce image file size for faster loading.
Enhancing With Plugins
Plugins make adding banner images easy. One popular choice is the WP Bannerize plugin. It helps you manage banners with ease. Another great option is AdRotate. It offers many features for banner management. Simple Banner is perfect for beginners. It provides a straightforward way to add banners.
First, go to the WordPress Dashboard. Click on Plugins and choose Add New. Type the plugin name in the search box. Click Install Now when you find it. After installation, click Activate. Now, configure the plugin settings. Follow the simple instructions in the setup guide. Adjust settings to fit your needs. Save your changes when done.
Credit: themewinter.com
Frequently Asked Questions
How To Upload A Banner Image In WordPress?
To upload a banner image, navigate to your WordPress dashboard. Select “Appearance” then “Customize. ” Choose “Header” or “Banner” settings. Click “Upload” and select your desired image file from your computer. Ensure the image fits the recommended dimensions for your theme to maintain quality and appearance.
Save changes.
Can I Customize The Banner Size In WordPress?
Yes, you can customize the banner size in WordPress. Go to “Appearance” and then “Customize. ” Locate the “Header” or “Banner” section. Here, you can adjust the dimensions to fit your design preferences. Always check your theme’s documentation for recommended sizes to ensure compatibility.
Why Is My Banner Image Not Displaying?
Your banner might not display due to incorrect file format or size. Ensure the image format is compatible, such as JPEG or PNG. Check your theme’s recommended dimensions and adjust accordingly. Clear your browser cache after updating the image. Lastly, verify your theme settings to ensure the banner section is active.
How To Make Banner Image Responsive In WordPress?
To make a banner responsive, use CSS media queries or plugins. Navigate to your WordPress dashboard and install a responsive design plugin if needed. Alternatively, add custom CSS via “Appearance” -> “Customize” -> “Additional CSS” to adjust image size based on screen dimensions, ensuring optimal viewing on all devices.
Conclusion
Adding a banner image in WordPress enhances your site’s look. It attracts visitors and makes your message clear. Follow steps to upload your image easily. Customize it to fit your theme. Adjust size and position for best results. Use quality images that represent your brand.
Regular updates keep content fresh and engaging. This simple addition boosts your site’s appeal and user experience. With practice, it becomes a quick task. Enjoy creating a visually appealing website that stands out. Your audience will appreciate the effort.


