
Are you ready to expand your online presence by adding another domain to your hosting account? Whether you want to manage multiple websites or create separate projects under one roof, knowing how to add another domain is a game-changer.
You’ll discover simple, step-by-step instructions that make the process easy—even if you’re not a tech expert. Keep reading, and you’ll unlock the secrets to managing multiple domains efficiently, saving time and money while growing your digital footprint.
Choose The Right Hosting Plan
Choosing the right hosting plan is key for adding another domain to your hosting account. The plan must support multiple domains without slowing down your site. It also needs enough space and resources to handle traffic for all your websites. Picking the wrong plan can cause poor performance and extra costs. Consider your needs carefully before making a decision.
Shared Vs. Dedicated Hosting
Shared hosting means many websites share the same server. It is cheaper and good for small sites. But resources like speed and storage are limited. Dedicated hosting gives you a whole server for your sites. It costs more but offers better performance and control. Choose shared hosting for small or new sites. Pick dedicated hosting if you want more power and space.
Check Domain Addon Limits
Every hosting plan has a limit on how many domains you can add. Some plans allow only one domain. Others let you add multiple domains as addon domains. Check these limits before buying a plan. If you want to host many domains, pick a plan with higher addon limits. This helps you avoid extra fees or the need to upgrade later.

Credit: www.inmotionhosting.com
Prepare Your Domain
Preparing your domain is the first step to add another domain to your hosting. This process ensures your new domain points correctly to your hosting server. It also avoids issues with website access and email services. Take time to complete this preparation carefully.
Registering A New Domain
Choose a domain name that fits your website or business. Use a trusted domain registrar to register it. Provide accurate contact information during registration. Confirm your registration through the email you receive. Keep your domain registration active by renewing it on time.
Updating Dns Settings
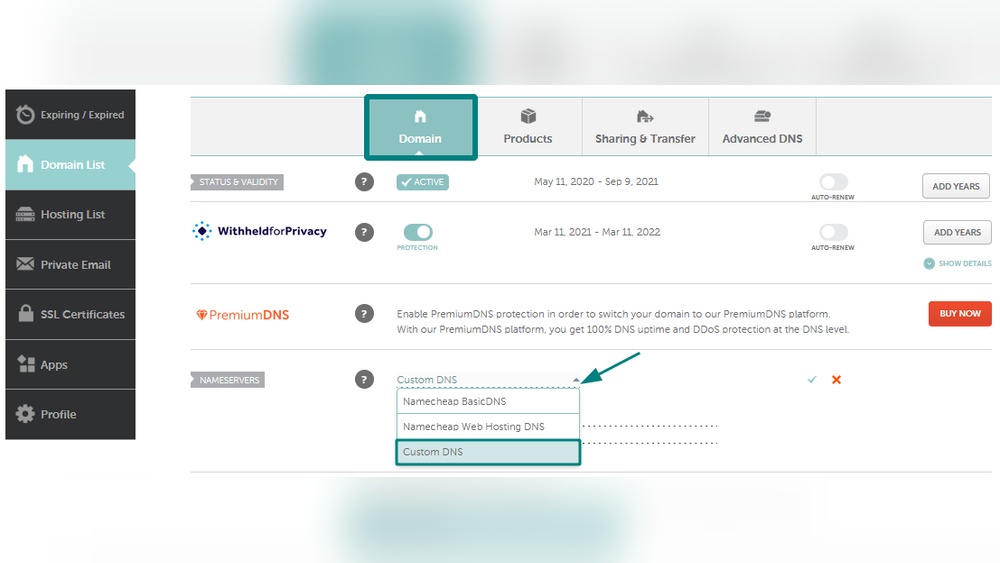
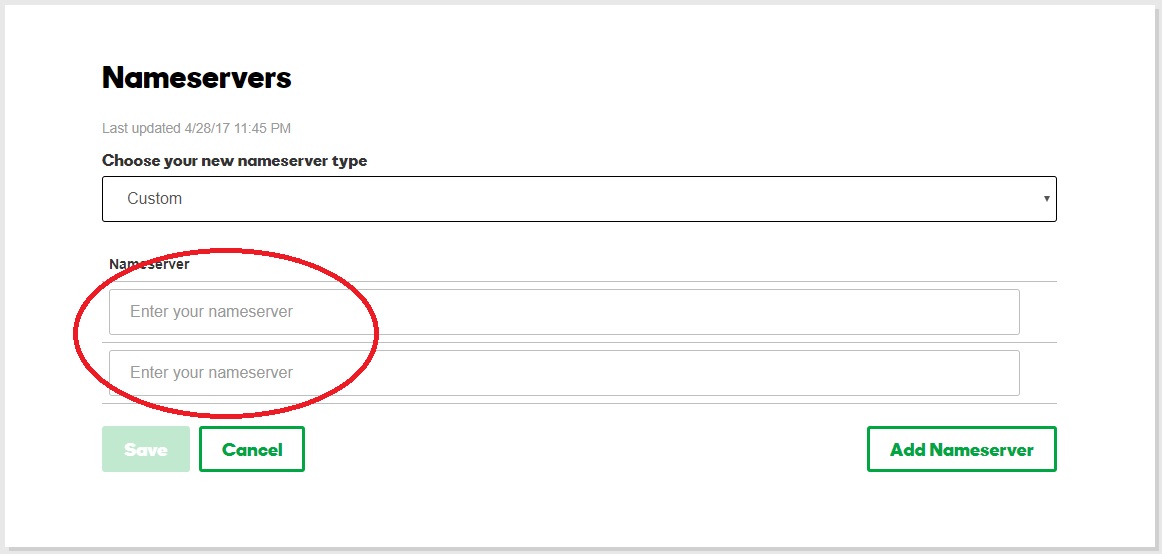
Access your domain registrar’s control panel to change DNS settings. Replace the current nameservers with those given by your hosting provider. This links your domain to your hosting server. Save the changes and wait for DNS propagation. Propagation can take from a few minutes to 48 hours. Check your domain status to confirm the update.
Access Your Hosting Control Panel
Accessing your hosting control panel is the first step to add another domain to your hosting account. This panel is where you manage your websites and domains. It gives you tools to control your hosting environment easily.
Most hosting providers use cPanel or a similar system. These interfaces help you handle domains, files, and emails. Knowing how to log in and find domain settings saves time and avoids confusion.
Logging Into Cpanel Or Equivalent
Start by entering your hosting provider’s website. Look for a login button or link to the control panel. You will need your username and password. These details come from your hosting signup email.
Enter your credentials and click the login button. The control panel dashboard will open. If you see different options, look for names like cPanel, Plesk, or DirectAdmin. These are common hosting control panels.
Navigating To Domain Management
Inside the control panel, find the section related to domains. It may be labeled “Domains,” “Domain Manager,” or “Addon Domains.” Click on this section to open domain settings.
Here, you can add new domains, manage existing ones, and set up subdomains. This area is crucial for linking your new domain to your hosting space. Take your time to explore the options available.
Add The Domain To Your Hosting
Adding another domain to your hosting allows you to manage multiple websites from one account. This saves money and keeps all your sites in one place. The process involves linking the new domain to your hosting service. Then, you organize files for that domain properly. This ensures your website works smoothly and visitors reach the right content.
Using Addon Domains Feature
Most hosting providers offer the Addon Domains feature. It lets you add extra domains without buying new hosting plans. Log in to your hosting control panel. Find the Addon Domains section. Enter your new domain name. Set a username and password if needed. The system will create space for your new website. This method keeps your domains separate but managed together.
Setting Document Root Folder
After adding the domain, set its document root folder. This folder stores your website files. Choose a folder name that matches your domain for easy access. The document root keeps files organized and prevents overlap with other sites. Upload your website files to this folder. This step ensures your domain shows the correct website content to visitors.
Upload Website Files
Uploading your website files is a key step to make your new domain live. These files include HTML, CSS, images, and other important content. Properly uploading ensures your site appears correctly online. Follow clear steps to organize and transfer your files efficiently.
Organizing Files For The New Domain
Start by gathering all website files in one folder on your computer. Sort files by type, like images or scripts, to keep things tidy. Name files clearly to avoid confusion during upload. Check that the main page is named index.html or index.php. This file loads first when visitors open your site. Ensure no unnecessary files are included to save space and reduce errors.
Using Ftp Or File Manager
Choose between FTP software or your hosting control panel’s file manager. FTP programs like FileZilla offer easy drag-and-drop upload options. Connect using your hosting username and password. Upload files to the folder assigned to your new domain, often named after the domain. File managers in hosting panels also allow direct file uploads. They work well for small files or quick edits. Confirm files are fully uploaded before checking the website online.
Credit: www.godaddy.com
Configure Email For The New Domain
Configuring email for your new domain is a key step after adding it to your hosting. It lets you send and receive emails using your new domain’s address. This setup helps keep your communication professional and organized.
Setting up email accounts and managing them with forwarders and filters makes your email system efficient. It ensures messages reach the right place and you don’t miss important emails.
Creating Email Accounts
Start by logging into your hosting control panel. Find the email section and select your new domain. Click on ‘Create Email Account’.
Enter the name you want before the @ symbol. Choose a strong password. Set mailbox size limits if available. Click ‘Create’.
Repeat this for each email address you need. Common emails include info@yourdomain.com or support@yourdomain.com.
Setting Up Forwarders And Filters
Forwarders send copies of incoming emails to another address. This helps manage multiple accounts easily.
In your control panel, go to the forwarders section. Choose the new domain and add the email you want to forward. Enter the destination email address. Save the changes.
Filters sort incoming mail automatically. Use filters to block spam or sort emails into folders.
Access the filters menu. Create rules based on sender, subject, or keywords. Decide what action to take for each rule. Save your filter settings.
Test The New Domain Setup
Testing the new domain setup is a key step after adding a domain to your hosting. This step ensures your website works well on the new domain. It also helps catch any problems early.
Checking accessibility shows if visitors can reach your site. Troubleshooting fixes common issues fast. Both parts make sure your domain setup is smooth and ready.
Checking Website Accessibility
Start by typing your new domain URL in a browser. See if the website loads without errors. Try different browsers like Chrome, Firefox, or Edge.
Check loading speed and website layout. The site should look the same as on your main domain. Test on mobile devices too. This confirms mobile users have a good experience.
Use online tools like “Down For Everyone Or Just Me” to verify website status. If the site is online, it means DNS settings work correctly.
Troubleshooting Common Issues
If the site does not load, check DNS records again. Make sure A records or CNAME point to your hosting server. DNS changes can take time to update fully.
Clear your browser cache and try loading the site again. Sometimes cached data causes display errors. Also, disable any browser extensions that might block content.
Check your hosting control panel for domain setup errors. Confirm the domain is added and linked to the correct folder. Review SSL certificate status to avoid security warnings.
Contact your hosting support if problems continue. Provide clear details about the issue and steps you tried. Support teams can help diagnose deeper problems fast.
Manage Multiple Domains Efficiently
Managing multiple domains on one hosting account can save time and money. It keeps your websites organized and easy to control. Proper management helps avoid conflicts and improves site performance. Use simple tools and clear steps to handle each domain.
Setting Up Redirects
Redirects send visitors from one domain to another automatically. This helps if you want different domains to point to the same website. Use 301 redirects for permanent moves. They tell search engines to update links. Set redirects in your hosting control panel or .htaccess file. Test redirects to make sure they work correctly.
Using Ssl Certificates For Security
SSL certificates protect your domains with encryption. They keep user data safe during transfers. Install an SSL certificate on each domain you manage. Many hosts offer free SSL with their plans. A secure site shows “https” and a padlock icon. This builds trust with visitors and improves search rankings.

Credit: www.inmotionhosting.com
Frequently Asked Questions
How Do I Add Another Domain To My Hosting Account?
Log in to your hosting control panel. Find the “Addon Domains” section. Enter the new domain name and assign a folder. Click “Add Domain” to complete the process. This links the new domain to your hosting space quickly.
Can I Use The Same Hosting Plan For Multiple Domains?
Yes, most hosting plans support multiple domains. Check your plan’s domain allowance first. Adding domains won’t affect your existing websites. This helps manage several sites under one hosting account efficiently.
Do I Need To Update Dns After Adding A Domain?
Yes, update the domain’s DNS to point to your hosting server. This ensures visitors reach your site. DNS changes may take up to 48 hours to propagate fully.
Will Adding Another Domain Affect My Website Speed?
No, adding domains does not directly affect website speed. However, server load and resource limits might impact performance. Choose a hosting plan with enough resources to handle multiple sites.
Conclusion
Adding another domain to your hosting is simple and useful. It helps you manage multiple websites in one place. Just follow the steps carefully to avoid errors. Check your hosting plan supports extra domains before starting. Keep your domain settings updated for smooth operation.
This process saves time and effort for site owners. Try it out and expand your online presence easily.


