
Want to make your WordPress site stand out? Adding animation is a simple way to grab your visitors’ attention and keep them engaged.
Imagine your buttons, images, or text coming to life—making your site feel more dynamic and professional. In this guide, you’ll learn exactly how to add animation to your WordPress site, step by step. No complicated jargon, just clear, easy instructions you can follow right now.
Ready to transform your website and impress your audience? Let’s dive in.

Credit: www.wpbeginner.com
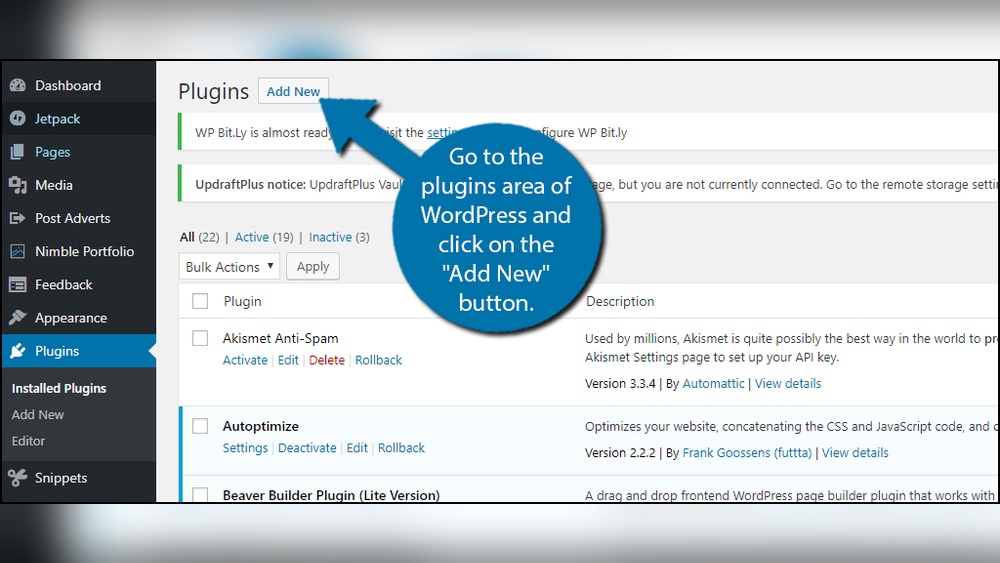
Choosing Animation Plugins
Choosing the right animation plugin can change how your website looks and feels. Animations bring life to your pages and grab visitors’ attention. Picking a plugin depends on your needs, budget, and how easy it is to use. Some plugins offer simple effects, while others provide advanced features for complex animations.
It helps to know which plugins work well with WordPress and your theme. Some plugins are free and good for beginners. Others require payment but offer more options and support. Check if the plugin updates regularly and has good reviews. This shows the plugin is reliable and safe to use.
Top Free Plugins
Several free animation plugins work well for basic effects. Animate It! lets you add simple entrance animations easily. Scroll Magic helps create scroll-based animations without coding. WP Animate gives a set of popular animations like fade and bounce. These plugins do not slow down your site much. They are great for small projects or learning animation basics.
Premium Options
Paid animation plugins offer more control and styles. Slider Revolution includes animation layers and timeline control. Master Slider supports touch gestures and CSS3 animations. AnimateMate has a drag-and-drop builder and many preset effects. Premium plugins come with support and updates. They fit better for professional sites or those needing unique animations.
Compatibility Checks
Always test plugins with your WordPress version. Check if the plugin works with your theme and other plugins. Some animations may conflict and cause errors. Read user feedback about compatibility issues. Try the plugin on a staging site before using it live. This avoids problems and keeps your site stable.
Credit: www.wpbeginner.com
Using Built-in WordPress Features
WordPress offers built-in features that help you add animations without extra plugins. These features are easy to use and work well with most sites. You can make your content more lively and interactive using simple tools inside WordPress. Let’s explore how the block editor and themes support animations.
Block Editor Animations
The WordPress block editor lets you add simple animations to blocks. Some blocks include options for fade-ins, slide-ins, or zoom effects. You can find these settings inside the block’s toolbar or sidebar. Animations help grab visitor attention and make your page dynamic. They work well on images, text, and buttons. You do not need coding skills to use these features.
Theme Animation Support
Many WordPress themes come with built-in animation effects. These themes add smooth transitions to page elements. For example, menus, headers, and sections may animate on scroll or hover. Using a theme with animation support saves time and effort. Check your theme’s settings to enable or customize animations. This approach keeps your site fast and visually appealing.
Adding Css Animations
Adding CSS animations to your WordPress site makes it more lively and interesting. Animations catch visitors’ eyes and improve user experience. You can create smooth movements without plugins by using simple CSS codes. This method keeps your site fast and easy to manage.
Basic Css Animation Properties
CSS animations use a few key properties to control effects. animation-name sets the animation’s label. animation-duration controls how long it runs. animation-timing-function adjusts the speed curve. animation-delay adds a wait time before starting. animation-iteration-count repeats the animation a set number of times or infinitely. These properties form the foundation of any CSS animation.
Customizing Animation Keyframes
Keyframes define the stages of your animation. Use @keyframes to set start and end points. You can add steps in between to create complex effects. For example, move an element from left to right by changing its transform property. Customize colors, sizes, or opacity at different points. Keyframes give you full control over the animation flow.
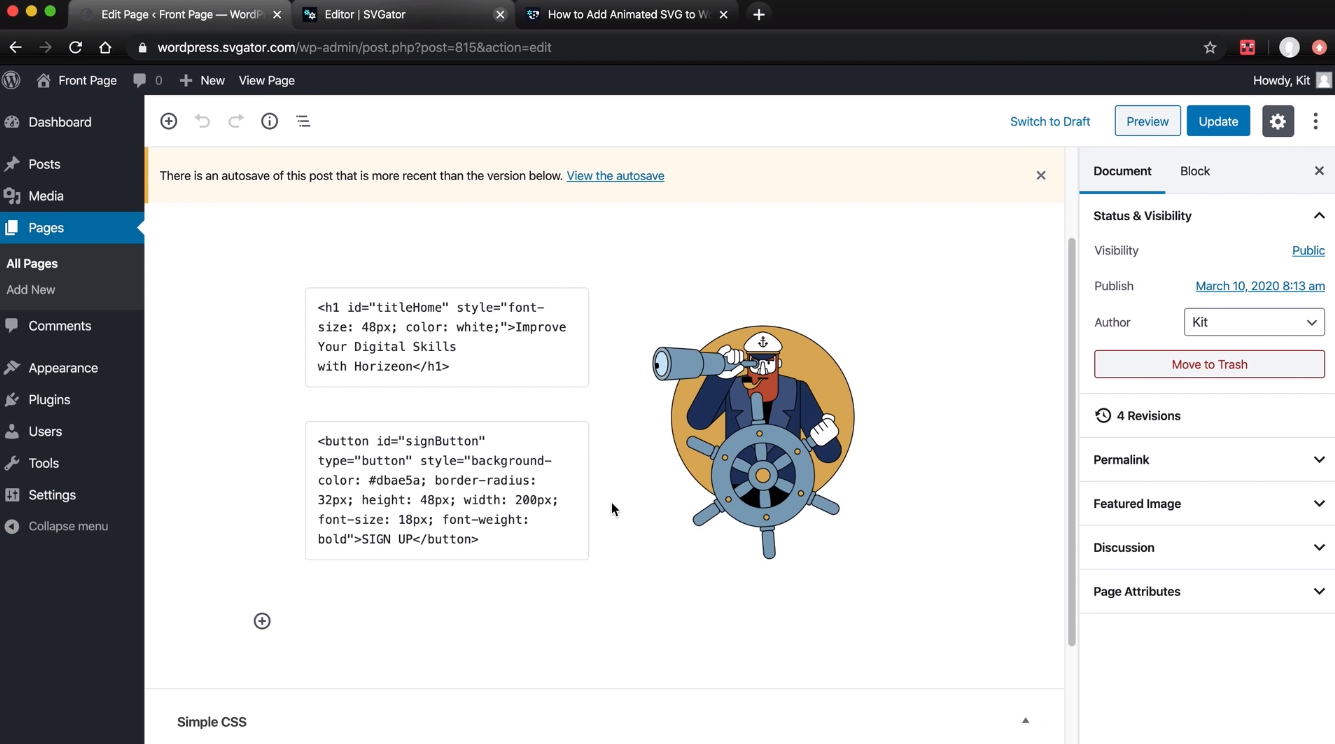
Applying Css To WordPress Elements
To animate elements, first find their CSS classes or IDs. Use browser tools to inspect the element you want to animate. Add your CSS code in the WordPress Customizer under “Additional CSS” or in your child theme’s style.css file. Target specific elements by class or ID and assign your animation properties. This way, your animations appear only where you want them on your site.
Integrating Javascript Animations
Integrating JavaScript animations in WordPress can make your site more lively and interactive. Animations grab visitors’ attention and improve user experience. JavaScript offers many ways to create smooth and engaging effects. You can animate buttons, images, text, and more. This section explains how to add JavaScript animations step-by-step.
Popular Animation Libraries
Many JavaScript libraries simplify animation tasks. Animate.css provides ready-to-use CSS animations with JavaScript triggers. GSAP (GreenSock Animation Platform) offers powerful and flexible animations for complex effects. AOS (Animate On Scroll) creates animations triggered by scrolling. These libraries save time and work well with WordPress.
Embedding Scripts In WordPress
To use JavaScript animations, add scripts to your WordPress site properly. Use the functions.php file to enqueue scripts safely. Avoid adding scripts directly in posts or pages. WordPress functions like wp_enqueue_script help load scripts in the right order. This method keeps your site fast and secure.
Triggering Animations On Scroll
Scroll-triggered animations activate effects as users scroll down the page. This technique highlights content and keeps visitors engaged. Use libraries like AOS or write custom JavaScript to detect scroll position. Connect scroll events to animation functions. This way, animations start only when the user sees them.
Optimizing Animation Performance
Optimizing animation performance improves your website’s speed and user experience. Slow animations can frustrate visitors and increase bounce rates. Proper optimization keeps animations smooth without draining resources. This helps your site load faster and run well on all devices.
Reducing Load Times
Use lightweight animation files like SVG or CSS animations. Avoid heavy video files or large GIFs. Compress animation files before uploading to reduce size. Limit the number of animations on one page. Load animations only when they enter the user’s view. This technique saves bandwidth and speeds up load times.
Mobile-friendly Animations
Ensure animations work well on smaller screens. Test animations on different mobile devices. Use simple animations to avoid lag on slow connections. Avoid animations that require too much CPU power. Use media queries to adjust or disable animations on mobile devices. This keeps your site fast and responsive everywhere.
Avoiding Common Issues
Check for animations that cause layout shifts or flickering. Avoid animations that loop endlessly and distract users. Use smooth easing functions for natural movement. Test animations in multiple browsers to ensure compatibility. Remove unused animation code to reduce clutter. Fix these issues early to enhance user experience.
Credit: www.svgator.com
Testing And Previewing Animations
Testing and previewing animations is a key step in adding animation to WordPress. It ensures your animations look smooth and work well on all devices. Checking animations before publishing saves time and avoids errors. This section explains how to test and preview animations effectively.
Using WordPress Preview Mode
WordPress preview mode shows how your animation looks on your site. It lets you view changes without publishing them. Use preview mode to check timing, movement, and effects. Refresh the preview after edits to see updates. Preview mode works on desktop and mobile views.
Cross-browser Checks
Animations can behave differently in various browsers. Test your animations in Chrome, Firefox, Safari, and Edge. Look for any glitches or slow loading. Fix issues like jittery movement or missing effects. Cross-browser checks ensure your animation reaches all users.
Gathering User Feedback
Ask friends or colleagues to review your animations. Fresh eyes can spot problems you missed. Collect simple feedback on speed, style, and clarity. Use this input to improve your animations. User feedback helps create a better experience for visitors.
Frequently Asked Questions
How Can I Add Animation To WordPress Without Coding?
You can add animation in WordPress using plugins like Animate It! Or Elementor. These tools offer easy drag-and-drop animation features without coding.
Which WordPress Plugins Are Best For Adding Animations?
Top plugins include Animate It!, WP Animate, and Elementor. They provide various animation effects and are user-friendly for beginners and experts alike.
Can I Use Css Animations In WordPress Themes?
Yes, you can add CSS animations by editing your theme’s stylesheet or using custom CSS plugins. This method allows precise control over animation effects.
Will Animations Affect My WordPress Site Speed?
Animations can impact loading time if overused. Optimize animations by minimizing file sizes and using lightweight plugins to maintain fast site performance.
Conclusion
Adding animation to your WordPress site makes it more lively and fun. It helps catch visitors’ eyes and keeps them interested. You can use plugins or simple code to add effects easily. Always test your animations on different devices to ensure they work well.
Keep animations smooth and not too fast to avoid distraction. With a little practice, your site will look more modern and engaging. Try different styles and see what fits your content best. Animation can improve user experience and make your site stand out.


