
If you run a WordPress site, adding a new author can boost your content and bring fresh voices to your readers. But how do you do it quickly and correctly?
You might feel stuck or unsure where to start. This guide will show you step-by-step how to add an author on WordPress without any hassle. By the end, you’ll know exactly how to give someone else the space to share their ideas on your site.
Keep reading to unlock this simple yet powerful skill that can grow your blog or website faster than you expect.

Credit: www.greengeeks.com
Add New User In WordPress
Adding a new author to your WordPress site helps share content creation. This allows multiple people to contribute posts. The process is simple and quick. Follow these steps to add a new user as an author.
Access WordPress Dashboard
First, log in to your WordPress dashboard. Use your admin username and password. The dashboard is the main control panel for your site. It shows all management options in one place.
Navigate To User Section
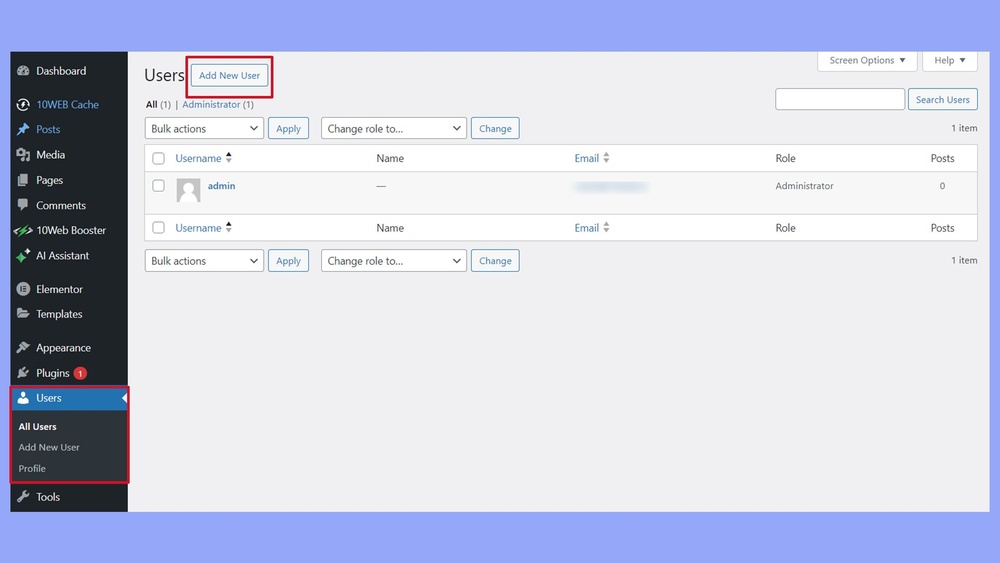
Find the “Users” menu on the left sidebar. Click on it to open the user management area. This section lets you add, edit, or remove users. You can also assign roles like author or editor here.
Fill In User Details
Click the “Add New” button at the top of the Users page. Enter the new user’s username and email address. Set a strong password or let WordPress generate one. Choose the “Author” role from the dropdown menu. Finally, click “Add New User” to save the details.
Assign Author Role
Assigning an author role on WordPress helps control who can write and manage content. This role limits user access to essential author tasks only. It keeps your website safe and organized. Follow the steps below to assign the author role correctly.
Understand User Roles
WordPress has different user roles with various permissions. Each role controls what the user can do on your site. The author role allows users to write, edit, and publish their own posts. They cannot change others’ posts or site settings. Knowing these roles helps you assign the right access to users.
Select Author Role
Go to your WordPress dashboard. Open the “Users” section and click “Add New.” Enter the user’s details like name and email. Find the “Role” dropdown menu. Choose “Author” from the list. This sets the user’s permissions to author level only.
Save User Settings
After selecting the author role, scroll down to find the “Add New User” button. Click it to save the changes. The new user now has author access. They can log in and start creating posts. Always double-check user roles to keep your site secure.
Verify Author Permissions
Verifying author permissions is a key step after adding a new author in WordPress. It ensures the author has the right access to create and manage content. Without proper permissions, authors might face issues publishing or editing posts.
Checking permissions helps maintain your site’s security. It also keeps the workflow smooth by preventing unauthorized actions. Follow these steps to confirm your author’s capabilities and access.
Check Author Capabilities
Start by reviewing the user role assigned to the author. WordPress offers roles like Contributor, Author, Editor, and Administrator. Each role has specific capabilities. For example, Authors can publish their own posts but cannot edit others’ posts.
Go to the WordPress dashboard and open the Users section. Select the author’s profile and check the assigned role. If needed, adjust the role to fit the author’s tasks. You can also use plugins to customize capabilities for each user.
Test Author Access
After setting the role, test the author’s access. Log in as the author or use a plugin to switch user roles temporarily. Try creating, editing, and publishing a post to confirm permissions work correctly.
Check if the author can upload media files if required. Make sure they cannot access restricted areas like site settings or other authors’ drafts. This testing prevents permission errors and protects your site.
Credit: www.hostinger.com
Add Author To Existing Posts
Adding an author to existing posts in WordPress helps give credit to the right person. It also keeps your website organized and professional. You can change the author for a single post or many posts at once. Both methods are simple and fast.
Edit Post Author
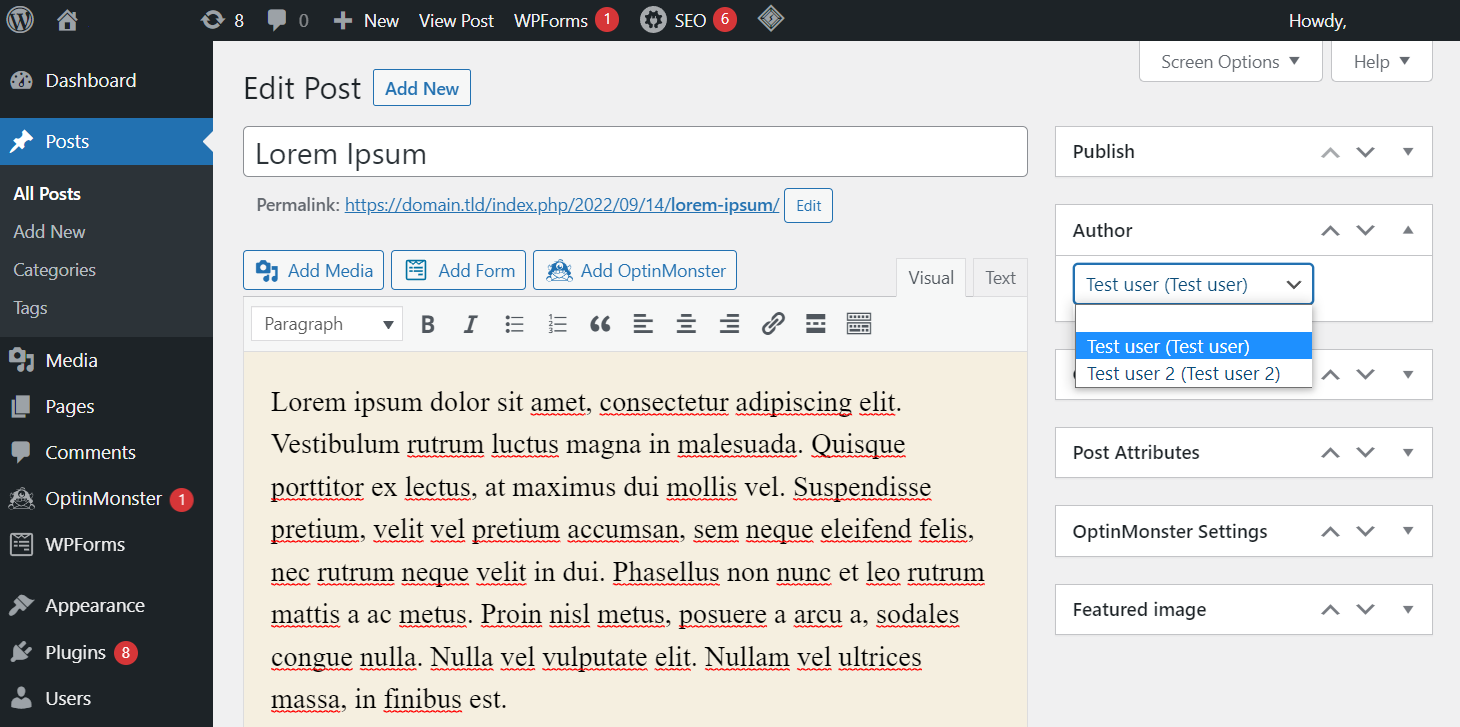
To change the author of one post, start by opening the post editor. Look for the “Author” box on the right side. If you do not see it, click on “Screen Options” at the top. Check the box for “Author” to make it visible. Then, select the new author from the dropdown list. Save or update the post to apply the change. The post will now show the new author’s name.
Bulk Edit Multiple Posts
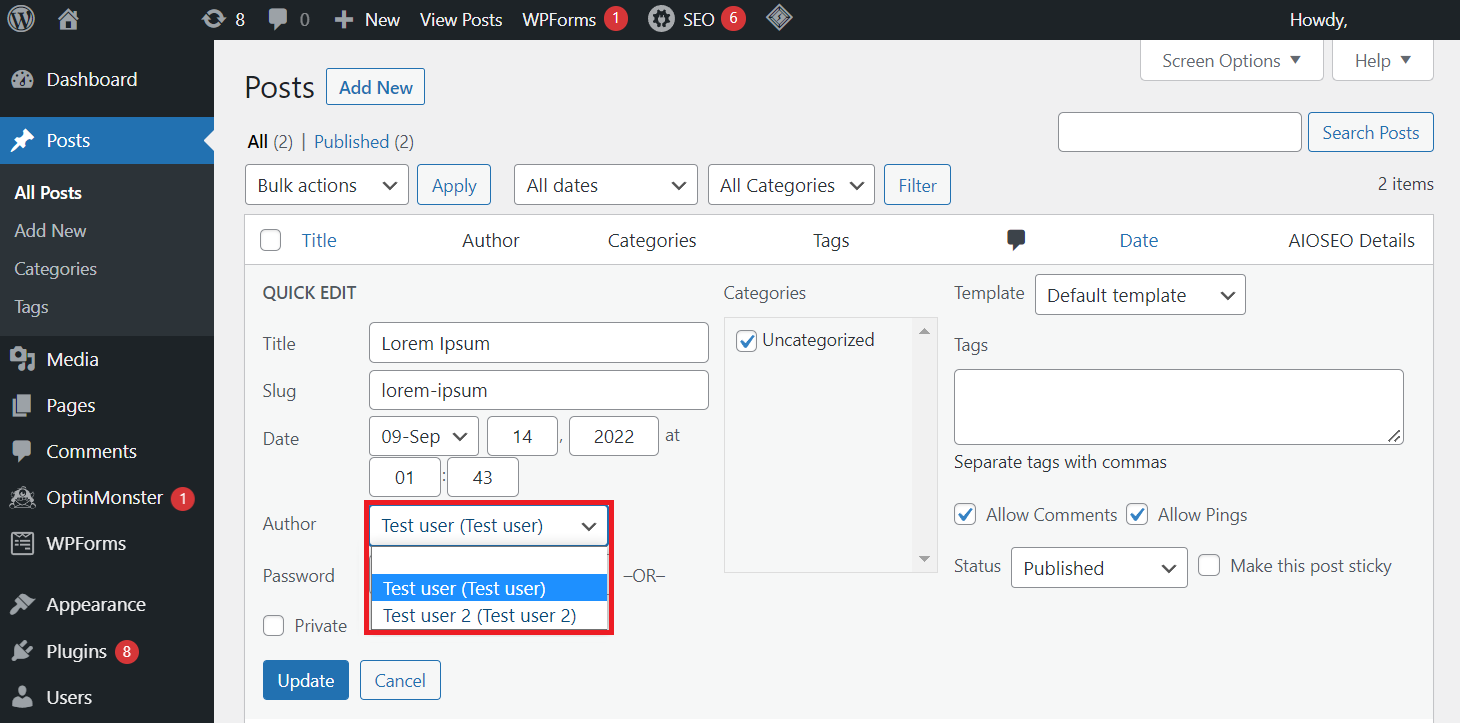
You can also change authors for many posts at once. Go to the “Posts” page in the WordPress dashboard. Use the checkboxes to select the posts you want to edit. Then, click “Bulk Actions” and choose “Edit.” Click “Apply” to open the bulk edit panel. Find the “Author” dropdown and pick the new author. Click “Update” to save changes. All selected posts will now have the new author assigned.
Display Author Info On Site
Displaying author information on your WordPress site helps readers connect with the content. It builds trust and shows who is behind each article. Author info can include a photo, bio, and links to social profiles. This section guides you on how to show author details clearly and attractively.
Enable Author Bio
Most WordPress themes allow you to show an author bio below posts. To enable this, go to your WordPress dashboard. Navigate to the “Users” section and select “Profile.” Here, add details like a short bio and photo. Save changes and check a post to see the bio appear.
Some themes require turning on author bio in the theme settings. Look for options named “Display Author Info” or “Show Author Box.” Switch this on to activate the bio display on posts. This simple step helps readers learn more about the writer.
Customize Author Profiles
Customizing author profiles makes your site look professional. Use plugins like “Simple Author Box” or “WP Author Profile” for more options. These tools let you add social media links, custom images, and style the author box.
Encourage authors to fill out their profiles fully. Ask them to write a clear, brief bio. Include links to their websites or social accounts. A well-done author profile increases reader trust and keeps visitors engaged.
Troubleshoot Common Issues
Adding an author to WordPress can sometimes cause issues. These problems can stop the author from showing correctly or having the right permissions. Troubleshooting common issues helps fix these problems fast. It makes sure your site runs smoothly and your authors get the access they need.
Fix Role Assignment Errors
Role assignment errors happen when WordPress does not save the author role properly. Check the user’s role in the dashboard under Users > All Users. Make sure the new author has the “Author” role assigned.
If the role is wrong, change it to Author and save the changes. Some plugins can block role changes. Disable plugins one by one to find the cause. Clear your site cache after making changes.
Resolve Author Visibility Problems
Sometimes authors do not appear in posts or on the author page. Check if the theme supports author display. Some themes hide author info by default.
Go to Appearance > Customize and look for author settings. Turn on the option to show author names. Also, check the post settings to confirm the author is selected for each post.
Clear your site cache and refresh the page. This step often fixes visibility issues. If the problem stays, try switching to a default theme temporarily. This helps find theme conflicts.
Credit: www.hostinger.com
Frequently Asked Questions
How Do I Add A New Author In WordPress?
To add a new author, go to your WordPress dashboard. Click “Users” then “Add New. ” Fill in the user details and assign the “Author” role. This allows them to create and manage their own posts without full admin access.
Can I Assign Multiple Authors To One WordPress Post?
By default, WordPress doesn’t support multiple authors per post. You need to install a plugin like “Co-Authors Plus. ” This plugin allows you to assign multiple authors and display their names on the post.
How To Change An Existing User’s Role To Author?
Navigate to “Users” in your WordPress dashboard. Find the user you want to change. Click “Edit” and select “Author” from the Role dropdown menu. Save changes to update their permissions accordingly.
What Permissions Does The WordPress Author Role Have?
Authors can write, edit, and publish their own posts. They cannot modify others’ posts or change site settings. This role is ideal for contributors who only manage their own content.
Conclusion
Adding an author on WordPress helps share your website’s work clearly. It gives credit to the right person. You can add new authors quickly by following simple steps. This makes your site look professional and trustworthy. Keep your site updated with fresh content from different voices.
Try adding authors today to improve your blog’s appeal. The process is easy, and the benefits are clear. Start building a strong team for your WordPress site now.


