

If you’re running ads on your WordPress site, you need to make sure you’re protecting your earnings and boosting your ad revenue. One simple step to do this is by adding an ads.txt file.
It might sound technical, but don’t worry – you can do it yourself, even if you’re not a tech expert. In this post, you’ll learn exactly how to add ads. txt to your WordPress site quickly and easily. Follow along, and you’ll have your site set up in no time, helping you keep control over who sells ads on your site and maximizing your income.
Keep reading to find out how!
Credit: www.greengeeks.com
Why Ads.txt Matters
Ads.txt is a simple file that helps protect your website’s ad space. It tells ad networks which companies can sell ads on your site. This small file plays a big role in keeping your ad business safe and fair.
Many website owners do not realize how important ads.txt is. It helps you earn more money and stops bad actors from cheating the ad system.
Impact On Ad Revenue
Ads.txt makes your ad inventory more trustworthy. Advertisers prefer sites with ads.txt files. They pay better rates for ads on trusted sites. Without ads.txt, you might lose ad deals. Some ad networks even refuse to work with sites without it.
Adding ads.txt can lead to higher ad earnings. It shows advertisers that you control your ad space. This makes your site more attractive for ad spending.
Preventing Ad Fraud
Ad fraud happens when fake sellers pretend to sell your ad space. Ads.txt stops this by listing authorized sellers. This protects your brand and your income. Advertisers know they buy real ads, not fakes.
Fraudulent ads can harm your site’s reputation. Ads.txt keeps your ad space safe and clean. It helps build trust with advertisers and visitors alike.
Preparing Your Ads.txt File
Preparing your ads.txt file is a key step before adding it to WordPress. This file tells advertisers which sellers can sell your ad space. It helps protect your website from fake ad sellers and keeps your ad revenue safe.
Creating the ads.txt file requires careful attention. You must gather the right information and format the file correctly. This ensures your ads.txt works well with ad networks and platforms.
Gathering Authorized Seller Information
Start by listing all companies authorized to sell your ads. These include ad networks and platforms you use. Check your ad account dashboard for this data. Usually, they provide the exact lines you need to add to your ads.txt file.
Each entry should have the seller’s domain, your publisher ID, the type of relationship, and sometimes an ID number. Write down each detail carefully. Getting this right helps your ads run smoothly and prevents lost earnings.
Formatting The File Correctly
Your ads.txt file must follow a simple text format. Use a plain text editor, like Notepad or TextEdit, to create it. Each line should list one authorized seller in this order:
- Seller’s domain
- Your publisher ID
- Type of relationship (usually “DIRECT” or “RESELLER”)
- Optional certification authority ID
Separate each part with a comma. Do not add extra spaces or special characters. Save the file with the name ads.txt. This ensures WordPress and ad systems recognize it correctly.
Adding Ads.txt Via WordPress Plugins
Adding an ads.txt file to your WordPress site helps control who can sell your ad space. Using plugins makes this task simple and quick. Plugins let you upload or create the ads.txt file without coding. This method fits well for beginners and those who want to avoid technical steps.
Choosing The Right Plugin
Pick a plugin that supports ads.txt management clearly. Look for options with good ratings and recent updates. Popular choices include “Ads.txt Manager” and “Advanced Ads.” These plugins offer easy interfaces to edit or upload your ads.txt file. Check if the plugin works with your current WordPress version. Also, confirm it does not slow down your site.
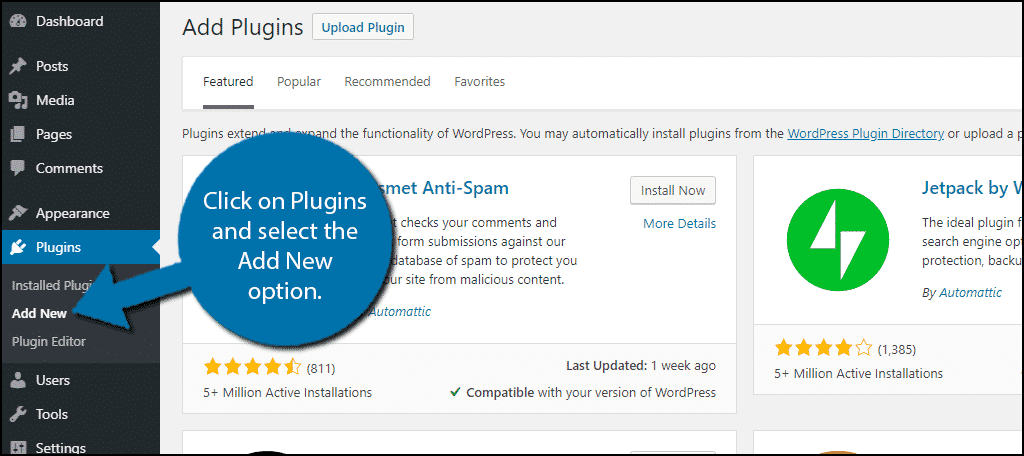
Step-by-step Plugin Setup
First, install the plugin from the WordPress dashboard. Go to “Plugins” and click “Add New.” Search for your chosen ads.txt plugin and click “Install Now.” After installation, activate the plugin. Next, find the plugin settings in your dashboard menu. Open the ads.txt editor or upload section. Paste your ads.txt content or upload the file directly. Save changes to publish the file on your site. Finally, verify the ads.txt file loads at yourdomain.com/ads.txt. This confirms your ads.txt is working correctly.

Credit: themehunk.com
Manual Ads.txt Upload On WordPress
Manual Ads.txt upload on WordPress lets you control your ad settings directly. It involves placing a small text file in your website’s root folder. This file helps ad networks verify your site’s authorized sellers. Doing it manually is simple and ensures your ads run without issues.
Accessing Your Site’s Root Directory
Start by logging into your web hosting control panel. Find the File Manager tool inside. Navigate to the root directory of your WordPress site. This folder is often called public_html or www. The root directory holds all main WordPress files and folders.
Look for folders like wp-admin, wp-content, and wp-includes. If you see these, you are in the right place. You can also use an FTP client like FileZilla. Connect to your site using your FTP login details. Access the root directory through the FTP interface.
Uploading The Ads.txt File
Create your ads.txt file using a simple text editor. Include only the authorized ad sellers and their details. Save the file as ads.txt on your computer. Upload this file to the root directory using File Manager or FTP.
Make sure the file is placed directly in the root folder. It should not go inside any subfolder. Once uploaded, check your site URL like this: yourdomain.com/ads.txt. The file should open in the browser showing your ad sellers.
Verifying Ads.txt Implementation
Verifying your Ads.txt implementation is important to ensure your ad setup works properly. It helps confirm that your file is accessible and correctly formatted. This step protects your site from unauthorized ad sales. Checking your Ads.txt file ensures advertisers trust your site. It also improves your ad revenue by preventing fake inventory sales.
Using Online Tools
Several free online tools help verify Ads.txt files quickly. These tools check if the file exists and follows the correct format. You just need to enter your website URL. The tool scans your Ads.txt file and reports any errors. This method saves time and avoids manual checks. Use these tools regularly to keep your Ads.txt file error-free.
Checking Through WordPress
You can verify Ads.txt directly from your WordPress dashboard. Visit the root folder of your website using a file manager plugin. Find and open the Ads.txt file to review its content. Ensure the file is uploaded in the root directory, not in subfolders. You can also use WordPress SEO plugins that scan and validate Ads.txt files. This way, you manage and check your file without leaving WordPress.
Credit: www.infolinks.com
Troubleshooting Common Issues
Troubleshooting common issues with the ads.txt file can save time and improve ad revenue. Problems often happen during setup or updates. Fixing these issues quickly keeps your ads running smoothly. This section explains two frequent errors and how to solve them.
File Not Found Errors
One common problem is the “File Not Found” error. This happens when the ads.txt file is missing or placed in the wrong folder. The file must be in the root directory of your WordPress site. Check your hosting file manager or use an FTP client to confirm the file location.
Make sure the file name is exactly “ads.txt”. Avoid extra spaces or different letters. Also, clear your site cache and browser cache to see changes. This error stops ad networks from reading your file, so fix it quickly.
Incorrect File Formatting
Another issue is incorrect file formatting. The ads.txt file must follow a specific format. Each line should have three parts: the domain name, the publisher ID, and the type of relationship. Separate each part with a comma and no extra spaces.
Use a plain text editor to create or edit the file. Avoid word processors that add hidden characters. Check for typos and make sure each entry matches your ad network’s instructions. Proper formatting ensures ad networks recognize your site correctly.
Frequently Asked Questions
What Is Ads.txt And Why Add It To WordPress?
Ads. txt is a file that protects ad inventory from fraud. Adding it to WordPress helps verify authorized sellers. It ensures ad revenue goes to legitimate publishers, improving transparency and trust with advertisers.
How Do I Create An Ads.txt File For WordPress?
Create a plain text file named “ads. txt” with authorized seller info. Use your ad network’s exact details. Save the file and upload it to your WordPress site’s root directory using FTP or file manager.
Where Should I Upload The Ads.txt File In WordPress?
Upload the Ads. txt file to your WordPress root directory. This is the main folder where WordPress is installed. It must be accessible at yourdomain. com/ads. txt to be recognized by ad platforms.
Can I Edit Ads.txt Directly In WordPress Dashboard?
WordPress doesn’t have a default option to edit Ads. txt. Use an FTP client or a file manager plugin to upload or modify the Ads. txt file manually for accuracy.
Conclusion
Adding ads. txt to your WordPress site helps protect your ad revenue. It tells advertisers who can sell your ads. This simple file stops fake sellers from using your space. You can add it in a few easy steps. Keep your ads.
txt file updated and accurate. This keeps your site safe and trustworthy for advertisers. Take a few minutes to add it today. It’s a small task with big benefits for your website.


