
Ever found yourself staring at your WordPress theme, wishing it had that extra touch of functionality or flair? Widgets can be your secret weapon.
They’re those handy little tools that can transform your website into a more engaging and interactive space for your visitors. But here’s the thing—you need to know how to add them properly to get the most out of your site.
Imagine having the power to customize your sidebar or footer with just a few clicks, boosting your site’s usability and appeal. This guide will walk you through the simple steps to seamlessly integrate widgets into your WordPress theme. Ready to give your website that much-needed boost? Let’s dive in and unlock the potential of your WordPress theme together!
Choosing The Right Widget
Widgets come in many types. Some show images or videos. Others display text or links. Think of a clock widget. It shows the time. A calendar widget shows dates. Social media widgets show feeds. They connect to sites like Facebook. Search widgets help users find things. Choose a widget that fits your need.
Check if the widget works with your theme. Some widgets need special settings. Others might not fit well. Always check compatibility first. Read the widget details. Some widgets work only with certain themes. Testing helps you find the right fit. A good widget should work smoothly.

Credit: qodeinteractive.com
Locating The Widget Area
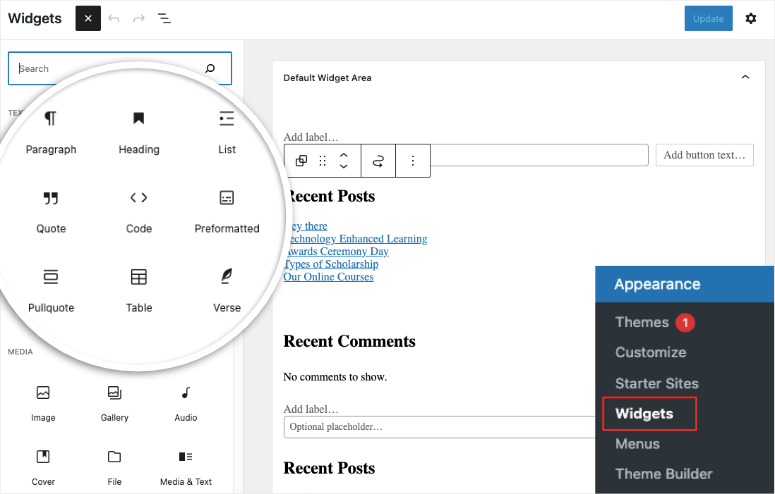
Discover the widget area in your WordPress dashboard. Navigate to Appearance, then Widgets. This section allows easy addition of widgets to your theme.
Understanding Widget Areas
Widget areas are special parts of a WordPress theme. They let you add useful tools. These tools are called widgets. Widgets can show text, images, or links. Many themes have multiple widget areas. Some themes have them in the sidebar. Others have them in the footer. Knowing where they are is important. It helps you customize your site.
Identifying Widget Areas In Your Theme
Start by visiting your WordPress dashboard. Click on the Appearance tab. Then select Widgets. Here, you will see available widget areas. Each area has a name. Names can be Sidebar, Footer, or Header. Explore these areas. Check where widgets are placed. Understanding their position is key. It helps you design your site easily.
Installing A New Widget
First, log in to your WordPress Dashboard. Find the menu on the left side. Click on Appearance. Then, click on Widgets. You will see a list of available widgets. Drag a widget to the sidebar area. This area shows where the widget will appear. Make sure to save your changes. Now, the widget is active on your site. It’s easy and quick!
Some widgets need manual upload. First, download the widget file. It is usually a zip file. Go to your WordPress Dashboard. Click on Plugins, then Add New. Find the Upload Plugin button. Click it and upload your file. After uploading, activate the widget. Visit the Appearance section. Drag the new widget to your sidebar. Save your settings to finish.
Adding Widgets To Your Theme
Adding a widget is easy with drag and drop. First, go to the WordPress Dashboard. Find the Appearance option. Click on Widgets. You will see a list of available widgets. Drag the widget you want to the sidebar. Place it where you like. You can also remove it by dragging it back.
Access the Customizer from the WordPress Dashboard. Find the Appearance option. Click on Customize. Look for the Widgets section. Select the area to add your widget. Click Add a Widget. Choose your desired widget from the list. Click Publish to save changes. Now your widget is live.
Customizing Widget Settings
Modifying Widget Appearance can be fun and creative. Choose the best colors that fit your theme. Try different fonts to make text stand out. Adjust the size to fit your space well. Add borders for a neat look. Use padding for better spacing. Make sure everything is clear and easy to read. Check your changes and see how they look. Experiment until it feels right. Your widget should look nice and match your site.
Adjusting Widget Functionality is important too. Make sure the widget does what you need. Add links if you want it clickable. Include images for better visuals. Ensure it updates fast for users. Use settings to improve interaction. Test the widget to see if it works. Fix any errors you find. Keep things simple and useful. Widgets should help, not confuse. Your site should be easy to use.
Credit: www.isitwp.com
Troubleshooting Common Issues
Widgets sometimes do not show up on WordPress. This can be frustrating. First, check if the widget is active. Go to the widget section in your dashboard. Ensure it is placed in the correct sidebar. If the problem persists, switch to a default theme. This helps determine if your theme is the issue. Refresh your page after any change. Widgets might just need a simple refresh.
Compatibility issues often arise with WordPress widgets. Themes and plugins can sometimes clash. Check if all your plugins and themes are updated. Outdated items may cause conflicts. Disable plugins one by one. See if the widget appears. If it does, the last plugin disabled is the culprit. Consider using another plugin or contacting the developer for help.
Enhancing Widget Performance
Adding a widget to a WordPress theme can boost your site’s functionality. Start by accessing the WordPress dashboard. Navigate to ‘Appearance’ and select ‘Widgets’. Drag and drop the desired widget into the appropriate widget area. Customize the widget settings to fit your theme’s needs.
Enjoy enhanced widget performance.
Optimizing For Speed
Fast loading widgets make your website feel smooth. They keep users happy. To make widgets load faster, use light images. Minimize the code. Avoid too many scripts. A small plugin can help compress files. This saves space and speeds up the site. Speed is important for user experience.
Ensuring Mobile Responsiveness
Widgets should fit small screens. They must work on phones and tablets. Use a responsive design for widgets. This means they adjust to different screen sizes. Test widgets on different devices. Make sure buttons are easy to tap. Text must be clear and not too small. Mobile-friendly widgets make browsing easy.

Credit: wordpress.org
Frequently Asked Questions
How Do I Add A Widget In WordPress?
To add a widget in WordPress, navigate to the “Appearance” menu, then select “Widgets. ” Drag your desired widget into the sidebar area. Customize the widget settings as needed, and save your changes. Widgets enhance functionality and layout, making your site more dynamic and user-friendly.
Can I Customize Widget Settings Easily?
Yes, customizing widget settings is simple. After adding a widget, click on it to access its configuration options. Adjust settings like title, visibility, and content display. Save your changes to apply them. This customization allows for personalized and effective widget integration on your WordPress site.
Do All Themes Support Widgets In WordPress?
Most WordPress themes support widgets, but some may have limitations. Check your theme documentation for widget compatibility. If your theme supports widgets, you can customize their placement and functionality. Choosing a widget-friendly theme enhances your site’s flexibility and user engagement.
Why Use Widgets In A WordPress Theme?
Widgets offer additional features and content display options for your WordPress site. They enhance user experience by providing interactive elements like search bars, calendars, and social media links. Using widgets optimizes site functionality and layout, helping to engage visitors effectively.
Conclusion
Adding a widget to your WordPress theme is simple. Follow each step carefully. Customize your site easily with widgets. They enhance functionality and design. Widgets give your site a unique touch. Experiment with different options. Find what suits your needs best.
Remember to check widget settings. Make sure they align with your site’s purpose. With practice, you can become more confident. Your site will stand out. Widgets are a powerful tool. They help personalize your web presence. Enjoy the creative process.
Happy customizing!


