
Want to make your WordPress site easier to navigate? Adding a page to your menu is one of the simplest ways to guide your visitors exactly where you want them to go.
If you’ve ever felt stuck or unsure about how to update your menu, you’re in the right place. You’ll learn a clear, step-by-step method to add any page to your WordPress menu quickly and effortlessly. By the end, you’ll have full control over your site’s navigation, helping your visitors find what they need without frustration.
Let’s get started!
Accessing The WordPress Dashboard
Accessing the WordPress dashboard is the first step to managing your website. This area lets you control all site content, settings, and design. It acts like the command center for your WordPress site.
To start, you need to log in. After login, you see the dashboard’s main screen. Here, you can add pages, posts, and change menus.
Logging Into Your WordPress Site
Open your web browser and go to your website’s login page. Usually, it is yourwebsite.com/wp-admin. Enter your username and password. Click the “Log In” button. If the details are correct, you reach the dashboard.
Understanding The Dashboard Layout
The left side shows the main menu with options like Pages, Posts, Appearance, and Settings. The center area shows updates and quick actions. The top bar provides shortcuts for your profile and site view.
Finding The Menu Settings
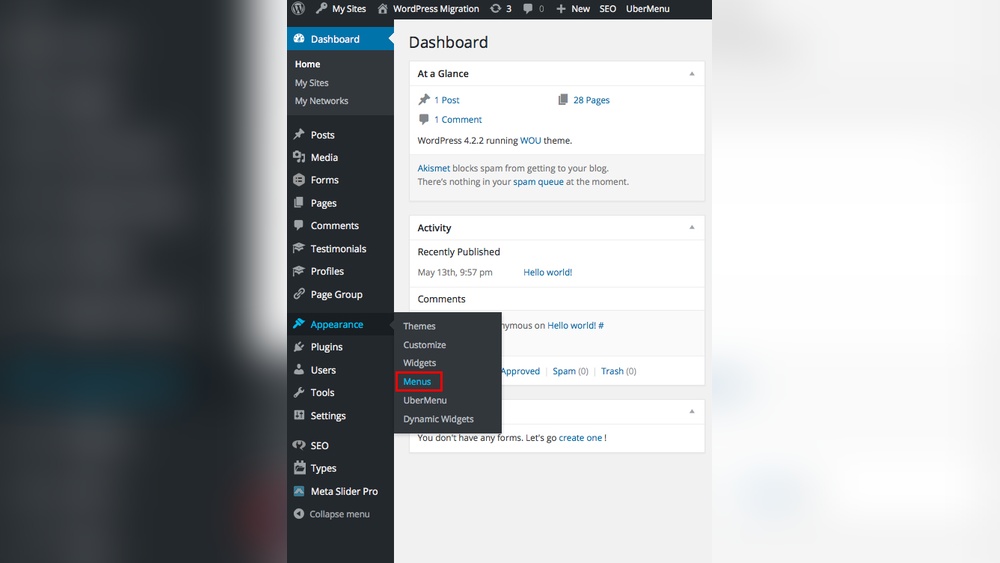
Look at the left menu and click on “Appearance.” From the dropdown, select “Menus.” This section lets you control your site’s navigation. Here, you can add or remove pages from the menu.

Credit: www.youtube.com
Navigating To The Menus Section
Navigating to the Menus section in WordPress is the first step to customize your website’s navigation. This area lets you control which pages appear on your site’s menu. Finding this section is easy and quick.
Follow these steps to reach the Menus section. This helps you organize your site’s structure and improve user experience.
Start by logging into your WordPress account. The dashboard is the main control panel of your website. It shows different options to manage your site.
Look for the left sidebar once you are in the dashboard. This sidebar contains the menu for all settings and tools.
Locating The Appearance Tab
In the sidebar, find the “Appearance” option. It controls the look and layout of your website. Click on “Appearance” to open a submenu.
The submenu has different options like Themes, Widgets, and Menus. Menus is where you customize your site’s navigation.
Selecting The Menus Option
Click the “Menus” link under the Appearance tab. This opens the Menus page. Here, you can create, edit, and manage your menus.
The Menus page displays all current menus and options to add new pages. It is simple to use and very helpful for organizing your site.
Selecting The Menu To Edit
Selecting the menu to edit is the first step in adding a page to your WordPress menu. This step helps you decide where your new page will appear on your website. Menus organize your site’s navigation and guide visitors to important pages.
WordPress allows you to create multiple menus. Each menu can be placed in different locations, such as the header, footer, or sidebar. Choosing the right menu ensures your visitors find what they need quickly.
Select The Appearance Menu
Start by logging into your WordPress dashboard. Look for the “Appearance” option in the left sidebar. Click on “Appearance” to reveal more choices. Then, select “Menus” from the list. This action opens the menu editor where you can manage your site’s menus.
Choose The Menu To Edit
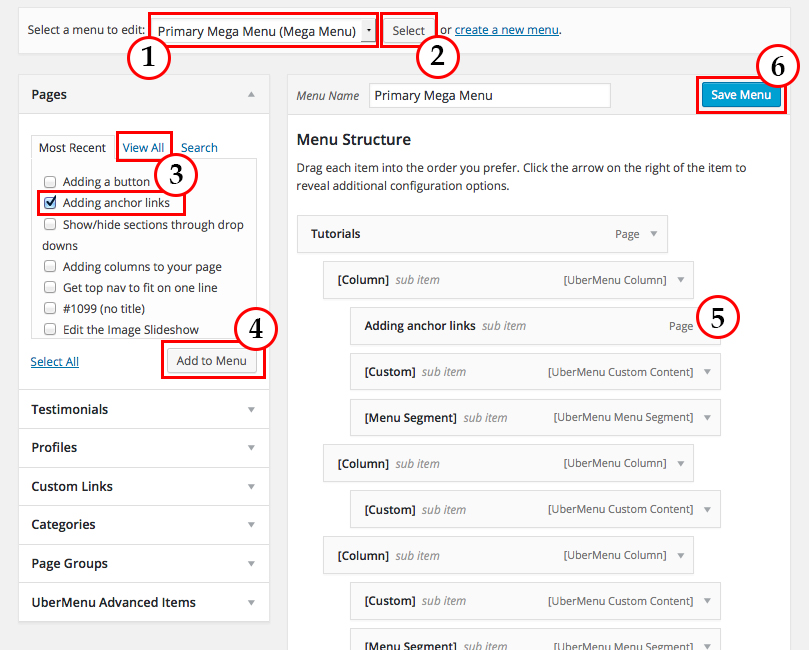
At the top of the menu editor page, find the “Select a menu to edit” dropdown box. Click on it to see all the menus you have created. Pick the menu you want to change. After selecting, press the “Select” button next to the dropdown.
Confirm Your Menu Selection
Once you choose a menu, WordPress loads it for editing. Check the menu items listed on the right side. These items show what visitors see on your website. Confirm this is the menu you want to add the new page to before continuing.
Credit: wou.edu
Adding A New Page To The Menu
Adding a new page to your WordPress menu helps visitors find important content. This process is simple and quick. You can include pages you want to highlight. Menus improve site navigation and user experience.
Menus are flexible. You can change them anytime in the WordPress dashboard. This guide explains how to add a page to the menu step-by-step.
Choosing The Page
Start by going to the WordPress dashboard. Find the “Appearance” section. Click on “Menus” to open the menu editor.
On the left side, you see a list of your pages. Check the box next to the page you want to add. Then click “Add to Menu.”
The page appears in the menu structure on the right. You can drag it to change its order. Place it where you want it to show on your site.
Adding Custom Links
You can add links that are not pages. Look for the “Custom Links” tab on the left side of the menu editor.
Enter the full URL of the link. Type the name for the menu item in the “Link Text” box.
Click “Add to Menu.” The link will appear in the menu structure. Move it to the desired position.
Organizing Menu Items
Organizing menu items helps visitors find pages quickly. A well-structured menu improves website navigation. WordPress offers simple tools to reorder pages and create submenus. This keeps your menu clean and easy to use.
Reordering Pages
Reordering pages changes the order they appear in the menu. Drag and drop menu items to move them up or down. This lets you put the most important pages first. You can reorder pages anytime from the WordPress menu settings.
Creating Submenus
Submenus group related pages under one main menu item. Drag a page slightly to the right under another menu item. This creates a dropdown menu with nested pages. Submenus keep your main menu simple and organized.
Credit: www.hostinger.com
Saving And Previewing Changes
Saving and previewing changes in WordPress is an important step after adding a page to the menu. This step makes sure your new menu item appears correctly on your website. It also helps you avoid mistakes before visitors see the site.
WordPress offers simple tools to save your menu changes quickly. You can also preview the menu as it will appear live. This lets you check links, order, and design easily.
Saving Your Menu Changes
After adding a page to your menu, click the “Save Menu” button. This button is usually at the top or bottom of the menu editor. Saving stores your changes in WordPress immediately. Without saving, your new menu item will not appear on your site.
Always save before leaving the menu editor. This practice prevents losing your work. If you forget to save, WordPress will warn you when you try to leave.
Previewing Your Menu Before Publishing
WordPress allows you to preview the menu on your website. Look for the “Manage Locations” tab or the “Preview” button. Previewing shows your menu as visitors will see it. Check the new page link to make sure it works.
Use preview mode to test the menu on different devices. This helps ensure your site looks good on phones and tablets. Fix any issues before making the menu live.
Troubleshooting Common Issues
Troubleshooting common issues helps keep your WordPress menu working well. Problems can stop your page from showing in the menu. These issues are often easy to fix.
Follow the tips below to solve common menu problems. Fixing these quickly improves your site’s navigation and user experience.
Menu Not Showing
Check if the menu is assigned to a location in your theme. Go to Appearance > Menus and find the “Menu Settings.” Make sure the menu is set to the correct display spot.
Clear your browser cache to see recent changes. Sometimes old data hides updates. Also, disable caching plugins temporarily. These can block menu changes from appearing.
Update your theme and WordPress to the latest version. Outdated software can cause menu display problems. After updates, revisit the menu settings and save again.
Page Not Listed
Verify the page is published and not set to draft or private. Unpublished pages won’t appear in the menu list. You can find this in the Page editor under “Status.”
Refresh the menu page by clicking the “View All” tab in the Pages box. This ensures WordPress loads all pages available for the menu.
Sometimes custom post types or plugins hide pages from the menu list. Disable plugins one by one to check if any cause the issue. If found, seek plugin support or alternatives.
Using Plugins For Advanced Menus
Using plugins for advanced menus in WordPress allows users to customize navigation easily. These tools offer more options than the default menu editor. Plugins help create multi-level menus, mega menus, and add icons or images. They enhance user experience and site navigation without coding.
Many plugins come with drag-and-drop builders. This simplifies the menu design process. Users can preview changes in real time. Some plugins also improve mobile menu responsiveness.
What Are Advanced Menu Plugins?
Advanced menu plugins extend WordPress menu features. They provide extra styling and layout options. Some support custom fonts, colors, and animation effects. These plugins often include preset templates for quick setup.
Popular Plugins For Creating Advanced Menus
Several plugins stand out for menu customization. “Max Mega Menu” allows building large, complex menus easily. “WP Mega Menu” supports icons and custom widgets inside menus. “UberMenu” offers great control over menu appearance and behavior.
How To Install And Activate A Menu Plugin
Go to the WordPress dashboard and open Plugins > Add New. Search for the plugin name in the search box. Click Install Now and then Activate. After activation, access the plugin settings for customization.
Customizing Menus Using Plugins
Open the plugin’s menu builder interface. Use drag-and-drop tools to arrange menu items. Add icons, images, or widgets to menu sections. Adjust colors, fonts, and sizes to match your site style.
Benefits Of Using Plugins For Menus
Plugins improve menu flexibility and design. They make navigation more user-friendly. Menus become more attractive and easier to use on all devices. Plugins also save time by simplifying menu setup.
Frequently Asked Questions
How Do I Add A New Page To The WordPress Menu?
To add a page, go to Appearance > Menus in your dashboard. Select the page and click “Add to Menu. ” Then, save the menu to apply changes.
Can I Rearrange Menu Items After Adding Pages?
Yes, you can drag and drop menu items to reorder them. After arranging, click “Save Menu” to update the menu structure.
How To Create A Custom Menu In WordPress?
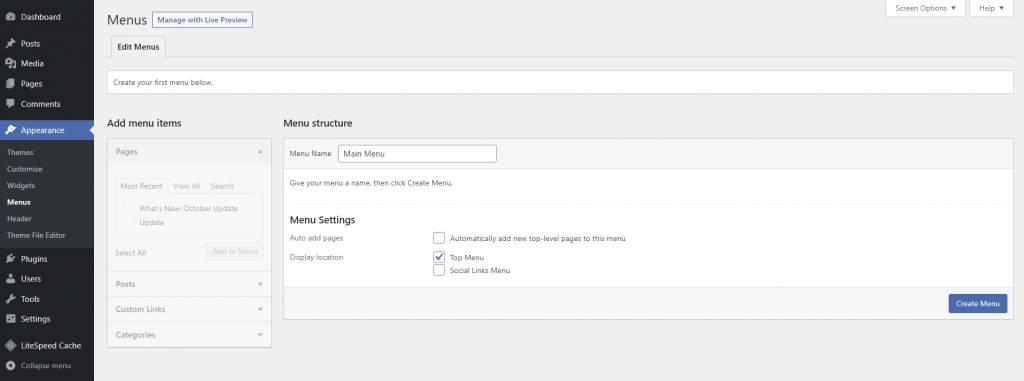
Navigate to Appearance > Menus, click “create a new menu,” name it, add pages, and save. Assign it to a menu location.
Why Is My New Page Not Showing In The Menu?
Ensure you added the page to the menu and saved it. Also, confirm the correct menu is assigned to your theme location.
Conclusion
Adding a page to your WordPress menu is simple and quick. Just follow the steps carefully. This helps visitors find important pages easily. A clear menu improves your website’s navigation and user experience. Keep your menu updated as you add new pages.
This way, your site stays organized and user-friendly. Practice these steps to feel more confident managing your WordPress menu. Your website will look better and work smoothly for everyone.



