
Are you looking to make your WordPress site easier to navigate? Adding a new menu can help you organize your pages and guide your visitors exactly where you want them to go.
Whether you want to highlight your latest blog posts, showcase important pages, or create a custom navigation experience, setting up a new menu is simpler than you might think. You’ll discover clear, step-by-step instructions to add a new menu in WordPress quickly and without hassle.
By the end, you’ll have full control over your site’s navigation, making it more user-friendly and professional. Let’s get started!
Accessing The WordPress Dashboard
Accessing the WordPress Dashboard is the first step to add a new menu. The dashboard is the control center for your website. It lets you manage content, menus, and settings easily.
Knowing how to open the dashboard saves time and avoids confusion. Follow simple steps to reach your dashboard quickly. This guide helps beginners access the dashboard with ease.
Opening The WordPress Login Page
Start by typing your website’s URL in a browser. Add /wp-admin at the end of the address. Press enter, and the login page will appear.
This page asks for your username and password. These details were set during installation or by your site admin.
Entering Your Username And Password
Type your username in the first box. Then, enter your password in the second box. Check for any typing mistakes to avoid errors.
Click the “Log In” button to proceed. If the details are correct, the dashboard will load.
Understanding The Dashboard Layout
The dashboard shows a menu on the left side. This menu has links to posts, pages, appearance, and more.
The main area displays recent activity and site statistics. Use the left menu to find “Appearance” and then “Menus”.
Navigating To The Menus Section
Finding the Menus section in WordPress is the first step to creating a new menu. This area lets you control the navigation of your website. Knowing where to go saves time and reduces confusion.
The WordPress dashboard is your starting point. It holds all the tools needed to manage your site. Menus are part of the Appearance settings, which manage how your site looks and functions.
Log in to your WordPress site with your username and password. After logging in, you see the dashboard. It shows different options like Posts, Pages, and Appearance.
Locating The Appearance Menu
Look at the menu on the left side of the dashboard. Find the “Appearance” option. Click it to open a submenu with more choices. Menus is one of these choices.
Opening The Menus Section
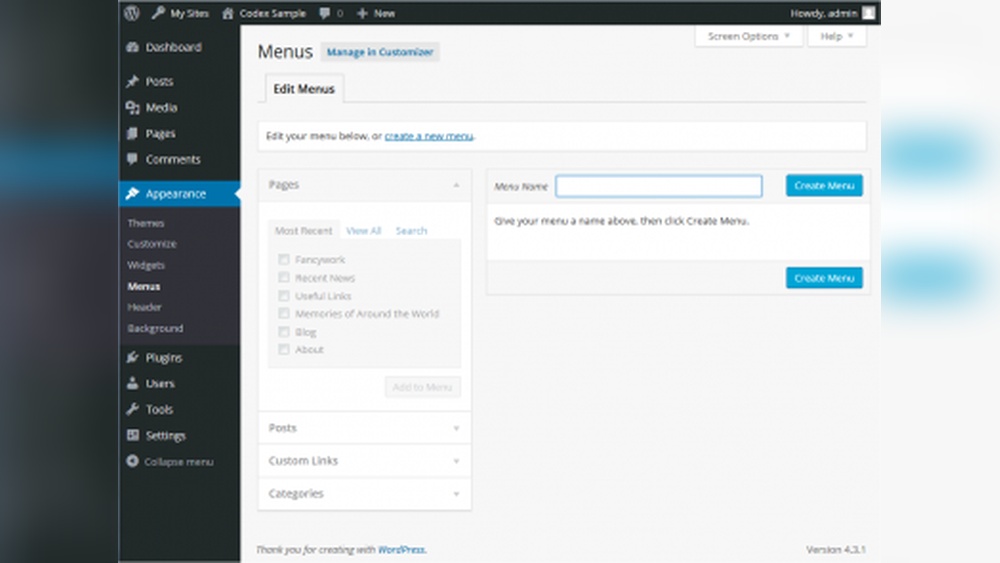
Click the “Menus” link under Appearance. This takes you to the Menus page. Here, you create and edit navigation menus for your site. The page is simple and easy to use.
Creating A New Menu
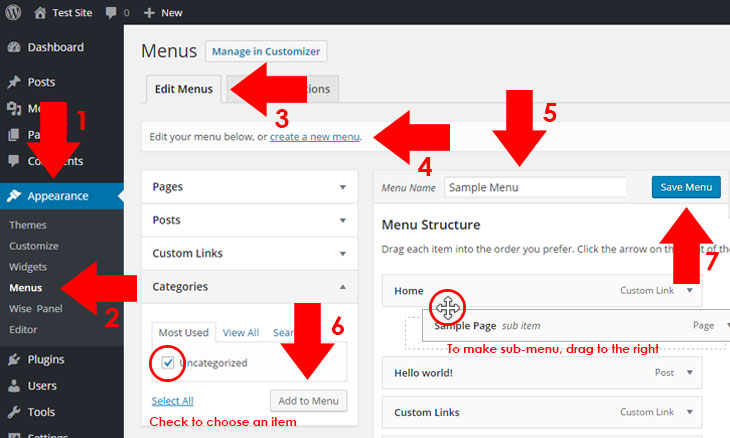
Creating a new menu in WordPress is simple and quick. Menus help visitors find pages and sections easily. You can organize your site navigation clearly. Follow these steps to create a menu that fits your needs.
Naming Your Menu
Start by giving your menu a clear name. Use words that describe its purpose. For example, “Main Menu” or “Footer Links.” A good name helps you find it later. It also makes managing menus easier.
Saving The Menu
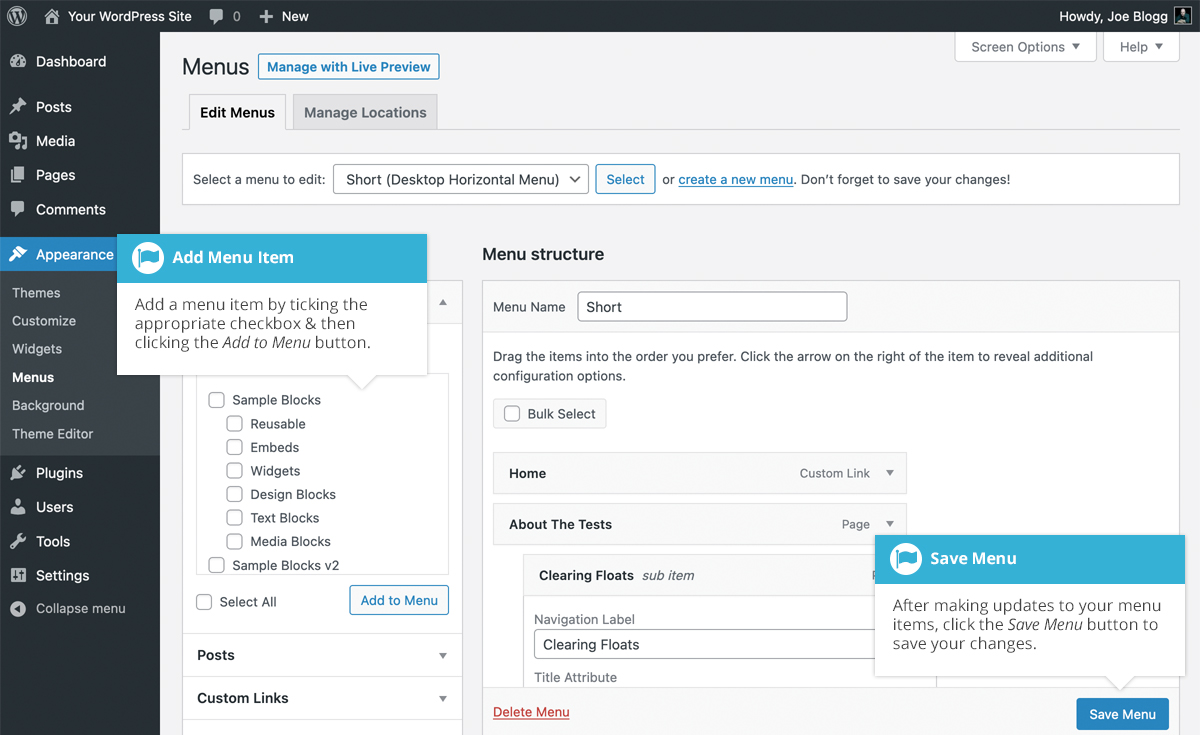
After naming, save your menu to keep changes. Click the “Save Menu” button below the menu settings. This step makes sure your new menu is ready. You can add items to it after saving.
Credit: www.probewise.com
Adding Items To Your Menu
Adding items to your WordPress menu is simple and flexible. You can include different types of content to guide visitors through your site easily. This section explains how to add pages, custom links, and categories to your menu. Each option helps you create a navigation menu that suits your needs.
Adding Pages
Pages are the most common items in a menu. To add a page, find the list of your website pages in the menu editor. Check the box next to the page you want. Click “Add to Menu.” The page will appear in your menu structure. You can drag it to change the order. Save the menu to apply the changes.
Adding Custom Links
Custom links let you add any URL to your menu. This is useful for linking to external sites or specific sections on your own site. Enter the URL in the custom link box. Give it a label that shows in the menu. Click “Add to Menu.” The link will show in your menu list. Move it where you want and save your menu.
Adding Categories
Categories organize your blog posts. Adding categories to the menu helps visitors find related content. In the menu editor, locate the categories box. Select the categories to include. Click “Add to Menu.” The categories will appear in the menu layout. Arrange them by dragging and save your menu.
Organizing Menu Items
Organizing menu items in WordPress is simple and helps visitors find content easily. A well-structured menu improves site navigation. It also makes your website look clean and professional.
WordPress lets you arrange menu items by dragging, dropping, and creating submenus. These tools give you full control over your menu’s layout. This section explains how to organize your menu items step by step.
Dragging And Dropping Items
Click and hold a menu item to move it. Drag the item up or down to change its order. Drop it in the desired position. This method lets you quickly reorder items without deleting them. Use this to prioritize important pages or links.
Creating Submenus
To create a submenu, drag a menu item slightly to the right under another item. This action nests it beneath the main item. Submenus help group related pages together. They also keep your menu neat and easy to navigate. Visitors see main items first and expand submenus to explore more options.
Credit: easywpguide.com
Assigning Menu Locations
Assigning menu locations is a key step after creating a new menu in WordPress. It tells your website where to show the menu. Each WordPress theme has specific areas for menus. These areas are called menu locations. You can place your menu in one or more of these spots. This helps visitors find important pages easily.
Choosing the right location improves site navigation. It also keeps your website neat and organized. Let’s explore how to assign menu locations in WordPress.
Accessing The Menu Settings
First, go to your WordPress dashboard. Find the Appearance section on the left side. Click on Menus. This opens the menu editor. Here, you see your created menus and options to edit them. The menu settings allow you to assign locations quickly.
Selecting A Menu Location
Under Menu Settings, find the Display location area. This shows all available spots for menus. These spots depend on your theme. Common locations include Primary, Footer, and Social menus. Tick the box next to the location you want. You can assign one menu to multiple spots.
Saving Your Menu Location
After selecting the menu location, scroll down. Click the Save Menu button. This saves your changes and applies the menu to the chosen spots. Visit your website to check the menu’s new position. Adjust if needed by repeating these steps.
Saving And Previewing Your Menu
Saving and previewing your new menu in WordPress is an important step. It ensures your website visitors see the menu as you want. This process helps avoid mistakes and lets you check the menu’s look before it goes live.
After creating your menu, WordPress offers a simple way to save your work. The save button stores your menu settings safely. You can return later and make changes if needed. This step is quick and keeps your menu ready for use.
How To Save Your Menu
Look for the “Save Menu” button at the bottom or top right of the menu editor. Click it once you finish adding menu items. Wait a few seconds to confirm the menu saves successfully. Avoid leaving the page before saving to prevent loss of changes.
Using The Menu Preview Feature
Previewing your menu shows how it appears on your website. WordPress allows you to view the menu without publishing it. This helps check the order and appearance of menu items. You can test the menu on different devices to ensure it looks good everywhere.
Checking Menu Placement
After saving, assign your menu to a location like the header or footer. Use the “Manage Locations” tab or menu settings to do this. Preview the site to confirm the menu appears where you want. Adjust placement if the menu does not fit well.
Credit: www.wpbeginner.com
Troubleshooting Common Issues
Troubleshooting common issues helps ensure your WordPress menu works well. Many beginners face simple problems that block the menu from showing or cause it to look wrong. Fixing these issues quickly improves your website’s navigation and user experience. Understanding basic troubleshooting saves time and reduces frustration.
Menu Not Showing
Sometimes the menu does not appear on your site after creation. Check if you assigned the menu to a theme location. WordPress needs this to know where to display the menu.
Go to Appearance > Menus and select your menu. Look for the “Display location” options and tick the right box. Save your changes to update the menu on your site.
Clear your browser cache or refresh the page to see the update. Some themes also have custom menu settings. Check your theme options if the menu still doesn’t show.
Incorrect Menu Order
The menu items might not appear in the order you want. To fix this, go back to Appearance > Menus. Drag and drop each menu item to the correct position.
Remember to save the menu after rearranging. Preview your site to confirm the order is right. Nested menu items create dropdowns, so check their indentation.
Wrong order can confuse visitors. Keep your menu simple and easy to follow for better navigation.
Frequently Asked Questions
How Do I Create A New Menu In WordPress?
Go to Appearance > Menus in your WordPress dashboard. Click “Create New Menu,” name it, and click “Create Menu. ” Add pages or links to the menu and save your changes.
Can I Add Custom Links To A WordPress Menu?
Yes, WordPress allows adding custom links. In the Menus section, use the “Custom Links” panel. Enter the URL and link text, then click “Add to Menu. “
How Do I Assign A Menu To A Location In WordPress?
After creating a menu, go to “Manage Locations” or use the “Menu Settings” area. Select your menu for the desired theme location and save the settings.
Is It Possible To Reorder Menu Items In WordPress?
Yes, you can drag and drop menu items to reorder them. Simply drag each item to your preferred position and save the menu to apply changes.
Conclusion
Adding a new menu in WordPress is simple and quick. You just need to follow a few clear steps. Menus help visitors find important pages on your site. Customizing menus improves your website’s look and user experience. Keep your menu organized and easy to navigate.
Try creating different menus for different parts of your site. With practice, managing menus becomes second nature. Start adding menus today to make your site friendlier and easier to use.


