
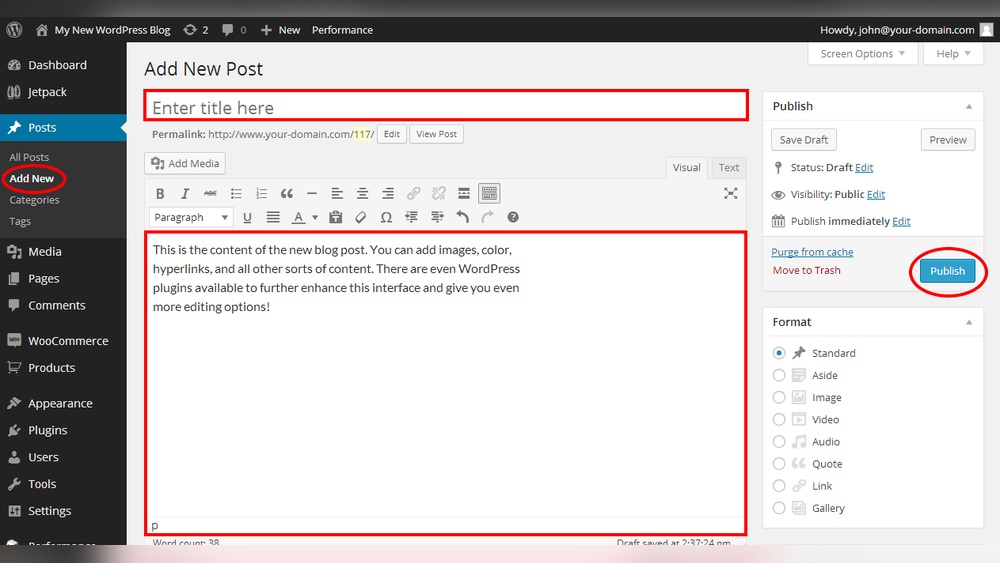
Are you ready to share your ideas, stories, or expertise with the world? Adding a new blog post in WordPress is easier than you think, even if you’re not a tech expert.
This step-by-step guide will show you exactly how to create and publish your post quickly, so your voice reaches your audience without delay. Keep reading, and you’ll be blogging like a pro in no time!
Credit: wordpress.org
Accessing The WordPress Dashboard
Accessing the WordPress dashboard is the first step to adding a new blog post. This area is the control center for your website. It allows you to manage posts, pages, and settings easily.
Understanding how to enter the dashboard helps you start blogging quickly. The process is simple and straightforward. Anyone can do it with a few easy steps.
Logging Into Your WordPress Site
Open your web browser and type your website’s URL. Add /wp-admin at the end of the URL. Press enter to go to the login page.
Enter your username and password in the login fields. Click the “Log In” button. This action takes you to the dashboard.
Finding The Dashboard Menu
Once logged in, the dashboard menu appears on the left side. It shows options like Posts, Pages, Media, and Settings. Use this menu to navigate your site’s backend.
Understanding The Dashboard Interface
The dashboard screen displays sections like At a Glance and Activity. These provide quick info about your site. The interface is user-friendly and easy to explore.
Navigating To The Add New Post Screen
Navigating to the Add New Post screen in WordPress is simple. This step is the first part of writing a new blog post. Knowing where to go saves time and confusion. WordPress has a clean and easy-to-use dashboard. It makes finding the post editor fast.
Logging Into Your WordPress Dashboard
Start by opening your website’s admin login page. Enter your username and password. Click the login button. The WordPress dashboard will appear. This is the control center for your site.
Finding The Posts Menu
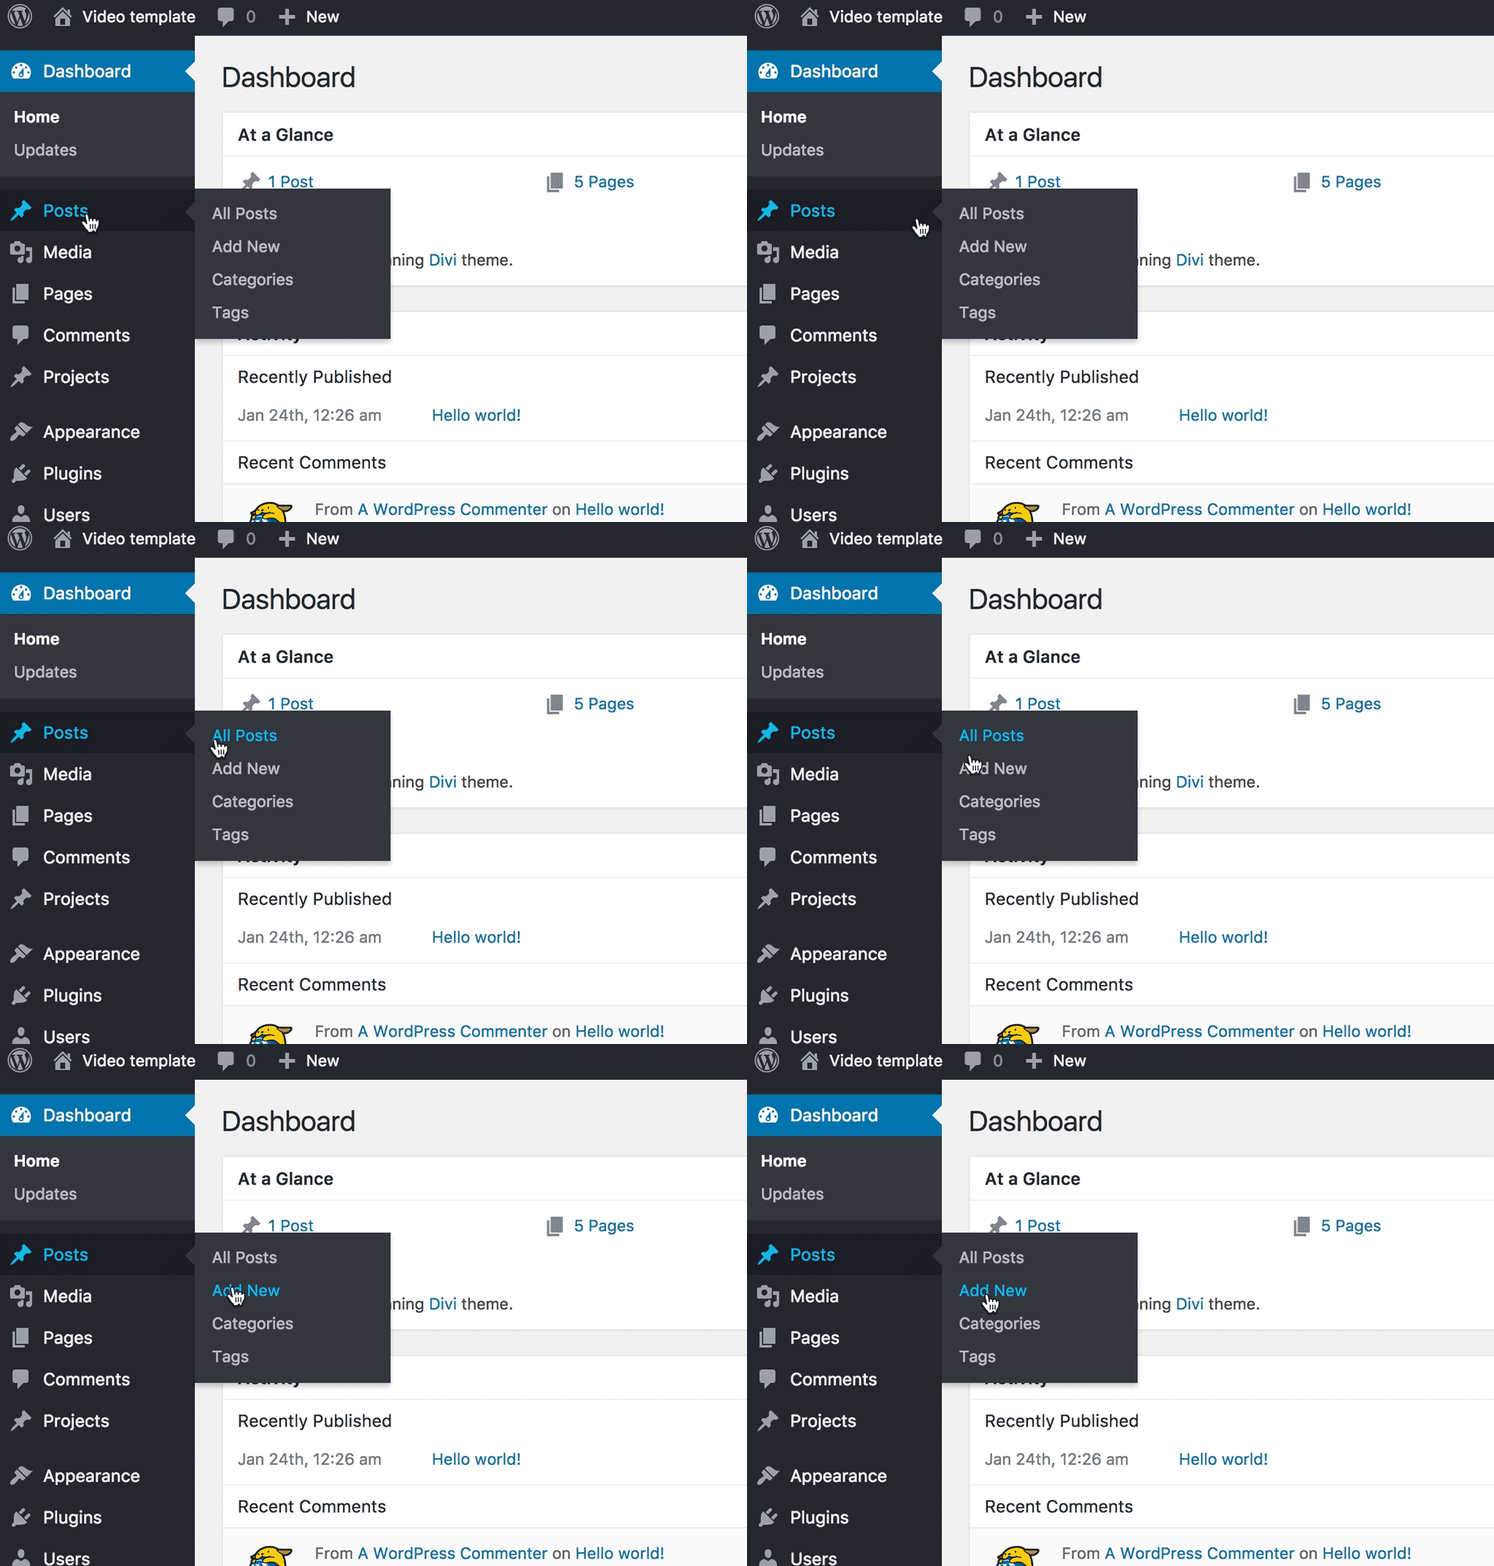
On the left side of the dashboard, see the main menu. Look for the “Posts” option. It usually has a small icon of a pushpin. Click on “Posts” to open a submenu. This is where you manage your blog posts.
Clicking The Add New Button
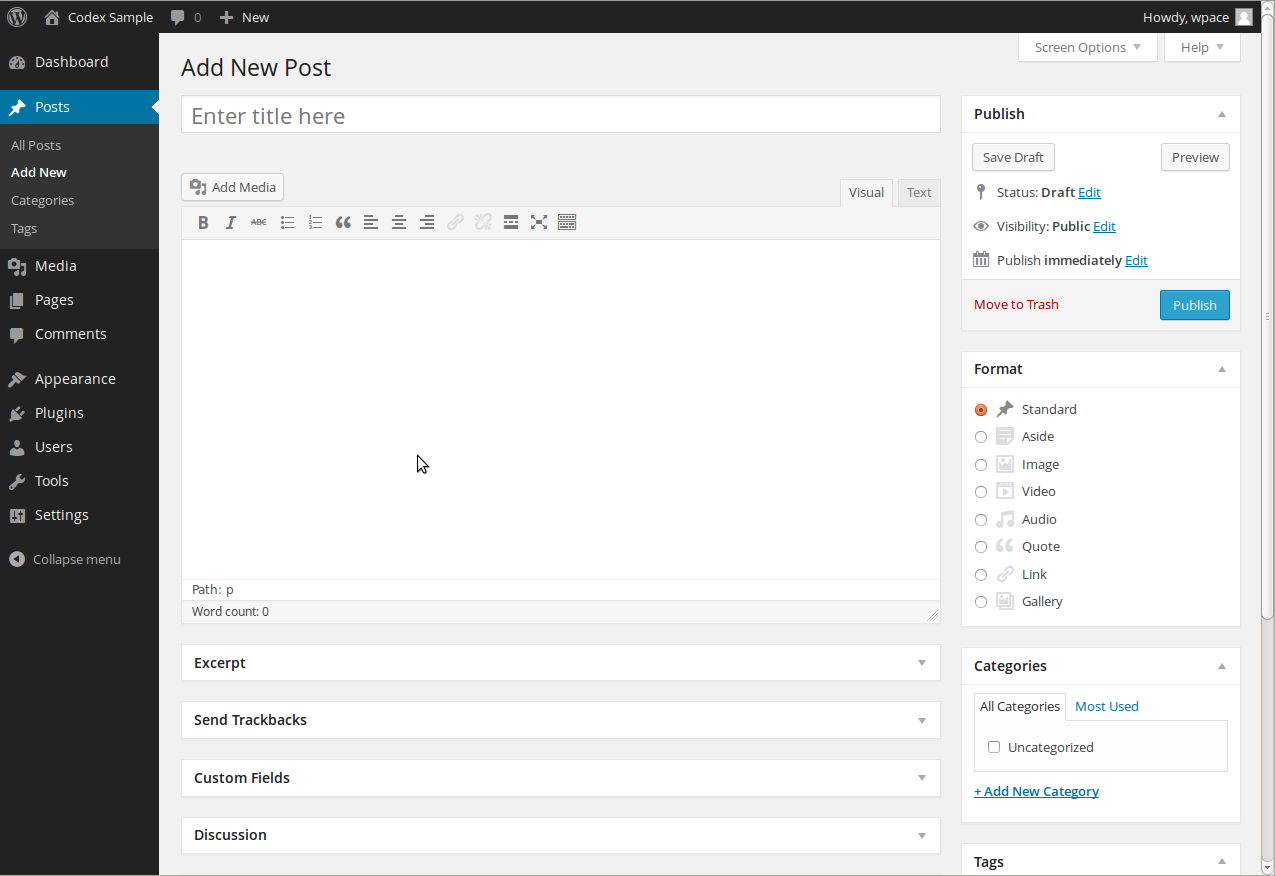
Inside the Posts submenu, find the “Add New” button. It is at the top of the page or under the Posts menu. Click this button to open the Add New Post screen. This is where you write your new blog post.
Entering The Blog Post Title
Creating a new blog post in WordPress is simple and quick. Just log in, click “Add New,” and start writing your content. Publishing your ideas online has never been easier.
Where To Enter The Blog Post Title
The blog post title is the first thing readers see. It must be clear and catchy. In WordPress, you enter the title at the top of the editor page. This box is labeled “Add Title.”
How To Choose A Good Blog Post Title
Pick a title that shows what the post is about. Use simple words. Keep it short and direct. Avoid long or confusing titles. A good title helps readers understand the topic fast.
Tips For Writing Your Blog Post Title
Start with important keywords. This helps search engines find your post. Make it interesting to grab attention. Use active words and avoid filler words. Check spelling and grammar for a professional look.
Credit: blog.hubspot.com
Writing The Blog Content
Writing the blog content is a key step in creating a new post in WordPress. Clear and well-structured content keeps readers interested. It also helps search engines understand your topic better. Below are tips to write and format your blog content effectively.
Using The Block Editor
The WordPress block editor divides content into blocks. Each block holds a piece of text, image, or media. This makes editing simple and flexible.
Start by adding a paragraph block for your main text. Use heading blocks to organize sections. Add image or video blocks to include media. Drag and drop blocks to change their order easily. This tool helps create neat and readable posts.
Formatting Text And Media
Good formatting improves the blog’s look and readability. Use bold or italics to highlight important words. Break long text into short paragraphs. Add bullet points or numbered lists for clarity.
Insert images to support your text. Make sure images are clear and relevant. Use captions to explain pictures. Align media properly with the text for a clean layout. Proper formatting makes your post attractive and easy to follow.
Adding Categories And Tags
Categories and tags help organize your blog posts. They make it easier for readers to find related content. Proper use improves site navigation and SEO. Adding them is simple and quick in WordPress.
Adding Categories
On the post editor screen, find the Categories box on the right side. Click “Add New Category” to create a fresh category. Enter a clear, short name that matches your post topic. Choose a parent category if needed. Click “Add New Category” to save it. Select existing categories by checking the boxes. Use categories to group similar posts together.
Adding Tags
Below the Categories box, locate the Tags section. Type keywords related to your post in the box. Separate tags with commas to add multiple ones. Use simple, specific words that describe your content well. Press Enter or click “Add” to save tags. Tags help connect posts with similar topics across categories.
Setting A Featured Image
Setting a featured image is an important step when creating a new blog post in WordPress. This image represents your post on your website and social media. It helps attract readers and gives a visual idea of the content.
A good featured image can increase clicks and improve the look of your blog. WordPress makes it easy to upload and set this image. Below are clear steps to do this.
Locate The Featured Image Box
On your post editor screen, look to the right side. Scroll down until you find the “Featured Image” box. This box is where you will add your image. If you do not see it, check your screen options at the top right of the page.
Upload Or Select An Image
Click on “Set featured image” inside the box. This opens the WordPress media library. You can choose an existing image or upload a new one. To upload, click “Upload Files” and select your file from your computer.
Choose The Best Image Size
Select an image that looks clear and fits your blog’s style. Use images that are at least 1200 pixels wide for better display on all devices. Avoid images that are too large to keep your site fast.
Set And Update The Featured Image
After choosing the image, click the “Set featured image” button. The image will now appear in the box. Finish your post and click “Publish” or “Update” to save your changes.
Configuring Post Settings
Configuring post settings in WordPress helps control how your blog post appears and functions. These settings let you decide when the post goes live and its visibility. Proper configuration ensures your content reaches the right audience at the right time.
Choosing Post Status
Post status controls whether your blog post is visible or hidden. WordPress offers several statuses: Draft, Pending Review, and Published. Draft saves your work without showing it to visitors. Pending Review lets editors check the post before publishing. Published means the post is live and visible to everyone.
Choose Draft if you want more time to edit. Select Published to share your post immediately. This feature helps manage your content workflow smoothly.
Scheduling The Post
Scheduling allows you to set a future date and time for publishing. This is helpful if you want posts to go live automatically. In WordPress, click the “Publish” option, then select “Schedule.”
Pick the exact date and time you want the post to appear. WordPress will handle the rest. This keeps your blog active without manual updates. Scheduling posts saves time and keeps your audience engaged regularly.
Previewing The Blog Post
Previewing the blog post is an important step before publishing. It shows how the post looks on your website. This helps catch any errors or formatting issues. You can see the post from a reader’s view. This step ensures your content looks neat and clear.
WordPress makes previewing easy and quick. You don’t need to publish the post to check it. Previewing saves time and improves post quality.
How To Use The Preview Button
In the WordPress editor, find the “Preview” button at the top right. Click it to open a new tab. This tab shows the post as it will appear live. You can review text, images, and layout here. Close the tab and return to editing anytime.
Preview On Different Devices
Preview your post on a phone, tablet, and desktop. WordPress preview works on any device. Check if the text is easy to read. Make sure images fit well on smaller screens. This helps create a better user experience.
Fixing Issues Found In Preview
Spot problems like typos or broken links in preview. Go back to the editor to correct them. Refresh the preview tab to see changes. Repeat until the post looks perfect. Previewing helps avoid publishing mistakes.
Publishing The Post
Publishing a blog post in WordPress is the final step to share your content with the world. This process makes your post live on your website for readers to see. It is simple and quick.
Before publishing, double-check your post. Make sure the title, content, images, and settings are correct. This helps you avoid mistakes and present your best work.
Checking Post Settings
Look at the post’s visibility options. Choose between public, private, or password-protected. Public means everyone can see it. Private limits access to yourself or selected users. Password protection adds a simple lock for visitors.
Set the publish date if you want to schedule. You can publish immediately or select a future date. Scheduling helps you plan your content release.
Previewing The Post
Click the preview button to see how your post looks. This shows the post as visitors will see it. Check the layout, images, and text. Fix any errors or formatting issues here.
Previewing avoids mistakes and improves reader experience. It is a useful step before making your post live.
When ready, click the “Publish” button. WordPress will ask for confirmation. Confirm to make your post live. Your content is now visible to your audience.
After publishing, share your post on social media or newsletters. This increases its reach and attracts readers.
Credit: shortiedesigns.com
Editing Or Updating Existing Posts
Editing or updating existing posts keeps your blog fresh and relevant. Changes improve your content’s accuracy and help readers find new information. Regular updates boost SEO and maintain your site’s value.
WordPress makes editing posts easy. You can update text, images, or any other part of your post quickly. Save changes to publish updates immediately or schedule them for later.
Edit Posts From The WordPress Dashboard
Log in to your WordPress dashboard. Click on “Posts” in the menu. Find the post you want to edit. Click “Edit” below the post title. This opens the post editor where you can make changes.
Update Text And Media
Change the post’s text by clicking inside the editor. Add or remove paragraphs as needed. To update images, click on them or use the media library. Replace old pictures with new ones easily.
Save And Preview Changes
After editing, click “Save Draft” to keep changes without publishing. Use the “Preview” button to see how the post looks live. Confirm everything is correct before updating the post.
Publish Updated Posts
Click “Update” to make changes live immediately. WordPress replaces the old post with the new version. Visitors will see the latest content when they visit your blog.
Frequently Asked Questions
How Do I Create A New Blog Post In WordPress?
To create a new blog post, log in to your WordPress dashboard. Click “Posts” then “Add New. ” Enter your title and content, then hit “Publish” to go live.
Can I Add Images To My WordPress Blog Posts?
Yes, you can add images by clicking the “Add Media” button above the editor. Upload or select an image from your library to enhance your post visually.
How Do I Optimize A WordPress Blog Post For Seo?
Use relevant keywords in the title, headings, and content. Add meta descriptions and use SEO plugins like Yoast for better search rankings.
Is It Possible To Schedule Blog Posts In WordPress?
Yes, WordPress lets you schedule posts. After creating your content, click “Publish” options, set a future date and time, then confirm to schedule it.
Conclusion
Adding a new blog post in WordPress is simple and quick. Just follow the steps carefully, and you will have your content online soon. Regular posting helps keep your site fresh and visitors interested. Take your time to write clear, useful posts.
Practice makes perfect, so keep creating and improving. Your blog can grow with each new post you add. Start today and enjoy sharing your ideas with the world.


