Are you struggling to make your WordPress buttons work the way you want? Adding a link to a button might sound simple, but if you don’t do it right, you could miss out on clicks and visitors.
Imagine turning every button on your site into a powerful tool that guides your visitors exactly where you want them to go. You’ll learn easy, step-by-step ways to add links to buttons in WordPress—no tech skills needed. Keep reading, and you’ll soon have buttons that boost your site’s performance and keep your audience engaged.
Choose The Right Button Block
Choosing the right button block is key to adding links in WordPress. The right block ensures your button looks good and works well. It also makes linking easy and quick. Understanding your options helps you pick the best fit for your site.
Using Gutenberg Editor
The Gutenberg editor comes with a built-in button block. It is simple and easy to use. Just add the button block to your page or post. Then, enter your button text and paste the link. You can also change the button color and size. This block works well for most basic needs.
The Gutenberg button block is lightweight. It does not slow down your site. It fits well with other blocks on your page. Plus, it is free and updated regularly with WordPress.
Alternative Button Plugins
Some users want more button styles or features. Alternative plugins offer extra options. These plugins can add animated buttons, icons, or custom shapes. They often include more design controls than the default block.
Popular plugins like “MaxButtons” or “Forget About Shortcode Buttons” give you more flexibility. These plugins create buttons that stand out. They also help add links easily with no coding.
Using a plugin might add extra weight to your site. Choose one that is updated often. Check reviews and support before installing.

Credit: www.hostinger.com
Create Your Button
Creating a button in WordPress is a simple way to guide visitors to important pages. A well-designed button can catch attention and improve user experience. This section explains how to create your button step-by-step.
Adding Text To The Button
Start by selecting the button block in the WordPress editor. Click on the button to activate the text field. Type a clear and short message that tells users what will happen. For example, “Buy Now,” “Learn More,” or “Contact Us.” Keep the text simple and direct.
Customizing Button Style
After adding text, customize the button style to match your site. Choose a color that stands out but fits your theme. Adjust the size and shape to make the button easy to click. Use the block settings on the right side of the editor for these options. A good style makes the button look professional and inviting.
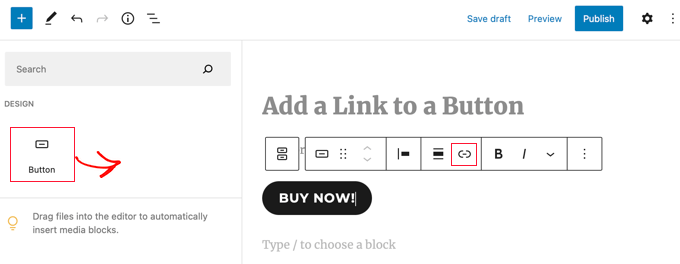
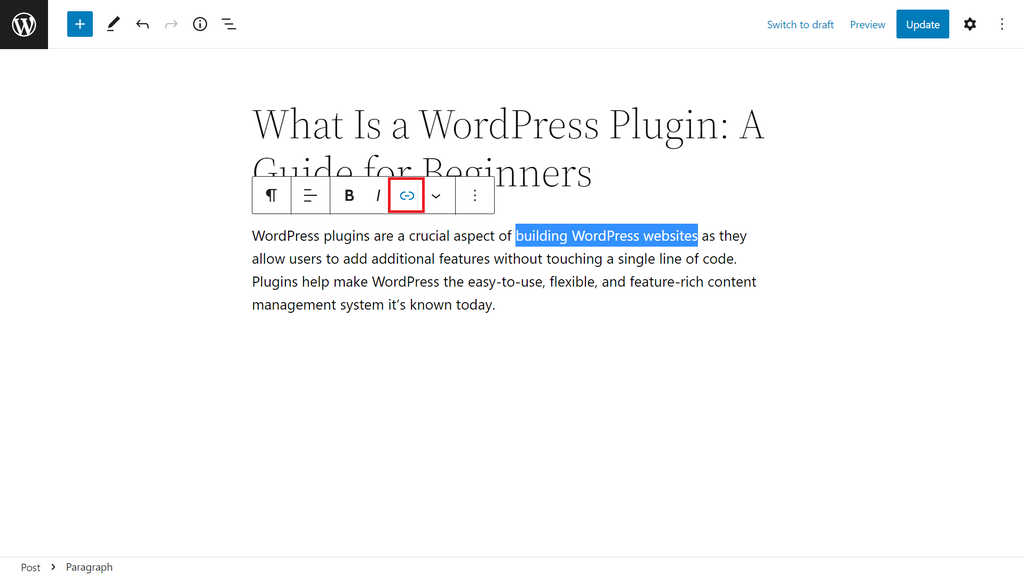
Add Link To Button
Adding a link to a button in WordPress helps users navigate easily. It turns a simple button into a clickable element. This makes your website interactive and user-friendly.
Follow simple steps to insert the link properly. This ensures the button works as expected. Let’s explore how to add a link to a button effectively.
Inserting Url
First, select the button on your WordPress editor. Look for the link icon or link field. Paste or type the URL where you want the button to go.
Make sure the URL starts with “http://” or “https://”. This helps the browser recognize the link. Press “Enter” or click “Apply” to set the link.
Setting Link Attributes
Adjust link attributes to control how it behaves. Choose if the link opens in the same tab or a new tab. Opening in a new tab keeps visitors on your site longer.
Add a “nofollow” attribute if you want search engines to skip the link. This affects SEO and site ranking. Setting these attributes is simple and quick.
Credit: www.wpbeginner.com
Test The Button Link
Testing the button link is a key step after adding it in WordPress. This ensures the button works correctly and leads visitors to the right page. A broken link or wrong URL can confuse users and hurt your site’s credibility. Take time to check the button before publishing your page.
Previewing Your Page
Preview your page in WordPress before making it live. Click the “Preview” button at the top right of the editor. This opens your page in a new tab as visitors will see it.
Find the button and click it. Check if it opens the correct link. Test the link on different devices if possible. This helps ensure it works for all visitors.
Troubleshooting Common Issues
If the button link does not work, start by checking the URL. Make sure it is complete and correct. Missing “http://” or “https://” can cause errors.
Clear your browser cache and reload the preview page. Sometimes old data stops new changes from showing. Also, disable any caching plugins temporarily to test the link.
Check for typos in the link address. Even one wrong character can break the link. Lastly, confirm the linked page is published and accessible to users.
Use Shortcodes For Buttons
Using shortcodes for buttons in WordPress is a simple way to add links. Shortcodes let you insert buttons without coding. They work inside posts, pages, or widgets. This method keeps your site clean and easy to update. You can create buttons that fit your style and link anywhere.
Shortcode Syntax
A shortcode looks like a small code snippet inside square brackets. For example, [button url="https://example.com"]Click Here[/button] creates a button linked to a website. The url attribute sets the link address. The text between the tags shows on the button. You can change the text or link by editing the shortcode.
Advantages Of Shortcodes
Shortcodes save time. No need to write long HTML or CSS for buttons. They keep content clean and simple. Buttons look the same everywhere on your site. You can easily update all buttons by changing one shortcode. They work with many themes and plugins. No coding skills needed to use shortcodes.
Add Buttons In Widgets
Adding buttons in widgets helps improve website navigation. Visitors can quickly access important pages or offers. Widgets appear in sidebars or footers, making buttons visible on many pages. This section explains how to add buttons using widgets in WordPress.
Using Custom Html Widget
Custom HTML widget lets you add code directly to your sidebar or footer. Open the WordPress dashboard and go to Appearance > Widgets. Find the Custom HTML widget and drag it to the widget area. Paste your button HTML code inside the widget content box.
Use simple HTML like Click Here. Replace “URL” with your link address. Save the widget. The button will now show in the chosen widget area.
Linking Buttons In Sidebars
Sidebars are common spots for buttons. After adding the Custom HTML widget, check the sidebar on your site. Make sure the button links work correctly. Test the button on different devices for mobile friendliness.
Some themes offer built-in button widgets. Explore Appearance > Widgets to see if your theme supports this. These widgets make adding buttons even simpler without writing code.
Credit: www.hostinger.com
Frequently Asked Questions
How Do I Add A Link To A Button In WordPress?
To add a link, select your button block in the editor. Click the link icon, then enter your URL. Save changes and preview the button to test the link.
Can I Link Buttons To External Websites In WordPress?
Yes, WordPress buttons can link to any URL, including external sites. Just enter the full URL in the button’s link field when editing.
How To Make A WordPress Button Open A Link In A New Tab?
When adding a link to a button, click the gear icon next to the URL field. Enable “Open in new tab” to make it open separately.
Is It Possible To Style Linked Buttons In WordPress?
Yes, WordPress offers styling options for buttons. Customize colors, size, and fonts via the block settings to match your site’s design.
Conclusion
Adding a link to a button in WordPress is simple and fast. You only need a few steps to make your buttons work. Clear buttons help visitors find what they need quickly. This small change can improve your site’s user experience a lot.
Keep practicing, and soon it will feel natural. Try different buttons and links to see what fits best. Your WordPress site will become easier to use and more helpful for visitors. Just take it one step at a time.