Your website’s logo is more than just a picture—it’s the face of your brand. When visitors see your logo, they instantly recognize who you are and what you stand for.
But how do you make sure your logo is right where it should be on your WordPress site? If you’ve ever wondered how to add a logo on WordPress quickly and easily, you’re in the right place. This guide will walk you through every step, so you can give your site a professional look that builds trust and keeps visitors coming back.
Ready to make your brand stand out? Let’s dive in.
Choosing The Right Logo
Choosing the right logo is important for your WordPress site. A good logo shows your brand clearly and looks professional. It helps visitors remember your site. The right logo fits well on your website and works on all devices. Think about how the logo looks on phones and computers. Choose a logo that matches your site’s style and colors. This makes your site look nice and consistent.
Logo Formats And Sizes
Use common logo file formats like PNG, JPEG, or SVG. PNG is best for logos with transparent backgrounds. SVG files work well because they stay sharp on any screen size. Avoid using very large files. Large files slow down your website. Aim for a logo size around 200 to 400 pixels wide. Keep the file size under 200 KB for faster loading. Test your logo on different devices to see how it looks.
Design Tips For Clarity
Keep your logo simple. Avoid too many details or colors. Simple logos are easier to recognize. Use clear shapes and readable text. Make sure your logo looks good in black and white too. This helps if your logo appears in different places. Choose colors that stand out but match your site’s theme. A clear logo builds trust and makes your site look professional.
Credit: learn.wordpress.org
Preparing Your Logo File
Before uploading your logo to WordPress, prepare the file carefully. Proper preparation ensures your logo looks sharp and loads fast on your website. This process involves optimizing the file size and choosing the right format. A well-prepared logo improves your site’s appearance and user experience.
Optimizing For Web Use
Optimize your logo file to reduce its size. Smaller files load faster and save bandwidth. Use image editing tools like Photoshop or free online compressors. Save the logo as JPEG or PNG with a resolution of 72 dpi. Avoid very large dimensions; 250 to 400 pixels wide is usually enough. Check the file size stays under 200 KB for quick loading.
Transparent Backgrounds
Use a transparent background to make your logo blend well. PNG format supports transparency and works best for logos. Remove any white or colored background from your logo image. This helps your logo appear clean on any website background. Transparent logos look professional and more flexible for design.
Adding A Logo Via WordPress Customizer
Adding a logo to your WordPress site helps with branding and makes your site look professional. The WordPress Customizer offers a simple way to upload and place your logo. It lets you see changes live before saving. This method works well for most themes.
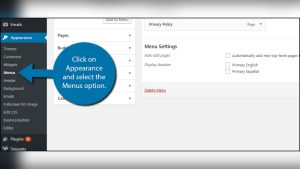
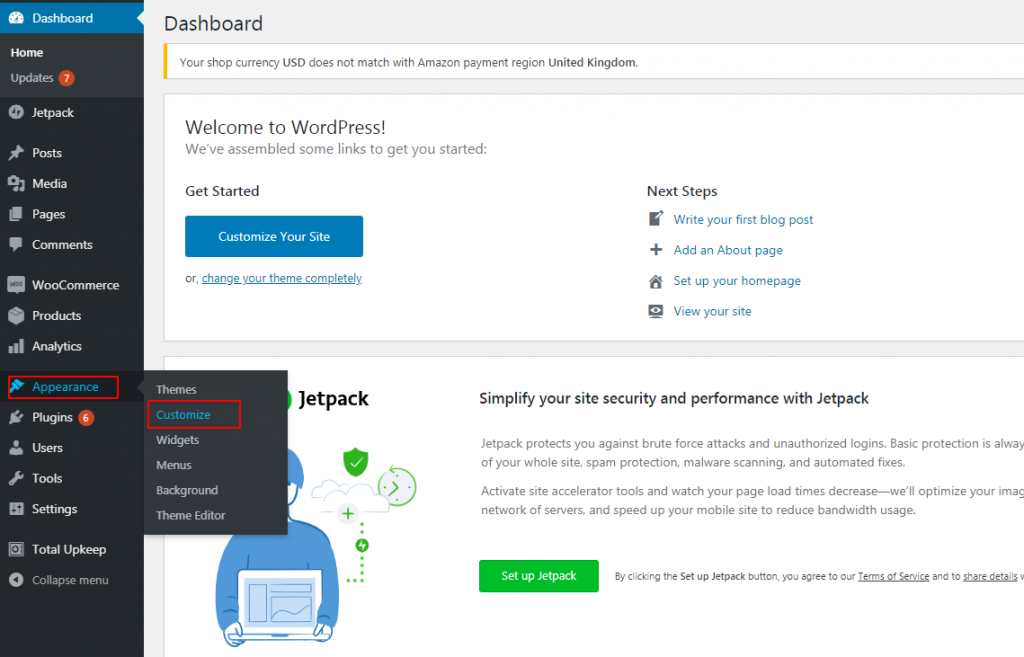
Accessing The Customizer
Start by logging into your WordPress dashboard. Find the menu on the left side and click “Appearance.” Then select “Customize.” This opens the WordPress Customizer panel. You will see several options to change your site’s look.
Look for the section labeled “Site Identity” or “Header.” Click on it. This is where logo settings usually appear. The exact name may vary by theme.
Uploading Your Logo
Inside the “Site Identity” section, find the “Logo” option. Click the “Select logo” button. A media uploader window will pop up. Choose an image from your library or upload a new file.
Make sure your logo image is clear and not too large. Ideal size depends on your theme but keep it under 300 pixels wide for best results. After selecting, click “Choose.” The logo will appear in the preview area.
Adjusting Logo Placement
Some themes allow you to adjust logo placement in the Customizer. Look for options like “Logo Position” or “Header Layout.” You might move the logo left, right, or center.
Try different placements and watch the live preview. Pick the position that looks best on your site. When satisfied, click the “Publish” button at the top. Your logo is now live on your WordPress site.
Credit: www.gavick.com
Using A Theme Builder Or Page Builder
Using a theme builder or page builder makes adding a logo on WordPress simple. These tools let you customize your site’s look without coding. You can place your logo exactly where you want it. Many builders offer drag-and-drop features. This helps you see changes live as you edit. It suits beginners and those who want fast results.
Popular Builders For Logo Integration
Elementor is a top page builder with easy logo options. It lets you add images and resize them quickly. Divi Builder also supports logo placement with visual controls. Beaver Builder offers a straightforward interface for logo uploads. These builders work with most WordPress themes. They help keep your site design consistent and professional.
Step-by-step Logo Addition
Start by opening your page builder dashboard. Look for the header or site identity section. Upload your logo file from your computer. Drag it into the logo area or insert an image block. Adjust the size and position until it looks right. Save your changes and preview your site. Check how the logo appears on different devices.
Adding A Logo With Plugins
Adding a logo to your WordPress site can be easy with plugins. Plugins simplify the process. They offer flexible options for logo placement and size. Plugins also help if your theme does not support logo uploads directly.
This method suits beginners and users who want more control over their site’s branding. Plugins often include extra features like logo sliders or sticky logos. These enhance your site’s look without complex coding.
Recommended Logo Plugins
Several plugins work well for adding logos. “WP Logo Showcase” is popular for showing logos attractively. “Simple Image Widget” lets you add a logo in widget areas with ease. “Site Logo” plugin integrates smoothly with many themes.
Choose a plugin that fits your needs. Check reviews and updates to ensure reliability. A lightweight plugin keeps your site fast and smooth.
Installation And Setup
Go to your WordPress dashboard. Click on “Plugins” then “Add New.” Search for your chosen logo plugin. Click “Install Now” and then “Activate.”
After activation, find the plugin settings in the dashboard menu. Upload your logo image using the plugin interface. Adjust size and position settings as needed. Save changes to display your logo on the site.
Test your site to see the logo in place. Make changes if the logo does not look right. Plugins provide easy tools for quick edits without hassle.
Credit: www.inmotionhosting.com
Optimizing Logo Display For Mobile
Optimizing your logo for mobile devices is key to a good website. Mobile screens are smaller, so logos must be clear and fit well. A logo that looks great on a desktop might appear too large or blurry on a phone. Proper sizing and placement improve user experience and brand visibility on all devices.
Responsive Design Tips
Use flexible images that adjust to screen size. Set your logo width in percentages, not fixed pixels. Choose SVG format for sharp, scalable logos. Avoid heavy files to keep loading times fast. Place the logo where it stays visible but not intrusive. Test different logo sizes to find the best fit.
Testing On Different Devices
Check your logo on phones, tablets, and small laptops. Use browser tools to simulate screen sizes. Look for distortion or cut-off parts of the logo. Make sure the logo loads quickly on slow networks. Ask friends to view your site on their devices. Fix any issues before finalizing your design.
Troubleshooting Common Issues
Troubleshooting common issues with your WordPress logo can save time. Many users face simple problems that stop the logo from showing well. Fixing these issues helps your website look professional and load fast.
Logo Not Displaying Correctly
Check the logo file format. Use PNG or JPEG for best results. Avoid large files that might not load properly. Make sure the logo size fits your theme’s recommended dimensions. Clear your browser cache to see recent changes. Sometimes, a plugin conflict can hide the logo. Deactivate plugins one by one to find the problem. Also, check your theme settings to confirm the logo upload is active.
Slow Loading Logos
Large image files cause slow loading times. Resize your logo to a smaller width and height. Compress the image without losing quality using free online tools. Use the right file type for the web, like PNG or JPEG. Avoid using very high-resolution images. Enable caching plugins to speed up your site. Slow logos hurt user experience and SEO, so keep them light and fast.
Frequently Asked Questions
How Do I Add A Logo To My WordPress Site?
To add a logo, go to Appearance > Customize > Site Identity. Upload your logo image, then click Publish. This method works for most themes.
Can I Use Any Image Format For WordPress Logos?
Yes, WordPress supports PNG, JPEG, and GIF formats for logos. PNG is preferred for transparent backgrounds and better quality.
How Do I Resize My Logo In WordPress?
Resize your logo by adjusting dimensions in the Customizer’s Site Identity section. You can also edit the image before uploading for precise control.
Is It Possible To Add A Logo To WordPress Mobile View?
Most WordPress themes automatically display the logo on mobile devices. Check the Customizer’s preview to ensure your logo appears correctly on mobile.
Conclusion
Adding a logo to your WordPress site is simple and quick. It helps visitors recognize your brand easily. Use the WordPress Customizer or theme settings to upload your logo. Make sure the image fits well and looks clear on all devices.
A good logo boosts your site’s professional look. Keep your logo updated if your brand changes. Now, your website feels more complete and trustworthy. Start customizing today and see the difference a logo makes.