
Are you looking for a simple way to collect information from your website visitors? Adding a Google Form to your WordPress site can make this task easy and effective.
Whether you want feedback, sign-ups, or surveys, embedding a Google Form lets you gather responses quickly without extra plugins or complicated setups. In this guide, you’ll learn step-by-step how to add a Google Form to your WordPress site, so you can start engaging with your audience instantly.
Keep reading, and you’ll have your form ready in no time!

Credit: gloriathemes.com
Create A Google Form
Creating a Google Form is the first step to collect data on your WordPress site. The process is simple and fast. You can design a form that fits your needs perfectly.
Start by opening Google Forms and then add the questions you want. Adjust the settings to control how people respond. This way, your form will work just right for your audience.
Access Google Forms
Go to the Google Forms website by typing forms.google.com in your browser. You need to sign in with your Google account. After that, click on the blank form or choose a template to start.
Design Your Form
Add a title that explains what your form is about. Write clear questions and choose the question types like multiple choice or short answer. Use the plus button to add more questions. Keep your form simple and easy to use.
Set Form Settings
Click the gear icon to open settings. Decide if you want to collect email addresses or allow multiple responses. Enable or disable options like showing a progress bar. Save your settings to make sure your form works well.
Get The Embed Code
Getting the embed code is the key step to add your Google Form to WordPress. This code lets you place the form directly on your website page. Visitors can fill out the form without leaving your site. Follow easy steps to find and copy this code. The process is quick and simple.
Open Form’s Send Options
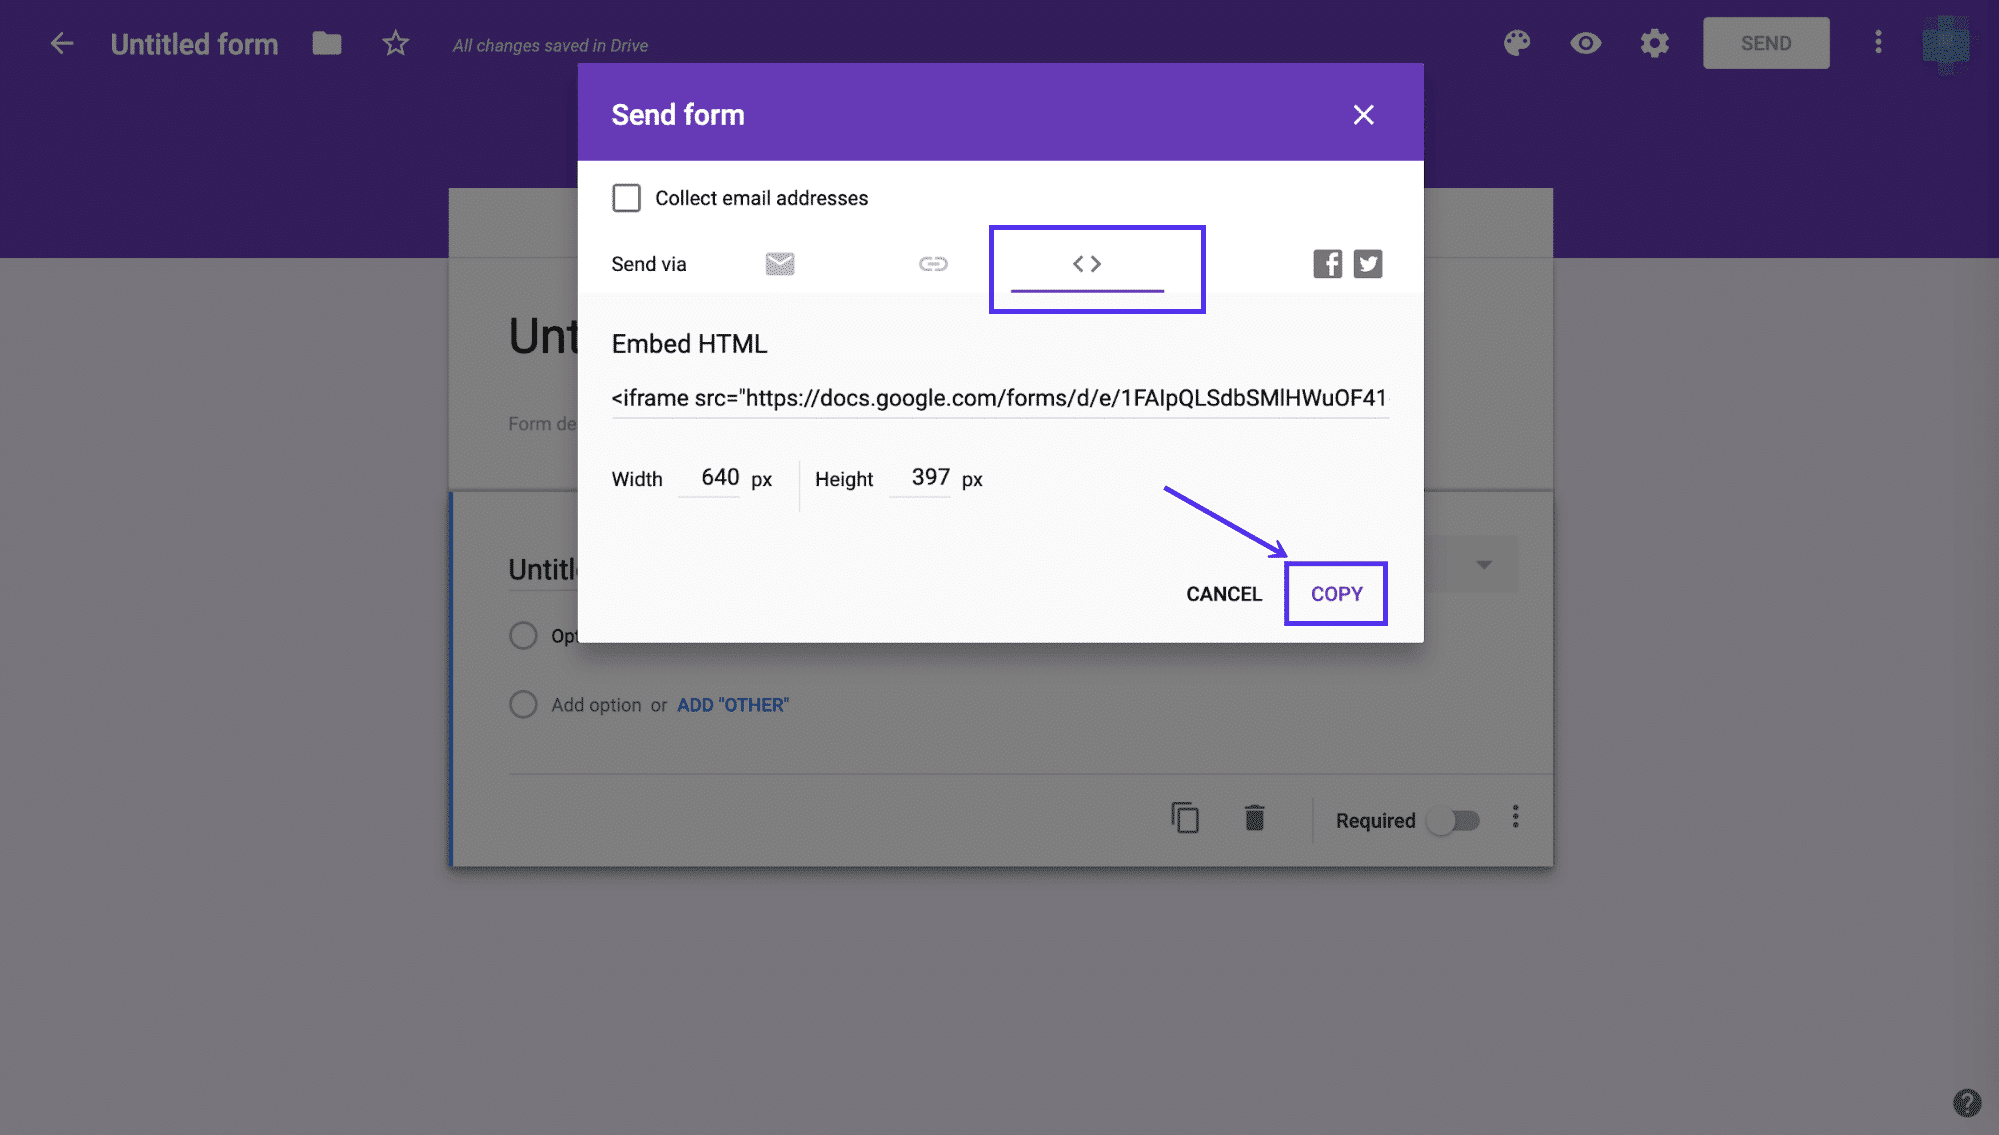
First, open your Google Form. Look for the “Send” button at the top right corner. Click on it to open the send options. This area holds different ways to share your form. Find the embed option to get the HTML code.
Copy The Embed Html
Inside the send options, click the embed icon, which looks like two brackets <>. A box will appear with the HTML code. Adjust the size if needed by changing the width and height. Click “Copy” to save the code to your clipboard. Now, you have the embed code ready for WordPress.
Prepare Your WordPress Site
Preparing your WordPress site is the first step to adding a Google Form. This step makes sure your form fits perfectly on your website. It also helps avoid errors during the embedding process.
Organizing your site before adding the form saves time later. It ensures the form appears where visitors expect it. This improves user experience and engagement.
Choose The Right Page Or Post
Pick the page or post where your form will make the most sense. Think about where visitors will look for it. A contact page or feedback post often works well.
Choosing the right place gives your form a clear purpose. It helps visitors find and use it easily. Avoid putting the form on unrelated pages.
Switch To Html Or Code Editor
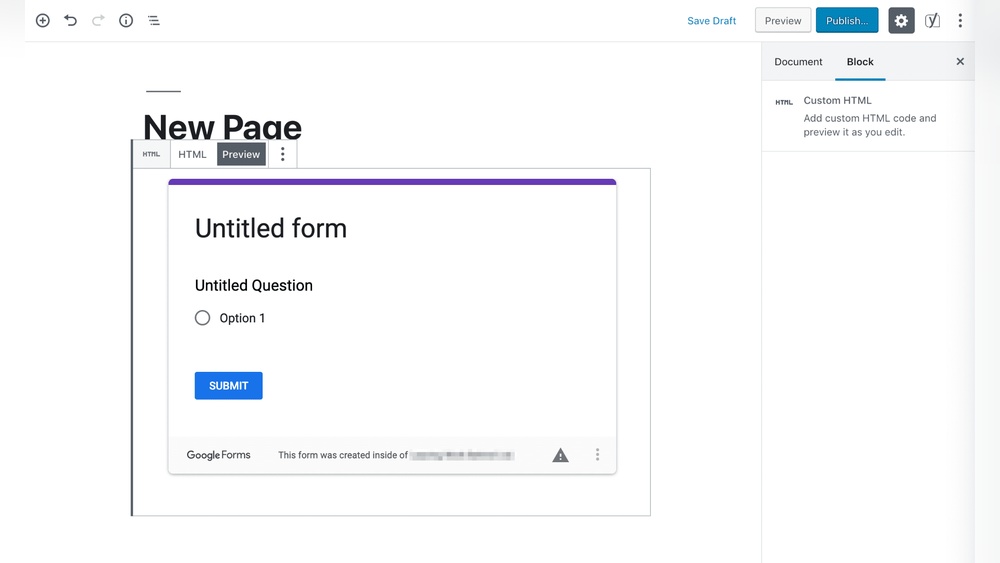
Before pasting the Google Form embed code, switch to the HTML or code editor. This step is crucial for proper code placement. It prevents WordPress from altering the form’s code.
Using the HTML editor ensures the form works correctly. It keeps the embed code clean and functional. Switching is simple and keeps the process smooth.

Credit: formfacade.com
Insert The Google Form
Inserting a Google Form into your WordPress site lets visitors fill out surveys or sign up easily. The process is simple and does not require coding skills. Follow these steps to embed your form quickly and make it ready for users.
Paste The Embed Code
First, open your Google Form and click on the “Send” button at the top right. Choose the embed icon, which looks like “<>”. Copy the entire iframe code that appears. Next, go to your WordPress editor and switch to the “Text” or “HTML” view. Paste the copied iframe code where you want the form to appear on the page or post. Save or update your content to see the form live on your site.
Adjust Form Size If Needed
The default width and height of the form might not fit perfectly on your page. You can change the numbers inside the iframe code to adjust the size. Try changing the width and height values to make the form larger or smaller. Preview the page to check if the form looks good on both desktop and mobile screens. Adjust until you find the best fit for your website layout.
Publish And Test The Form
Publishing and testing your Google Form on WordPress is the final step. It ensures your form works well and looks good on your site. Testing helps catch errors before visitors use the form. Take time to review the form carefully.
Preview Your Page
Previewing your page shows how the form appears to visitors. Click the preview button in WordPress. This opens a new tab with your page and the embedded form. Check the layout, fonts, and spacing. Make sure the form fits the page well. Adjust if any part looks odd or cut off.
Submit A Test Response
Filling out the form yourself confirms it works correctly. Enter data as a visitor would. Submit the form and watch for confirmation messages. Verify the form sends responses to your Google account. Check that all fields save data properly. Testing prevents issues and improves user experience.
Use Plugins For Google Forms
Using plugins to add Google Forms to WordPress makes the process simple. Plugins handle the technical parts for you. They let you embed forms without coding knowledge. This saves time and reduces errors.
Many plugins offer extra features. You can customize form style and manage responses. Plugins ensure your form works well on all devices. They also improve user experience on your site.
Popular Plugins Overview
Several plugins work well with Google Forms. “Google Forms” plugin is easy to use. “WPForms” supports Google Forms integration. “Formidable Forms” offers advanced customization. Each plugin has unique features. Choose one that fits your needs and budget.
Plugin Installation Steps
Go to your WordPress dashboard. Click “Plugins” and then “Add New.” Search for your chosen Google Forms plugin. Click “Install Now” and then “Activate.” The plugin is ready for use. Follow setup instructions if needed. Most plugins have simple setups.
Embedding Forms Via Plugin
Open the plugin in your dashboard. Select the Google Form you want to embed. Copy the form link or ID. Paste it into the plugin’s form field. Save or publish your settings. Your Google Form will appear on your page or post. Check on different devices to ensure it looks good.
Troubleshoot Common Issues
Adding a Google Form to WordPress is easy but sometimes issues arise. Troubleshooting common problems saves time and frustration. Fixing these issues helps keep your site professional and user-friendly.
This section covers common problems and quick fixes. Follow these tips to resolve errors fast.
Form Not Displaying
The form may not show due to incorrect embed code. Check if you copied the entire iframe code from Google Forms.
Clear any extra spaces or missing parts in the code. Also, confirm the form is published and set to public access.
Sometimes themes or plugins block iframe content. Try disabling plugins one by one to find conflicts.
Use the WordPress Custom HTML block to paste your code instead of a text block.
Responsive Design Problems
Google Forms embed may not resize well on phones or tablets. This causes scroll bars or cut-off content.
Set the iframe width to 100% instead of fixed pixels. This allows the form to adjust to different screen sizes.
Add CSS styles to make the form container responsive. For example, use max-width and auto height settings.
Test the form on multiple devices to ensure it looks good everywhere.
Submission Errors
Users may get errors after submitting the form. This happens if the form link changes or the form is deleted.
Check the form’s sharing settings. Make sure anyone can submit without signing in.
Clear browser cache and cookies. Sometimes old data causes issues with form submissions.
Review Google Forms settings for limits or restrictions on responses.
Credit: kinsta.com
Frequently Asked Questions
How Do I Embed A Google Form In WordPress?
To embed a Google Form, copy the form’s iframe embed code from Google Forms. Then, paste it into your WordPress post or page using the HTML block or editor.
Can I Customize Google Forms Within WordPress?
No, customization must be done in Google Forms before embedding. WordPress only displays the form as is, without design changes.
Is Adding Google Forms To WordPress Free?
Yes, embedding Google Forms in WordPress is completely free. Google Forms and WordPress both offer free tools for this integration.
Will Google Forms Work On Mobile Devices In WordPress?
Yes, Google Forms are mobile-responsive. Embedded forms automatically adjust to fit screens on smartphones and tablets within WordPress.
Conclusion
Adding a Google Form to WordPress is simple and quick. You just need to copy the form’s embed code and paste it into your site. This helps collect information easily from visitors. It saves time and keeps your site organized.
You can change the form anytime without trouble. Try it today and see how it works for your site. Easy steps lead to better contact with your audience.


