
Are you ready to make your website live but not sure how to connect your domain to your GoDaddy hosting account? You’re in the right place.
Adding a domain to your GoDaddy hosting is a crucial step that can feel confusing if you’re new to it. But don’t worry—this guide breaks down the process into simple, clear steps you can follow right now. By the end, you’ll have your domain and hosting working together smoothly, so your site is ready for visitors.
Keep reading, and let’s get your online presence up and running quickly!
Credit: www.godaddy.com
Preparing Your Domain
Preparing your domain is the first step before adding it to your GoDaddy hosting account. This process ensures your domain is ready for smooth integration. You avoid errors and save time by preparing well. Understanding what to check and gather helps you move forward easily.
Checking Domain Eligibility
Not all domains can be added to GoDaddy hosting. You must confirm your domain is eligible. The domain should be registered and active. It cannot have any holds or locks that stop transfers or changes. Make sure the domain is not expired or pending deletion. Domains with private registration may need settings adjusted first.
Gathering Required Information
Having the right information ready speeds up the process. You need your domain’s login details from the registrar. Also, know your GoDaddy hosting account username and password. Check your domain’s nameserver details if you plan to update them. Keep your authorization code handy for domain transfers. These details help link your domain to hosting without delays.
Accessing Godaddy Hosting
Accessing your GoDaddy hosting account is the first step to managing your website. You need to enter your account to control domains, files, and settings. This part guides you through the process of reaching your hosting dashboard quickly and easily.
Logging Into Your Account
Start by visiting the GoDaddy homepage. Click on the “Sign In” button at the top right corner. Enter your username or customer number and password carefully. Use the “Keep me signed in” option for faster access next time. Click “Sign In” to enter your account.
Navigating To Hosting Dashboard
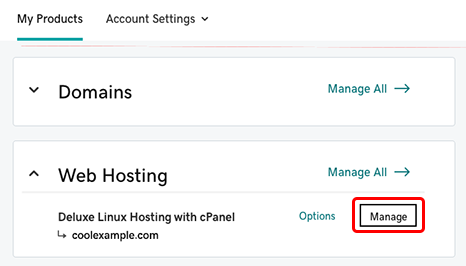
After logging in, find the menu labeled “My Products.” Look for the section called “Web Hosting.” Click on “Manage” next to the hosting plan you want to use. This opens the hosting dashboard where you can add domains and adjust settings.
Adding A Domain
Adding a domain to your GoDaddy hosting account lets you manage your website easily. It connects your domain name with your hosting space. This step is key to getting your site online. Follow the simple process below to add your domain correctly.
Selecting Add Domain Option
First, log in to your GoDaddy account. Go to your hosting dashboard. Find the section for domains or hosting settings. Look for the “Add Domain” button or link. Click on it to start the process. This opens the form to add a new domain.
Entering Domain Details
Type your domain name carefully in the provided field. Double-check spelling to avoid errors. Choose the correct domain extension like .com or .net. Select the hosting account where you want the domain. Confirm the details and submit the form. GoDaddy will link your domain to your hosting.
Configuring Dns Settings
Configuring DNS settings is a key step to connect your domain with GoDaddy hosting. DNS controls how visitors find your website online. Proper DNS setup ensures your site loads quickly and correctly.
This process involves updating nameservers and checking DNS propagation. Both steps take a few minutes but are essential for your domain to work well with GoDaddy hosting.
Updating Nameservers
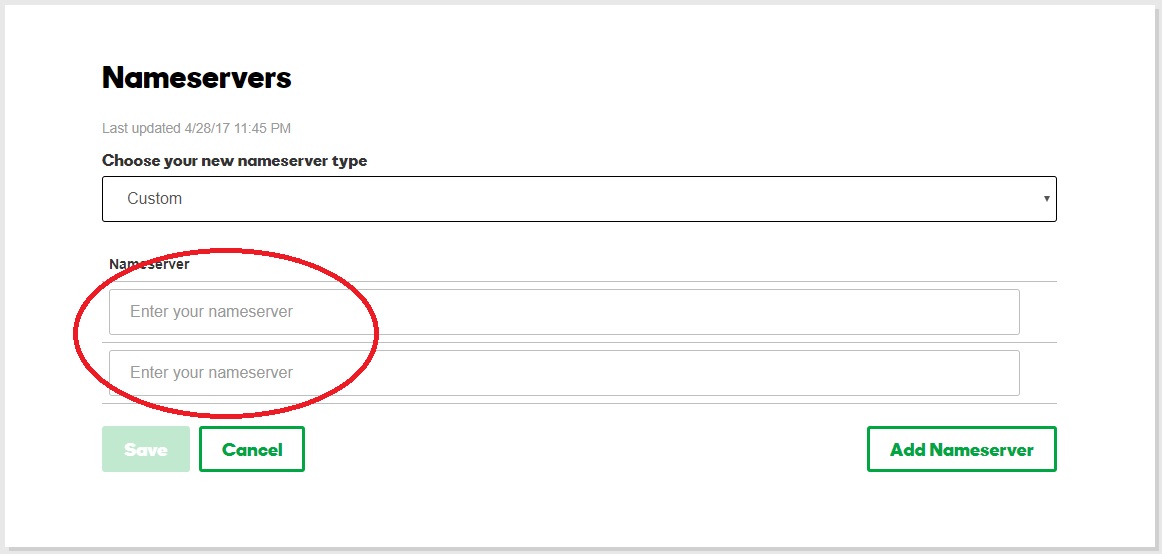
Start by logging into your GoDaddy account where your domain is registered. Find the domain you want to connect and open its DNS settings. Locate the nameserver section and select the option to change nameservers.
Enter the nameservers provided by your GoDaddy hosting. These usually look like ns1.godaddy.com and ns2.godaddy.com. Save the changes to update your domain’s DNS records. This directs your domain to use GoDaddy’s hosting servers.
Verifying Dns Propagation
After updating nameservers, DNS changes take time to spread worldwide. This delay is called DNS propagation. It can take from a few minutes to 48 hours. During this time, your site might not appear correctly for all users.
Use online DNS checker tools to track propagation status. Enter your domain and see if the new nameservers show up globally. Once the update is complete, your domain will fully connect to your GoDaddy hosting.
Assigning Domain To Hosting
Assigning your domain to a GoDaddy hosting account is a key step to make your website live. This process connects your domain name with the files stored on your hosting. It ensures visitors see the right website when they type your domain in the browser.
Once you add the domain to your hosting account, you must set it as primary or addon. Then, link the domain to the correct website files. These steps make sure your website content shows properly.
Setting Primary Or Addon Domain
In your GoDaddy hosting dashboard, find the section for domains. Choose to set your domain as primary if this is your main website. The primary domain points directly to your main website folder.
If you want to host another website, set the domain as an addon. Addon domains work like extra websites under one hosting account. Each addon domain has its own folder for files.
To set this, select “Add Domain” or “Manage Domains.” Enter your domain name and assign it as primary or addon. Save changes to update your hosting settings.
Linking Domain To Website Files
After setting the domain type, link it to the right folder. This folder holds all your website files like HTML, CSS, and images. For a primary domain, files usually go in the main public_html folder.
Addon domains need a separate folder inside public_html. Name this folder clearly to match the addon domain. This step tells GoDaddy where to find website files for each domain.
Check your hosting file manager or FTP client to upload files. Make sure your domain points to the correct folder. This keeps your website visible and working properly online.
Testing Your Domain Setup
Testing your domain setup is a vital step after adding a domain to your GoDaddy hosting account. It confirms that everything works properly. You avoid future issues by checking early. This section guides you through simple ways to test your domain.
Checking Domain Accessibility
Start by typing your domain name in a web browser. See if your website loads without errors. Use different browsers and devices to test. This helps check if your site is visible to everyone. You can also use online tools like “Down For Everyone Or Just Me” to verify accessibility.
Check if the domain points to your hosting server. Use tools like “DNS Checker” to see DNS propagation. It may take a few hours for changes to update worldwide. If your site appears, the setup is correct.
Troubleshooting Common Issues
If your domain does not load, first clear your browser cache. Old data can block new changes. Check your DNS settings in your GoDaddy account. Make sure the domain points to the right server IP.
Check for typos in domain names or DNS entries. Verify that your hosting plan is active and not expired. Sometimes, waiting a bit helps as DNS changes take time. Contact GoDaddy support if problems continue after these steps.
Managing Domains In Godaddy
Managing domains in GoDaddy is simple and straightforward. It lets you control settings, update details, and remove domains as needed.
Understanding how to manage your domains helps keep your website running smoothly. You can make quick changes without hassle.
Editing Domain Settings
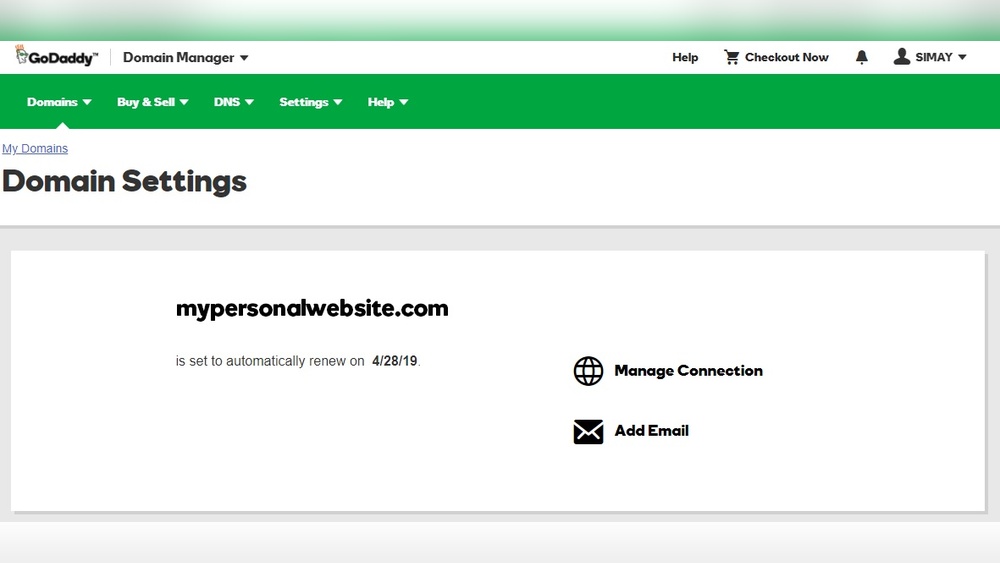
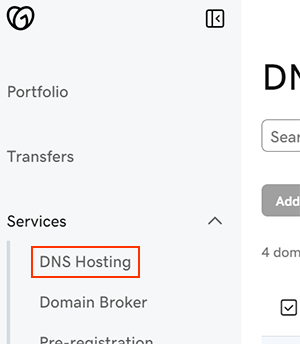
GoDaddy allows easy editing of domain details. Change your contact info, update name servers, or set forwarding options. Just log in to your account and select the domain you want to edit. The control panel shows all editable options clearly. Save changes to apply them immediately.
Removing A Domain
Removing a domain from your hosting account is quick. Go to your domain list and choose the domain to remove. Confirm the removal to avoid mistakes. Removing a domain frees up resources and keeps your account organized.
Credit: www.godaddy.com
Credit: www.godaddy.com
Frequently Asked Questions
How Do I Add A Domain To My Godaddy Hosting?
Log in to your GoDaddy account, go to your hosting dashboard, and select “Manage. ” Then, click “Add Domain,” enter your domain name, and follow the prompts to link it to your hosting account.
Can I Add Multiple Domains To One Godaddy Hosting?
Yes, GoDaddy allows multiple domains on one hosting account. You can add addon domains through the hosting control panel to manage several websites under one plan.
How Long Does Domain Propagation Take On Godaddy?
Domain propagation typically takes 24 to 48 hours after adding a domain. This delay allows DNS changes to update worldwide for your website to be accessible.
Do I Need To Update Nameservers When Adding A Domain?
Yes, update your domain’s nameservers to point to GoDaddy hosting servers. This step is essential for linking your domain to your hosting account properly.
Conclusion
Adding a domain to your GoDaddy hosting is simple and quick. Follow each step carefully to avoid mistakes. This process helps you manage your website easily. You can start building or moving your site right away. Keep your login details safe for future use.
Regularly check your domain settings for smooth operation. Now, your online presence is ready to grow. Take control and enjoy your new website setup.


