
Are you about to make important changes to your WordPress site but worried visitors might see a broken or incomplete page? Activating Maintenance Mode is the perfect solution to keep your audience informed and protect your site’s professionalism.
You’ll discover simple, step-by-step ways to turn on Maintenance Mode quickly and easily. By the end, you’ll know exactly how to keep your site looking great—even while you work behind the scenes. Let’s dive in and make sure your visitors always have a smooth experience.
Why Use Maintenance Mode
Using maintenance mode on your WordPress site is important during updates or fixes. It lets you control what visitors see. This keeps your site looking professional and working well. It also protects your site data and improves user experience. Below are the main reasons to use maintenance mode.
Benefits For Website Updates
Maintenance mode hides your site while you update it. Visitors see a clear message instead of broken pages. This stops confusion and keeps your site clean. You can safely update themes, plugins, or WordPress core. It prevents users from seeing errors or incomplete content.
Improving User Experience
Visitors get a simple notice about the site status. They know you are fixing or improving the site. This builds trust and reduces frustration. It avoids showing half-done pages or errors. A good message keeps users calm and informed.
Preventing Data Loss
Maintenance mode blocks users from making changes during updates. This stops data from being lost or corrupted. It helps keep your site’s information safe. You reduce the risk of errors from simultaneous actions. Your site stays secure while you work behind the scenes.
Methods To Activate Maintenance Mode
Activating maintenance mode on your WordPress site helps you make updates safely. It hides your site content from visitors. Instead, it shows a simple message that the site is under maintenance.
There are several ways to turn on maintenance mode. Each method suits different skill levels and needs. Choose the one that works best for you.
Using A Plugin
Plugins are the easiest way to enable maintenance mode. Many free and paid plugins exist. They let you activate maintenance mode with a few clicks. You can customize the message and design without coding.
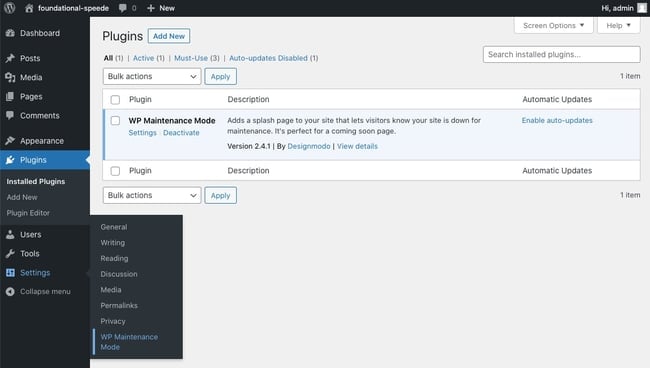
Popular plugins include “WP Maintenance Mode” and “Maintenance.” After installation, just turn on the mode in the plugin settings. No technical knowledge required.
Manual Activation Via Code
Manual activation requires adding code to your WordPress files. This method suits users comfortable editing code. You can create a maintenance mode page using PHP. Then, add a snippet to your theme’s functions.php file.
This code redirects visitors to the maintenance page. Logged-in admins can still see the full site. It is a lightweight option without extra plugins.
Through Hosting Provider Tools
Some hosting providers offer built-in maintenance mode tools. These tools activate maintenance mode at the server level. You can turn it on from your hosting control panel.
This method is fast and does not affect your WordPress installation. It works well for quick fixes or major updates. Check with your hosting provider for availability and instructions.
Top Plugins For Maintenance Mode
Activating maintenance mode on WordPress is simple with the right plugin. Plugins help show a maintenance page while you update your site. Visitors see a clear message instead of errors or broken pages. Many plugins offer easy setup and customization options.
Choosing the best plugin can save time and make your site look professional. Below are some popular plugins and how they work.
Features Of Popular Plugins
Most maintenance mode plugins include a countdown timer. This shows when your site will be back online. They allow custom messages and logos to fit your brand. Some plugins offer templates to create attractive pages quickly.
Many plugins support email notifications. This lets you inform visitors about updates. A few plugins also block search engines during maintenance. This protects your SEO rankings.
Step-by-step Plugin Setup
Start by installing the plugin from the WordPress dashboard. Activate it after installation. Go to the plugin settings page to enable maintenance mode. Customize the message and page appearance if needed. Save changes and test the page by visiting your site.
Make sure the maintenance mode is visible to visitors but not to admins. This helps you work without interruptions. Turn off maintenance mode when updates finish.
Customizing The Maintenance Page
Use the plugin’s editor to add your logo and colors. Write a clear message that explains why the site is down. Add a contact email or social media links for visitor questions. Some plugins let you add background images or videos.
Keep the design simple and easy to read. Avoid too much text or complicated layouts. A clean page keeps visitors patient and informed.

Credit: www.interserver.net
Manual Activation Steps
Activating maintenance mode manually in WordPress gives you full control. This method lets you customize the process without relying on plugins. It requires editing core files carefully. Follow these simple steps to set up maintenance mode on your site.
Editing The .htaccess File
The .htaccess file controls server settings for your WordPress site. You can add rules here to show a maintenance page. First, connect to your website via FTP or use the hosting file manager. Find the .htaccess file in the root directory.
Before editing, back up the .htaccess file. Add the following code at the top of the file:
RewriteEngine On RewriteCond %{REQUEST_URI} !/maintenance.html$ RewriteCond %{REMOTE_ADDR} !^123\.456\.789\.000$ RewriteRule ^(.)$ /maintenance.html [R=302,L]Replace 123.456.789.000 with your own IP address. Create a maintenance.html page in your root folder. This page will show your maintenance message. This method blocks most visitors except your IP.
Adding Maintenance Code To Functions.php
You can also activate maintenance mode by adding code to your theme’s functions.php file. This approach is simple and fast. Open functions.php in your theme folder via FTP or the WordPress editor.
Insert this code at the end of the file:
function wp_maintenance_mode() { if (!current_user_can('edit_themes') || !is_user_logged_in()) { wp_die('Site Under Maintenance
We will be back soon.
'); } } add_action('get_header', 'wp_maintenance_mode');This code shows a simple maintenance message to visitors. Logged-in admins can still see the site normally.
Testing The Maintenance Mode
After setting maintenance mode, test it on different devices. Use a browser where you are not logged in. Check if the maintenance page appears as expected. Refresh the page several times to confirm.
Try accessing the site from another network or use private browsing. Ensure logged-in admins can still access the site normally. Testing helps avoid surprises during real maintenance work.
Best Practices During Maintenance
Activating maintenance mode on your WordPress site is important for smooth updates. During this time, follow best practices to keep visitors informed and protect your data. Proper steps help maintain trust and avoid confusion.
Setting Expected Downtime
Inform visitors about how long the site will be offline. Choose a time with low traffic to reduce impact. Keep the downtime short to avoid losing visitors. Clear timing helps users plan their visits better.
Communicating With Visitors
Display a friendly message explaining the maintenance. Use simple words to say the site is temporarily unavailable. Provide an estimated time for the site to return. This keeps visitors calm and informed.
Backup Before Maintenance
Create a full backup of your website before starting work. Save all files and the database to avoid data loss. Backups protect your site from errors during updates. This step is crucial for a safe maintenance process.
Credit: kinsta.com
Troubleshooting Maintenance Mode Issues
Maintenance mode in WordPress is helpful during updates or changes. Sometimes, it can cause problems that stop your site from working well. Troubleshooting these issues helps get your website back online quickly. Knowing common errors and how to fix them saves time and stress.
Common Errors And Fixes
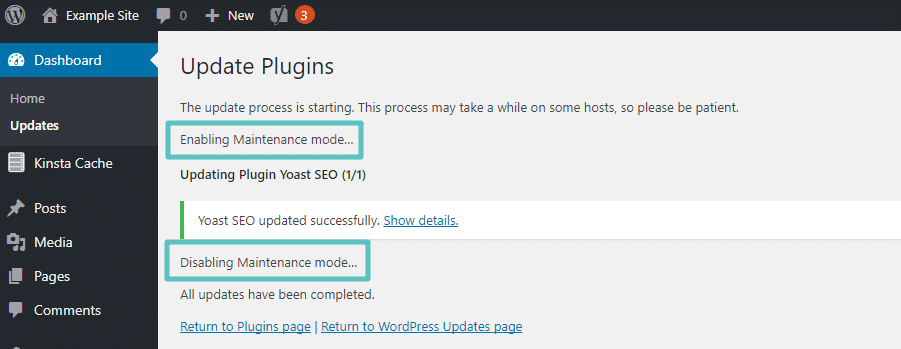
A frequent error is the site stuck in maintenance mode. This happens when the update process does not finish properly. To fix this, delete the .maintenance file from your WordPress root folder. You can do this using FTP or the file manager in your hosting control panel.
Another problem is the white screen of death. This may occur due to plugin conflicts during maintenance. Deactivate all plugins temporarily to see if the site loads. Then, reactivate them one by one to find the problem plugin.
Deactivating Maintenance Mode
You can turn off maintenance mode manually by removing the .maintenance file. This is usually enough to restore your site. Some plugins add maintenance mode too. Check plugin settings to disable it if needed.
Clear your browser cache after deactivating maintenance mode. Sometimes your browser still shows the old maintenance page. Refreshing ensures you see the live site.
When To Contact Support
Contact your web host or WordPress support if problems persist. Issues like server errors or file permission problems need expert help. Provide details about what you tried and any error messages.
Getting support early prevents long downtime. Professional help ensures your website runs smoothly again.
Credit: blog.hubspot.com
Frequently Asked Questions
How Do I Enable Maintenance Mode In WordPress?
To enable maintenance mode, install a plugin like “WP Maintenance Mode. ” Activate it, then customize the settings to display a maintenance page to visitors while you work.
Can I Customize The Maintenance Mode Page Design?
Yes, most maintenance mode plugins allow you to customize the page’s text, colors, and background. This helps keep your brand visible during updates.
Will Activating Maintenance Mode Affect Seo Rankings?
No, maintenance mode typically sends a 503 status code, telling search engines the site is temporarily down. This protects your SEO during updates.
How Long Should I Keep WordPress In Maintenance Mode?
Keep it active only as long as necessary to complete updates. Prolonged use can frustrate visitors and impact user experience.
Conclusion
Activating maintenance mode in WordPress keeps visitors informed during updates. It protects your site while you make changes. Use simple plugins or manual methods to enable it. Always test the mode before going live to avoid errors. Maintenance mode helps maintain a professional look and user trust.
Keep your site safe and user-friendly during updates. This small step improves your website’s overall experience. Try it today and see the difference.


