
Are you ready to make your website live but unsure how to connect your domain to your hosting? Activating your domain to hosting is a crucial step that brings your online presence to life.
Without this connection, your site remains invisible to the world. Don’t worry—this process is simpler than it sounds. In this guide, you’ll discover clear, step-by-step instructions that anyone can follow. By the end, you’ll confidently have your domain and hosting working together smoothly, so your website can start attracting visitors right away.
Let’s get started!
Choosing A Hosting Provider
Choosing the right hosting provider is important for your website’s success. Your hosting service stores your website files and makes them accessible online. A good provider ensures your website loads quickly and stays online without interruptions. Picking a provider that fits your needs helps avoid future problems.
Types Of Hosting Plans
There are several types of hosting plans. Shared hosting is the most affordable and suits small websites. VPS hosting offers more power and control for medium sites. Dedicated hosting gives full server access and is ideal for large websites. Cloud hosting uses multiple servers to keep your site running smoothly.
Key Features To Consider
Look for features like uptime guarantees to keep your site online. Fast server speed improves user experience. Security measures protect your data and visitors. Customer support helps fix issues quickly. Backup options keep your data safe. Easy control panels make managing your site simple.
Comparing Popular Providers
Some popular hosting providers include Bluehost, SiteGround, and HostGator. Bluehost offers beginner-friendly plans and good support. SiteGround is known for fast speed and strong security. HostGator provides affordable plans with flexible options. Review their features and prices to find a good match.

Credit: www.shoutmeloud.com
Registering Your Domain
Registering your domain is the first step to create your website. This process gives you a unique web address on the internet. It helps people find your site easily. Choosing the right domain name and registering it correctly is very important. This section explains how to select a domain name, check its availability, and complete the registration process.
Selecting A Domain Name
Choose a domain name that is short and easy to remember. Use words that describe your business or website. Avoid using numbers or special characters. Make sure the name sounds clear when spoken aloud. Try to pick a name that is unique and stands out. A good domain name helps build your brand online.
Domain Registration Process
To register your domain, visit a trusted domain registrar website. Create an account and enter your chosen domain name. Provide your contact details as required. Follow the steps to complete the payment. After payment, the registrar will secure your domain name. You will receive a confirmation email with your domain details.
Checking Domain Availability
Before registration, check if the domain name is available. Use the search tool on the registrar’s site. If the name is taken, try different variations or extensions like .net or .org. Avoid using names that are too similar to existing websites. Checking availability saves time and avoids legal issues. Confirm your domain is free before moving forward.
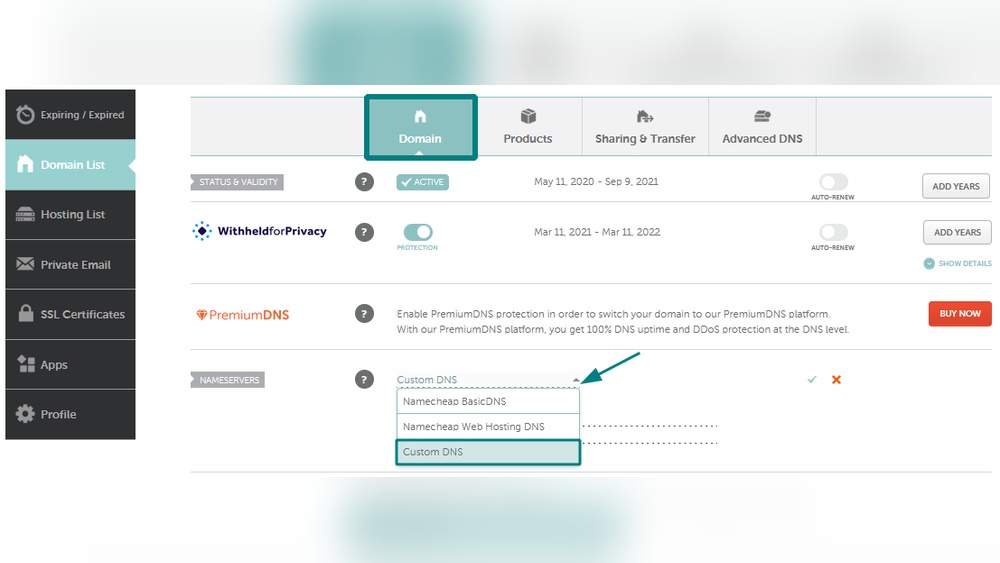
Linking Domain To Hosting
Linking your domain to hosting is a key step to make your website live. It connects your website address to the server where your site files are stored. This process lets visitors find your site using your domain name.
To link your domain to hosting, you need to change some settings in your domain provider account. These settings tell the internet where to send visitors when they type your domain name.
Accessing Dns Settings
Start by logging into your domain registrar account. Look for a section called “DNS Settings” or “Domain Management.” This area controls where your domain points. You need to open this section to make changes.
DNS settings manage how your domain interacts with the internet. You will see several records here. Focus on nameservers and A records for hosting connection.
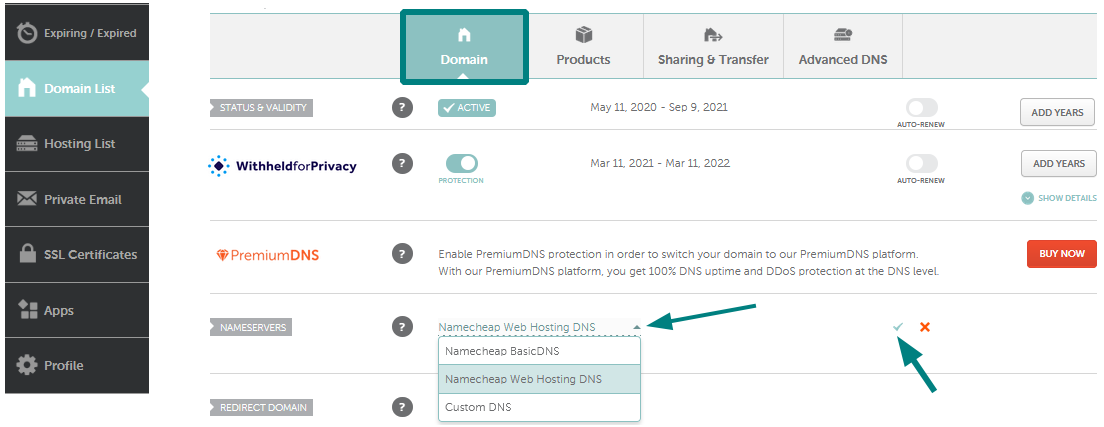
Updating Nameservers
Nameservers direct your domain to your hosting provider. Find the option to change nameservers in the DNS settings. Replace the current nameservers with those from your hosting provider.
Nameserver addresses usually look like ns1.example.com and ns2.example.com. Save the changes. It can take a few hours for the update to take effect worldwide.
Adding A Records
A records link your domain to your hosting server’s IP address. In DNS settings, find “Add Record” or “Manage Records.” Choose A record type. Enter the IP address of your hosting server.
This step ensures your domain points directly to your website files. Save the new A record. This may also take some time to update across the internet.
Credit: www.namecheap.com
Setting Up Hosting Account
Setting up your hosting account is the next step after buying your domain. This process prepares your website space on the internet. It involves accessing your control panel, uploading your website files, and setting up databases. Each step is important to make your website live and functional.
Follow these simple steps to get your hosting ready. This will help your website work smoothly and be accessible to visitors.
Creating Control Panel Access
The control panel is where you manage your hosting account. You get login details from your hosting provider. Use these to enter your control panel. This gives you control over your website settings and features. Always keep your login information safe.
Uploading Website Files
After logging in, find the file manager or use FTP to upload files. Upload your website files to the public_html folder or the main directory. This folder is the root folder for your website. Ensure all files are uploaded correctly to avoid errors.
Configuring Databases
Many websites need databases to store data. Create a new database using your control panel. Set a username and password for the database. Connect your website to the database by updating configuration files. This step helps your website work with dynamic data.
Verifying Domain Activation
Verifying domain activation is a key step after linking your domain to hosting. This process confirms that your website is live and accessible online. It also helps catch setup errors early. Checking domain status saves time and avoids future problems.
Using Dns Propagation Tools
DNS propagation tools show if your domain points to the hosting server. These tools check domain name system updates worldwide. You enter your domain name, and the tool scans multiple servers. It reveals whether changes have spread globally.
Popular tools include WhatsMyDNS.net and DNSChecker.org. Use them to track A records, CNAME, and other DNS types. Full propagation can take up to 48 hours. However, many updates appear within a few hours.
Troubleshooting Common Issues
Sometimes, domain activation fails or delays. Common problems include incorrect DNS records and slow propagation. Double-check your hosting provider’s DNS instructions. Make sure your domain uses the correct name servers.
Clear your browser cache to avoid loading old pages. Also, flush your computer’s DNS cache. If problems persist, contact your domain registrar or hosting support. They can help identify and fix issues quickly.
Optimizing Website Performance
Optimizing website performance is a key step after activating your domain to hosting. A fast, secure, and reliable website keeps visitors happy. It also helps improve your search engine ranking. Small changes can make a big difference in loading speed and user experience. Below are some simple ways to boost your website’s performance.
Enabling Ssl Certificates
SSL certificates protect your website by encrypting data. This keeps information safe from hackers. Most hosting providers offer free SSL certificates. Activate SSL to change your website address from HTTP to HTTPS. This not only improves security but also builds trust with visitors. Search engines prefer secure websites, so SSL helps your SEO too.
Setting Up Caching
Caching stores copies of your website pages. This allows faster loading for repeat visitors. Use caching plugins or built-in hosting options. Cached pages reduce server load and speed up response time. Faster websites reduce bounce rates and improve user satisfaction. Regularly clear cache to keep content updated.
Implementing Cdn Services
A Content Delivery Network (CDN) stores your website files on multiple servers worldwide. It delivers content from the closest server to the visitor. This cuts down loading time significantly. CDNs also protect against traffic spikes and attacks. Many CDN services integrate easily with hosting. Using a CDN makes your site faster and more reliable globally.
Credit: www.shoutmeloud.com
Frequently Asked Questions
What Is The First Step To Activate Domain To Hosting?
The first step is to update your domain’s nameservers to your hosting provider’s nameservers. This links your domain with your hosting account.
How Do I Point My Domain To Hosting Server?
You point your domain by changing DNS records, mainly the nameservers, to match your hosting server details.
How Long Does Domain Activation To Hosting Take?
Domain activation typically takes 24 to 48 hours due to DNS propagation across the internet.
Can I Activate Domain And Hosting On Different Platforms?
Yes, you can activate your domain and hosting on separate platforms by correctly updating DNS settings.
Conclusion
Activating your domain to hosting sets your website live on the internet. Follow each step carefully for smooth setup. Check your DNS settings and wait for changes to take effect. Test your website to ensure everything works correctly. Stay patient; sometimes updates take time.
A properly connected domain and hosting help your site reach visitors easily. Keep these basics in mind for future website projects. Simple steps lead to a successful online presence.


