

Are you ready to make your website live but not sure how to connect your domain to your hosting? Pointing your domain to hosting might sound tricky, but it’s simpler than you think.
When done right, it ensures your visitors land exactly where you want them—on your website. In this guide, you’ll discover step-by-step how to link your domain to your hosting easily and quickly. By the end, you’ll have full control over your website’s address and be one step closer to sharing your content with the world.
Let’s dive in and get your site online!
Credit: www.seekahost.com
Choose A Hosting Provider
Choosing the right hosting provider is a key step in pointing your domain to hosting. The hosting service stores your website files and makes them visible online. Picking a good host helps your website load fast and stay online without interruptions.
Focus on a provider that fits your needs and budget. A reliable host gives you good performance and support. Here are some points to consider before making your choice.
Compare Hosting Plans
Hosting plans vary by price, features, and limits. Check the storage space, bandwidth, and number of websites allowed. Some plans offer free SSL certificates or domain registration. Make sure the plan matches your website size and traffic.
Check Server Locations
Server location affects website speed. Choose a hosting provider with servers near your main audience. Closer servers reduce loading time. Some hosts offer multiple server locations. This helps if your visitors come from different places.
Review Customer Support
Good customer support solves problems fast. Look for providers with 24/7 support via chat, phone, or email. Read user reviews to see how helpful the support team is. Quick help keeps your website running smoothly.
Credit: www.namecheap.com
Register Your Domain
Registering your domain is the first step to creating your website. It gives your site a unique address on the internet. This process is simple and quick. You need to choose a reliable domain registrar, find an available domain name, and complete the registration.
Select A Domain Registrar
Pick a trusted company to register your domain. Look for one with good reviews and fair prices. Check if they offer easy management tools. Some popular registrars include GoDaddy, Namecheap, and Google Domains. Choose one that fits your needs and budget.
Search For Available Domains
Think about the name you want for your website. Enter it in the registrar’s search box. The tool will tell you if the name is free or taken. Try different variations if your first choice is unavailable. Keep it short, simple, and relevant to your site.
Complete Domain Registration
Once you find a free domain, add it to your cart. Provide your contact details as required. Choose the registration period, usually one year or more. Pay using the available payment methods. After payment, you will receive a confirmation email. Your domain is now registered and ready to use.
Access Domain Dns Settings
Accessing your domain’s DNS settings is the first step in pointing your domain to hosting. These settings control how your domain connects to the web server. Changing them correctly ensures your website loads properly.
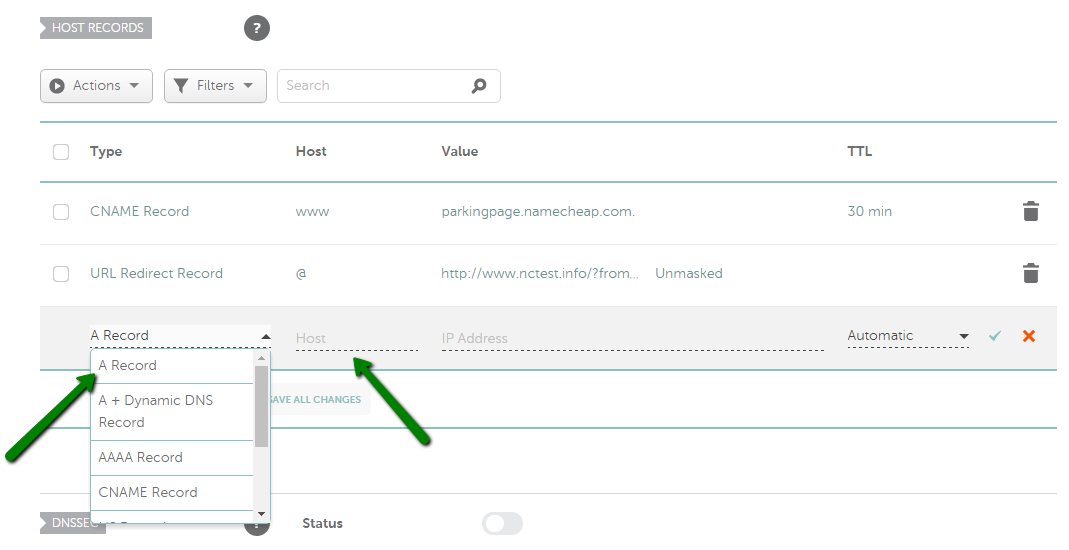
DNS settings include records like A, CNAME, and MX. These records tell the internet where to find your website and email services. Accessing and editing these records requires logging into your domain control panel.
Login To Domain Control Panel
Start by visiting your domain registrar’s website. Enter your username and password to log in. This panel is where you manage all domain-related settings. Make sure you have your login details ready before you begin.
Locate Dns Management Section
Once logged in, look for sections named “DNS,” “DNS Settings,” or “Manage DNS.” This area allows you to view and edit your domain’s DNS records. The exact name and location can vary by registrar, but it is usually easy to find.
Update Nameservers
Updating nameservers is a key step to connect your domain to your hosting. It tells the internet where to find your website files. Without updating nameservers, your domain will not show your website. This process is simple and only takes a few minutes. Follow these steps carefully to update your nameservers correctly.
Get Nameserver Details From Host
Start by logging into your hosting account. Look for the nameserver information in your hosting control panel or welcome email. Nameservers usually look like ns1.example.com and ns2.example.com. Write them down or keep the page open for easy access.
Replace Existing Nameservers
Next, log into your domain registrar account. Find the domain management section and open the nameserver settings. Remove the old nameservers listed there. Enter the new nameservers you got from your host. Double-check for any typing mistakes.
Save Changes And Confirm
After entering new nameservers, save your changes. The system might ask you to confirm the update via email. Confirm if needed. Note that changes can take up to 48 hours to take effect worldwide. Check your website after some time to see if it loads correctly.
Add Domain To Hosting Account
Adding a domain to your hosting account is an important step to make your website live. This process links your domain name with your hosting service. It allows visitors to find your site easily on the internet.
This guide explains how to add your domain to the hosting account quickly. Follow simple steps to connect your domain correctly.
Login To Hosting Dashboard
Start by logging into your hosting dashboard. Use the username and password provided by your hosting provider. The dashboard is where you control your hosting settings.
Look for the login page on your hosting provider’s website. Enter your credentials carefully to avoid errors.
Use Add Domain Feature
Find the “Add Domain” or “Addon Domain” section in the dashboard. This tool lets you link a new domain to your hosting.
Enter the domain name you want to add. Make sure it is spelled correctly. Select the folder where your website files will be stored.
Verify Domain Ownership
After adding the domain, verify you own it. This step protects your site and confirms your control.
Verification methods may include uploading a file to your hosting or updating DNS records. Follow the instructions given by your hosting provider carefully.
Wait For Dns Propagation
After pointing your domain to hosting, the next step is waiting for DNS propagation. This process lets the internet know about your new website location. It takes time for all servers worldwide to update the new settings. During this period, some users may see the old website or an error page. Patience is key while DNS changes spread across the web.
Understand Propagation Time
DNS propagation usually takes between 24 to 48 hours. Some changes appear faster, even within a few minutes. Others take longer, depending on your domain registrar and hosting provider. Internet service providers also play a role in the delay. Keep in mind, this is normal and expected. Avoid making more changes before propagation finishes.
Check Dns Status Tools
Use online DNS status tools to monitor propagation progress. These tools check your domain from different locations worldwide. They show if the new hosting IP address is visible. Popular tools include WhatsMyDNS and DNSChecker. Regular checks help you know when your website is fully live. This avoids confusion and unnecessary troubleshooting.
Test Your Website Connection
Testing your website connection is a key step after pointing your domain to hosting. It confirms that your site is live and accessible. This step helps catch errors early and ensures visitors reach your website without problems.
Check your website connection right after updating your domain settings. This saves time and avoids confusion later. A quick test can show if everything works as expected or if there are issues to fix.
Access Domain In Browser
Type your domain name into a web browser’s address bar. Press enter and watch for your website to load. The site should open with your new hosting content visible. If the page loads correctly, the connection is successful.
Clear your browser cache before testing. Old cached data can block the new site from showing. Use private mode or a different browser to avoid cached results. This ensures you see the latest version of your website.
Troubleshoot Common Issues
Page not loading? Check if DNS changes have fully propagated. DNS updates can take up to 48 hours to spread worldwide. Use online DNS checkers to see if your domain points to the right server.
Still no site? Verify your hosting account is active and configured correctly. Confirm your domain is added to the hosting control panel. Mistakes in setup can stop your website from appearing.
Check for typos in your domain name or hosting details. Simple errors can cause connection failures. Correct any mistakes and retry accessing your site.
Credit: www.youtube.com
Secure Your Site With Ssl
Securing your website with SSL is essential for safety and trust. SSL protects data sent between visitors and your site. It keeps information private and safe from hackers. Search engines also prefer sites with SSL, helping improve your site’s ranking.
Setting up SSL is easy and often free. Most hosting providers offer free SSL certificates. Installing SSL gives your site the HTTPS prefix, showing visitors your site is secure.
Enable Free Ssl Certificates
Many hosts provide free SSL certificates through services like Let’s Encrypt. Log in to your hosting control panel. Look for the SSL or Security section. Find the option to activate free SSL. Click to enable it. The system will install the certificate automatically. It usually takes a few minutes. No extra cost or technical skill needed.
Configure Https Settings
After enabling SSL, set your site to use HTTPS. Update your website’s URL to start with https://. Redirect all HTTP traffic to HTTPS. This ensures visitors always use the secure version. Check your content for mixed elements (HTTP links inside HTTPS pages). Fix these to avoid warnings. Use your hosting tools or plugins to force HTTPS. This step completes your site’s protection.
Frequently Asked Questions
What Does It Mean To Point A Domain To Hosting?
Pointing a domain to hosting means linking your domain name to your web server. This allows visitors to access your website using the domain. It involves updating DNS records to direct traffic from the domain to the hosting server’s IP address.
How Do I Update Dns Records For My Domain?
To update DNS records, log into your domain registrar’s control panel. Locate the DNS management section and change the A record to your hosting server’s IP address. Save changes and wait for propagation, which can take up to 48 hours.
Can I Point Multiple Domains To One Hosting Account?
Yes, most hosting providers allow multiple domains on one account. You can add additional domains as addon domains or aliases. Each domain must have its DNS records pointed to the hosting server for proper functionality.
How Long Does Domain Pointing Take To Work?
Domain pointing usually takes between a few minutes to 48 hours. This depends on DNS propagation speed across the internet. Clearing your browser cache and using DNS check tools can help verify if the changes took effect.
Conclusion
Pointing a domain to hosting is simple with clear steps. Start by accessing your domain’s DNS settings. Change the nameservers or add the correct A record. Wait for the changes to take effect, usually a few hours. Check your website to confirm it loads properly.
This process connects your domain name to your website files. Keep your login details safe for future updates. Follow these steps carefully, and your site will be live soon. Easy to do, and important for your online presence.


