

Want to make changes to your WordPress site but don’t know where to start? Editing a page might seem tricky at first, but it’s actually easier than you think.
Whether you want to update text, add images, or change the layout, this guide will walk you through each step clearly and simply. By the end, you’ll feel confident managing your pages like a pro—no technical skills needed. Ready to take control of your website and make it truly yours?
Let’s dive in!

Credit: stackoverflow.com
Accessing The WordPress Dashboard
Accessing the WordPress dashboard is the first step to edit any page on your website. The dashboard is the main control center where you manage content, settings, and design. It gives you a clear overview of your site’s status and tools.
Knowing how to reach the dashboard quickly saves time and makes editing easier. The process is simple and requires just a few steps. Let’s explore how to access the WordPress dashboard safely and efficiently.
Locate Your WordPress Login Url
Every WordPress site has a unique login URL. It usually looks like yoursite.com/wp-admin or yoursite.com/wp-login.php. This address takes you to the login page for your site’s backend.
Type the URL into your browser’s address bar and press Enter. This step is essential to reach the dashboard login screen.
Enter Your Username And Password
The login page asks for your username and password. Use the credentials you created during WordPress setup. These details keep your site secure from unauthorized access.
Type your username and password carefully. Then click the “Log In” button to proceed.
Navigate The WordPress Dashboard
After logging in, the dashboard appears on your screen. It shows a menu on the left with options like Pages, Posts, and Settings. The center area displays site stats and updates.
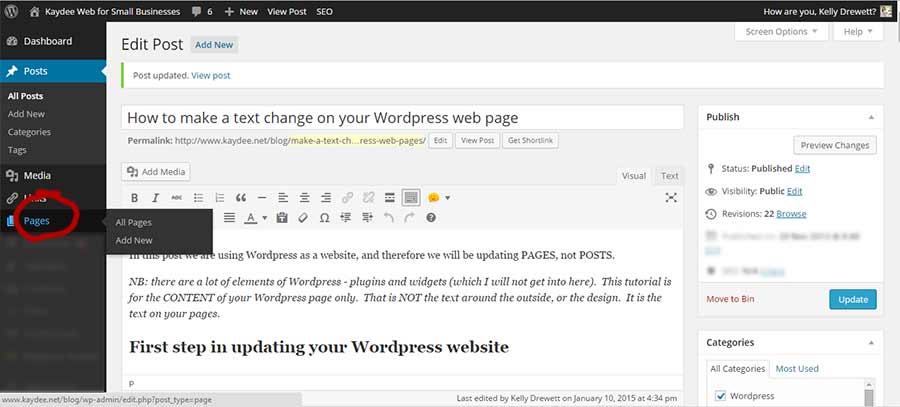
Use the left menu to find the “Pages” section. This area allows you to view and edit all pages on your website.
Locating The Page To Edit
Finding the right page to edit is the first step in updating your WordPress site. This part is simple but important. Knowing exactly where to go saves time and avoids confusion. The WordPress dashboard offers clear options to locate your pages quickly. Understanding these options helps you manage your site better.
The dashboard is your control center. Log in with your username and password. Once inside, you see many menu items on the left side. This is where you start your editing journey. Click on “Pages” to view all the pages on your site.
Using The Pages Menu
The “Pages” menu lists every page you created. It shows titles, authors, and dates. Scroll through the list to find the page you want to edit. You can also use the search box to type the page name. This helps if you have many pages.
Filtering Pages For Easier Search
Filters help narrow down your options. Use status filters like “Published,” “Draft,” or “Pending” to see specific pages. This makes it easier to find pages not yet live. Filters also include sorting by date or title. These tools speed up the process.
Using The Gutenberg Editor
The Gutenberg editor in WordPress makes page editing simple and flexible. It uses blocks to organize content. Each block can hold text, images, videos, or other elements. This system helps create clean, well-structured pages without coding skills.
Editing with Gutenberg lets you see changes in real time. The interface is user-friendly and works well for beginners. You can add, move, and customize blocks easily. This section explains how to edit pages using the Gutenberg editor.
Editing Text Blocks
Text blocks are the most common blocks in Gutenberg. Click inside a text block to start editing. You can type, delete, or change words quickly.
Use the toolbar above the block for basic text options. Make text bold, italic, or add links. You can also adjust alignment and add lists.
Editing text is fast and clear. Changes appear instantly on the page.
Adding And Removing Blocks
To add a new block, click the plus (+) button. Choose the block type you want from the menu. Options include paragraphs, headings, images, and more.
Blocks can be moved by dragging them up or down. This rearranges your content easily.
Remove blocks by selecting them and clicking the three dots. Then choose the delete option to remove unwanted blocks.
Customizing Block Settings
Each block has its own settings panel on the right side. Here you can change colors, font size, and layout.
Some blocks offer extra options like adding a background color or adjusting spacing. These settings help make your content look unique.
Experiment with settings to match your website style and improve readability.

Credit: onesmartsheep.com
Editing With The Classic Editor
The Classic Editor in WordPress offers a simple way to edit your pages. It shows a familiar text box, similar to a word processor. Many users prefer it for its straightforward design. Editing content feels natural and direct. This editor is perfect for basic page changes without distractions.
Modifying Content
Start by opening the page you want to edit. The content appears in a large text area. Click inside this area to change text. You can delete old words or add new ones easily. The editor saves your changes with a click on the update button. This way, your edits appear live on your site fast.
Using Formatting Tools
The Classic Editor includes simple tools for text style. You can make text bold or italic with one click. Use bullet points or numbers for lists. Align text to the left, center, or right. Add links to other pages or websites. These tools help make your content clear and neat.
Updating Page Attributes
Updating page attributes in WordPress lets you control how your page looks and where it fits in your site. These settings help organize your content and improve visitor navigation. You can change the page template, set parent pages, and adjust the page order easily.
Changing The Page Template
Page templates control the design of your page. WordPress offers different templates like full-width, default, or custom layouts. Choose a template that fits your content style. To change it, go to the Page Attributes box on the right side. Select a template from the dropdown menu. Then save or update the page to apply changes.
Setting Parent Pages
Parent pages create a hierarchy for your website. This helps group related pages together. Setting a parent page makes your page a child page. To set it, find the Parent dropdown in the Page Attributes box. Pick a parent page from the list. This structure helps visitors find related content quickly.
Adjusting Page Order
Page order controls the sequence of pages in menus or lists. Lower numbers appear first. By default, pages have an order of zero. Change this by entering a number in the Order field under Page Attributes. Use small numbers for important pages. Save your changes to update the page order.
Credit: kaydee.net
Adding Images And Media
Adding images and media makes your WordPress pages more attractive and engaging. Visual content helps explain your message clearly. It breaks up text and keeps visitors interested. WordPress offers easy tools to add and manage images and other media. Understanding these tools improves your page editing skills quickly.
Inserting Images
To insert images, open the page editor in WordPress. Click the plus (+) icon to add a new block. Select the “Image” block from the list. You can upload a new image from your computer or use an existing one. Drag and drop also works for uploading files. After inserting, you can resize or align the image easily. Adding captions helps explain the image to readers.
Using Media Library
The Media Library stores all your uploaded files. Access it by clicking “Media” in the WordPress dashboard. You can upload, search, and manage images here. Select images from the library when editing pages. This avoids uploading the same image multiple times. Organizing files with folders or tags saves time. The Media Library also shows image details like size and format.
Optimizing Media For Web
Optimizing images helps your website load faster. Large files slow down your page and annoy visitors. Use tools to reduce image size without losing quality. Choose the right format, like JPEG for photos or PNG for graphics. Add descriptive alt text to improve SEO and accessibility. Smaller, optimized images improve user experience and ranking.
Previewing And Saving Changes
Editing a page in WordPress includes steps for previewing and saving your changes. This helps you check your work before making it live. You can review how the page looks and save your progress safely. These steps keep your site organized and avoid mistakes.
Previewing The Page
Previewing shows how your page looks on the site. Click the “Preview” button in the editor. This opens a new tab with the page view. Check text, images, and layout. Make sure everything appears correct before saving or publishing.
Saving Drafts
Saving a draft keeps your changes without publishing. Click the “Save Draft” button. This stores your work privately. You can return to edit it later. Drafts prevent losing progress and allow careful editing.
Publishing Updates
Publishing makes your changes visible to visitors. Click the “Update” or “Publish” button. This replaces the old version with your new one. Only publish when you are ready. Your live page will show the latest edits immediately.
Troubleshooting Common Issues
Editing a page in WordPress sometimes causes issues. These issues can stop you from making changes smoothly. Troubleshooting helps fix these problems fast. It makes editing easier and saves time. This section shows common issues and simple fixes.
Fixing Formatting Problems
Formatting problems can make your page look messy. Text may appear in wrong places or styles. Clear the browser cache first. This often solves display glitches. Use the WordPress editor’s “Clear Formatting” tool. It removes unwanted styles from text. Check if your theme affects formatting. Switch to a default theme to test. Update WordPress and your theme regularly. Outdated versions cause many formatting errors.
Resolving Plugin Conflicts
Plugins add features to WordPress but can cause conflicts. These conflicts stop the editor from working right. Deactivate all plugins to find the troublemaker. Reactivate them one by one. This shows which plugin causes the problem. Delete or replace the faulty plugin. Always keep plugins updated. Use only trusted plugins from official sources.
Frequently Asked Questions
How Do I Access The WordPress Page Editor?
To edit a page, log in to your WordPress dashboard. Go to “Pages” and select the page you want to edit. Click “Edit” to open the page editor where you can make changes easily.
Can I Edit WordPress Pages Using The Block Editor?
Yes, WordPress uses the block editor (Gutenberg) by default. It lets you add, move, and customize content blocks like text, images, and videos on your page.
How Do I Save Changes After Editing A WordPress Page?
After editing, click the “Update” button on the top right. This saves your changes and publishes the updated content live on your website immediately.
Is It Possible To Edit WordPress Pages On Mobile Devices?
Yes, WordPress’s block editor works on mobile browsers and the WordPress app. You can edit and update your pages conveniently from any device.
Conclusion
Editing a page in WordPress is simple and quick. Just log in, find the page, and click edit. Make your changes using the editor tools. Preview the changes to see how they look. When you are happy, hit the update button.
This keeps your website fresh and up to date. Regular edits help your site stay useful and clear. Now you can easily manage your WordPress pages anytime. Try editing a page today and keep your site active.



