
Are you ready to bring your website to life but don’t know where to start? Installing WordPress on your domain is the first big step, and it’s easier than you might think.
Imagine having full control over your site, sharing your ideas, or growing your business online—all with just a few clicks. In this guide, you’ll discover simple, clear steps that anyone can follow to get WordPress up and running quickly. Stick with me, and by the end, you’ll have your very own website ready to shine.
Let’s dive in!
Choose A Hosting Provider
Choosing the right hosting provider is a key step to install WordPress on your domain. Your hosting service stores your website files and makes your site visible online. A good host ensures your website runs fast and stays secure. It also affects your site’s uptime and support availability.
Many hosting options exist. Each has benefits and limits. Understanding these helps you pick the best host for your needs and budget.
Shared Vs Dedicated Hosting
Shared hosting means your website shares a server with others. It is cheaper and suits small websites with low traffic. Resources like storage and bandwidth are shared, which can slow your site if others use too much.
Dedicated hosting gives you a whole server for your website only. It is faster and more secure. Best for large sites or those needing high performance. The cost is higher but offers better control.
Top Hosting Providers For WordPress
Some hosts specialize in WordPress and offer easy installation tools. Bluehost is popular for beginners. It provides good speed and customer support. SiteGround focuses on security and fast loading times. DreamHost offers flexible plans with a custom control panel.
These providers often include free SSL certificates and automatic backups. Choose one that fits your budget and offers reliable service. Check user reviews and uptime guarantees before deciding.

Credit: community.cloudflare.com
Register Your Domain
Registering your domain is the first step to creating your WordPress website. Your domain name is your website’s address on the internet. It helps visitors find your site easily. Choosing and registering the right domain name sets a solid foundation for your online presence.
Selecting A Domain Name
Choose a domain name that is short and easy to remember. Use simple words that relate to your website’s topic or brand. Avoid numbers and hyphens, as they can confuse visitors. Consider using keywords that describe your content. This helps improve your site’s visibility in search engines.
Domain Registration Process
Go to a trusted domain registrar website. Enter your chosen domain name in the search box. Check if the name is available. If it is, add it to your cart. Provide your contact information and create an account. Pay the registration fee using a secure payment method. After payment, you will receive a confirmation email. Your domain is now registered and ready to use.
Set Up Your Hosting Account
Setting up your hosting account is the first step to get WordPress on your domain. This process connects your website files to a server so visitors can see your site online. Hosting companies offer control panels to manage your website easily.
Accessing Control Panel
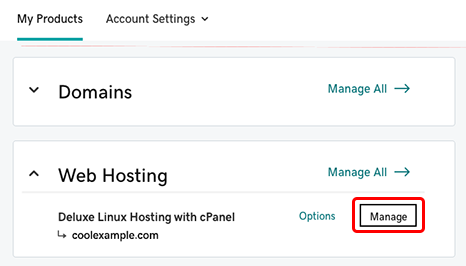
Start by logging into your hosting account. Use the username and password sent by your hosting provider. Look for the control panel link in the welcome email or on the hosting dashboard. The control panel helps you manage files, databases, and emails. Popular control panels include cPanel and Plesk. Knowing how to use it saves time and avoids mistakes.
Linking Domain To Hosting
Your domain name must point to your hosting server to display your website. Find the nameserver settings in your domain registrar account. Replace the current nameservers with those from your hosting provider. Nameservers look like ns1.example.com and ns2.example.com. Save the changes and wait for them to update, which takes a few hours. This step connects your domain to the hosting space where WordPress will be installed.
Install WordPress Automatically
Installing WordPress on your domain can be quick and simple. Many hosting providers offer tools that help you install WordPress automatically. This method saves time and avoids manual steps. It is perfect for beginners and those who want a fast setup.
Automatic installation handles all the technical details. You do not need to download files or create databases yourself. Just a few clicks and WordPress is ready to use. This makes building your website easier and less stressful.
Using One-click Installers
One-click installers are built into many hosting control panels. They allow you to install WordPress with just one click. No coding or technical knowledge is needed.
You simply log into your hosting account, find the WordPress installer, and start the process. The tool creates the database and uploads all files automatically. You only need to enter basic details like your site name and admin password.
This process usually takes a few minutes. After that, you can log into your new WordPress site and start adding content. One-click installers make WordPress accessible to everyone.
Popular Auto-install Tools
Several auto-install tools are common among web hosts. Softaculous is one of the most popular. It supports many apps, including WordPress. Softaculous offers a user-friendly interface and fast setup.
Another popular tool is Fantastico. It is easy to use and widely available. Mojo Marketplace also provides quick WordPress installs. These tools often come free with hosting plans.
Choosing a host with these tools can simplify your website launch. They help you avoid technical errors and save time. Your WordPress site will be ready faster with auto-installers.
Install WordPress Manually
Installing WordPress manually gives you full control over your website setup. This method is great for users who want to understand the process behind their site. It requires a few steps but is straightforward and clear. Follow these steps carefully to install WordPress on your domain.
Download And Upload WordPress Files
Start by downloading the latest WordPress package from the official website. Save the zipped file to your computer. Next, extract the files to a folder on your desktop. Use an FTP client to upload these files to your web server. Place them inside the root directory of your domain, usually called public_html or www.
Create A Database
Login to your hosting control panel. Find the database section, often named MySQL Databases. Create a new database for your WordPress site. Then, create a new database user with a strong password. Assign this user to the database and give full permissions. This database will store all your website information.
Configure Wp-config.php
Go back to the WordPress files on your server. Locate the file named wp-config-sample.php. Rename it to wp-config.php. Open this file in a text editor. Enter your database name, database user, and password in the correct fields. Save the changes and close the editor. This file connects WordPress to your database.
Run The Installation Script
Open your web browser and visit your domain URL. WordPress will detect the wp-config.php file. It will show the installation setup page. Fill in your site title, username, and password. Enter your email address. Click the install button. WordPress will finish the installation and take you to your new dashboard.
Credit: www.godaddy.com
Configure Basic WordPress Settings
After installing WordPress on your domain, the next step is to configure its basic settings. This setup shapes how your website looks and works. Simple adjustments can make your site clear and inviting for visitors. Let’s explore the key settings to get your site ready.
Set Site Title And Tagline
The site title is the name visitors see in the browser tab and search results. The tagline is a short phrase explaining what your site is about. Choose a clear and simple title. The tagline should be brief and descriptive. You can change these anytime in the WordPress dashboard under Settings > General.
Choose A Theme
The theme controls your website’s look and layout. Pick a theme that matches your site’s purpose. WordPress offers many free and paid themes. Go to Appearance > Themes to browse and activate a theme. A clean, simple design helps visitors focus on your content.
Install Essential Plugins
Plugins add extra features to your site. Some essential plugins improve security, SEO, and speed. Examples include a contact form, spam protection, and caching tools. To install plugins, go to Plugins > Add New. Search for the plugin name, then click Install and Activate.
Troubleshoot Common Issues
Troubleshooting common issues during WordPress installation helps save time and frustration. Many beginners face errors that block their setup process. Knowing how to fix these problems quickly keeps the project on track.
This section covers two key problems. Fixing installation errors and resolving database connection issues. Clear steps guide you through each fix.
Fixing Installation Errors
Installation errors often happen due to incorrect file uploads or permissions. Check that all WordPress files upload completely to your server. Use an FTP client for reliable file transfer.
Set correct permissions on files and folders. Usually, folders need 755 and files need 644 permissions. Wrong permissions stop WordPress from running.
Clear your browser cache before retrying the installation. Sometimes old data causes errors on the setup page. Refreshing helps load the latest information.
Resolving Database Connection Issues
Database connection errors appear when WordPress cannot access your database. Confirm your database name, username, and password are correct in the wp-config.php file.
Check that your hosting server allows database connections. Some hosts block connections for security reasons. Contact support if needed.
Make sure the database server name is correct. Usually, it is ‘localhost’ but some hosts use different names.
Reset your database password if you suspect it is wrong. Update wp-config.php with the new password to restore connection.
Credit: wordpress.com
Frequently Asked Questions
How Do I Install WordPress On My Domain?
To install WordPress, access your hosting control panel. Use the one-click installer or upload WordPress files manually. Create a database, then run the WordPress setup by visiting your domain.
What Are The Hosting Requirements For WordPress Installation?
WordPress requires PHP 7. 4 or higher, MySQL 5. 6 or higher, and HTTPS support. Most hosting providers meet these requirements by default.
Can I Install WordPress Without Technical Skills?
Yes, many hosts offer easy one-click WordPress installation. This process requires minimal technical knowledge and is beginner-friendly.
How Long Does WordPress Installation Take On A Domain?
The installation usually takes 5 to 10 minutes. One-click installers speed up the process significantly.
Conclusion
Installing WordPress on your domain is simple and quick. Just follow each step carefully. You will get a website ready to use in no time. Take your time to choose the right settings. This helps your site work better and look good.
Keep your login details safe for future use. Now, you can start adding content and customizing your site. Enjoy building your online presence with WordPress!


