
Are you ready to take control of your WordPress site and make a backup or move it somewhere new? Knowing how to export your WordPress site is a crucial skill that can save you time, headaches, and even money.
Whether you want to switch hosts, create a backup, or simply keep a copy for peace of mind, this process can seem tricky at first. But don’t worry—you’re in the right place. You’ll discover simple, step-by-step instructions that anyone can follow.
By the end, you’ll feel confident and ready to export your site like a pro. Keep reading to unlock this essential WordPress skill.
Reasons To Export Your WordPress Site
Exporting your WordPress site can be useful for many reasons. It helps keep your site safe and ready for changes. Exporting creates a copy of your content and settings. This copy can be used in different ways to protect or improve your website. Understanding why to export makes the process clearer and more effective.
Backup Purposes
Exporting your site is a smart way to create backups. Backups save your posts, pages, and settings. They keep your data safe if problems occur. A backup helps restore your site fast after crashes or hacks. Regular exports reduce the risk of losing important content.
Site Migration
Exporting makes moving your site easier. You can transfer your content to a new host or domain. This process saves time and avoids rebuilding from scratch. Export files contain all your posts and pages. Migration becomes simple and less stressful.
Testing And Development
Exporting allows safe testing and development. You can create a copy to try new themes or plugins. Changes made on the copy do not affect the live site. This protects your visitors from seeing unfinished work. Exporting supports smooth updates and improvements.

Credit: etsupport.freshdesk.com
Preparing Your Site For Export
Preparing your WordPress site for export is a crucial step. It ensures the process goes smoothly and your data stays safe. Taking time to clean up and update your site helps avoid errors during export. Backing up your database protects your content from accidental loss. Follow these simple steps to get ready for export.
Clean Up Unnecessary Content
Remove old posts, drafts, and unused media files. Delete spam comments and unused tags. Clear out plugins that are no longer active. This reduces the size of your export file. A cleaner site exports faster and runs better on the new host.
Update Themes And Plugins
Check for updates on your themes and plugins. Use the latest versions for better compatibility. Outdated software can cause problems after export. Updated themes and plugins improve site security and performance.
Backup Your Database
Create a full backup of your WordPress database. Use a reliable backup plugin or your hosting control panel. Store the backup file safely on your computer or cloud. This backup is your safety net if something goes wrong during export.
Using Built-in WordPress Export Tool
Using the built-in WordPress export tool is a simple way to save your website content. This tool helps you create a backup or move your site to another host. It exports your posts, pages, comments, and more. No extra plugins needed. Just a few clicks and you have your site data ready.
Accessing The Export Feature
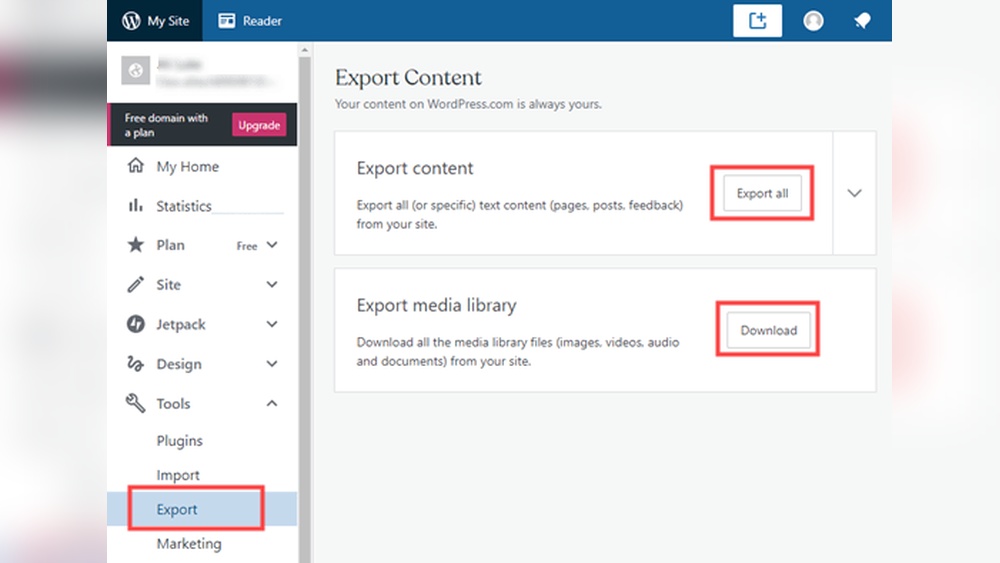
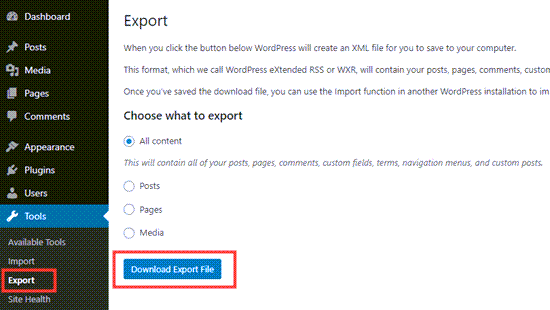
Log in to your WordPress dashboard. Look for the “Tools” menu on the left side. Click on “Export.” This opens the export page. You see options to choose what to export. It is easy to find and use.
Choosing What To Export
Pick what you want to save. You can export all content or select specific items. Options include posts, pages, and media files. You can also choose by author or date. This lets you control what gets exported.
Downloading The Export File
After choosing, click the “Download Export File” button. WordPress creates an XML file. This file holds your website data. Save it to your computer. Keep it safe for future use or import to another site.
Credit: www.wpbeginner.com
Exporting With Plugins
Exporting your WordPress site using plugins is a simple and efficient method. Plugins help you save your entire site, including content, themes, and settings. They reduce the risk of missing important files during export.
Many plugins come with easy-to-follow guides and options. This makes the export process smooth, even for beginners. Using plugins also allows you to handle different parts of your site separately if needed.
Popular Export Plugins
Several plugins are trusted by WordPress users for exporting sites. “All-in-One WP Migration” is popular for its user-friendly interface. “Duplicator” helps create site packages for easy migration. “WP Migrate DB” exports your database with precision. These plugins support different file formats and offer custom export options.
Step-by-step Plugin Export
First, install and activate your chosen export plugin. Next, open the plugin’s export section in your WordPress dashboard. Select what parts of your site you want to export. Common options include posts, pages, media, and themes. After selecting, start the export process. The plugin will create a downloadable file of your site. Save this file to your computer or cloud storage for safekeeping.
Handling Large Sites
Large sites can be tricky to export due to file size limits. Some plugins offer split export files to manage this. You may need to increase your server’s upload limits. Using plugins with compression features helps reduce file size. Exporting in smaller parts also works well. Always check for any errors during export to avoid data loss.
Exporting Manually Via Hosting Control Panel
Exporting your WordPress site manually through the hosting control panel gives you full control. It involves backing up your database and files directly from your hosting account. This method is reliable and does not require extra plugins.
Manual export is useful for moving your site to a new host or creating a backup. Let’s break down the process into clear steps.
Exporting The Database
Access your hosting control panel and open phpMyAdmin. Select the database used by your WordPress site. Click the Export tab to start the process. Choose the Quick export method and set the format to SQL. Download the database file to your computer. This file contains all your posts, pages, and settings.
Downloading WordPress Files
Use the File Manager in your hosting control panel to locate your WordPress files. These files include themes, plugins, and uploads. Compress the entire WordPress folder into a ZIP file. Download this ZIP file to your computer. This step saves all the site’s content and design elements.
Combining Files For Migration
Keep both the database export and WordPress ZIP file ready. These two parts make up your full website backup. Upload them to your new hosting account for migration. Import the database first, then extract the WordPress files. This order restores your website correctly on the new server.
Moving Your Site To A New Host
Moving your WordPress site to a new host can feel tricky. You need to copy all your files and your database. Then, set up the site on the new server. This section guides you through the key steps. Follow each step carefully to avoid errors.
Uploading Files And Database
First, upload your WordPress files to the new host. Use an FTP client to transfer all files from your old server. Next, import your database. Access the new host’s database tool, like phpMyAdmin. Create a new database, then import the SQL file. This stores your site’s content and settings.
Configuring Wp-config.php
Open the wp-config.php file in your WordPress folder. Update the database name, username, and password to match the new database details. Check the database host value. Usually, it is ‘localhost’, but some hosts use a different address. Save your changes after editing.
Testing The Migrated Site
After setup, visit your website URL on the new host. Check if pages load correctly and links work. Log in to the WordPress dashboard. Verify plugins and themes function as expected. Clear your browser cache to see the latest version. Fix any errors before pointing your domain to the new host.
Common Issues And Troubleshooting
Exporting a WordPress site can be smooth, but some problems might occur. Knowing common issues helps solve them fast. Troubleshooting these problems saves time and keeps your site safe.
Export File Size Limits
Many hosts limit the size of export files. Large sites with many posts and images can exceed this limit. When the export stops or fails, check your file size first. Splitting content into smaller parts can help. Use plugins that handle large exports if needed.
Broken Links After Migration
Broken links appear when URLs change after export. This happens if the site address or folder changes. Use plugins to update all links automatically. Check internal links in posts, pages, and menus. Fixing links keeps visitors and search engines happy.
Missing Media Files
Missing images or videos reduce site quality. Sometimes media does not export correctly. Check the uploads folder on your server. Use tools or plugins that export media files with content. Always verify media after export to avoid gaps.
Credit: www.webtoffee.com
Tips For Smooth Export And Migration
Exporting and migrating a WordPress site can feel tricky. A smooth process saves time and avoids errors. Simple steps help keep your site safe and working well.
These tips focus on easy ways to prepare and protect your site before moving it.
Regular Backups
Always create backups before starting the export. Backups keep your data safe from loss. Use reliable backup tools to copy files and databases. Store backups in a secure place outside your site. Check backups often to ensure they work correctly.
Using Staging Environments
Test your export on a staging site first. A staging environment copies your live site without affecting visitors. It helps find problems before the final move. Fix issues on staging to avoid downtime. Many hosts offer easy staging setup for WordPress.
Keeping Plugins Updated
Update all plugins before export. Updated plugins work better with migration tools. Old plugins may cause errors or break your site. Check plugin compatibility with your WordPress version. Keep plugins current to ensure smooth site performance after export.
Frequently Asked Questions
How Do I Export My Entire WordPress Site?
You can export your entire site using a plugin like All-in-One WP Migration or manually via cPanel. Plugins simplify the process, exporting files and databases. Manual export requires downloading files and exporting the database separately via phpMyAdmin. Both methods safely back up your site.
Can I Export WordPress Content Only?
Yes, WordPress lets you export content only through the built-in Export tool. Navigate to Tools > Export in your dashboard. Choose content types like posts, pages, or media. The tool generates an XML file with your content, ideal for migrating or backing up posts and pages.
Is Exporting WordPress Site Free?
Exporting your WordPress site is usually free using built-in tools or free plugins. Some advanced plugins offer premium features for easier or larger exports. However, basic exports for content or full backups can be done without cost using native WordPress options or free plugins.
How Do I Export WordPress Site With Plugins And Themes?
To export plugins and themes, use a full backup plugin like Duplicator or All-in-One WP Migration. These tools package your entire site, including plugins, themes, uploads, and the database, ensuring a complete export for migration or restoration.
Conclusion
Exporting your WordPress site is simple with the right steps. You can save your content, themes, and plugins easily. This helps when moving your site to a new host or making backups. Always double-check your exported files to avoid missing data.
Keep your site safe by exporting regularly. Now, you know how to export your WordPress site with confidence. Take your time and follow each step carefully for the best results.


