

Are you looking to organize your website better or launch a new project without buying a separate domain? Creating a subdomain in WordPress might be the simple solution you need.
It’s a powerful way to expand your site, keep things neat, and target different audiences—all while staying under your main domain. In this guide, you’ll discover exactly how to set up a subdomain step-by-step, even if you’re not a tech expert.
Keep reading, and you’ll have your subdomain ready in no time.
What Is A Subdomain
A subdomain is a part of your main website address. It acts like a separate section or folder on your site. You can use a subdomain to organize your content better.
Subdomains let you create different websites under one main domain. Each subdomain can have its own content and style. This helps to keep things clear and easy to manage.
What Does A Subdomain Look Like?
A subdomain appears before your main domain name. For example, “blog.example.com” is a subdomain of “example.com”. The part “blog” is the subdomain.
Why Use A Subdomain?
Subdomains separate parts of your site clearly. Use them for blogs, shops, or support pages. It keeps your main site simple and organized.
How Are Subdomains Different From Subfolders?
Subdomains are separate from your main site in the browser. Subfolders are just folders inside your main website. Subdomains can have their own settings and hosting.
Benefits Of Using Subdomains
Using subdomains in WordPress offers many benefits for website owners. Subdomains help organize content clearly and separate different site areas. They improve user experience by making navigation easier and more logical. Subdomains also provide technical advantages that support growth and management.
Seo Advantages
Subdomains can target specific keywords for different site sections. This helps search engines understand your content better. Each subdomain can rank separately in search results. It allows more focused optimization for each part of your website.
Better Organization
Subdomains keep your website structure neat and clear. You can separate blogs, stores, or forums easily. Visitors find what they need quickly without confusion. It creates a professional and well-managed appearance.
Improved Site Speed
Subdomains can reduce server load by spreading content. This can make your website load faster. Fast sites keep visitors happy and reduce bounce rates. Speed is important for both users and search engines.
Easy Management
Subdomains allow separate control of different site parts. You can install different themes or plugins per subdomain. This flexibility makes maintenance and updates simpler. It suits websites with varied content types or teams.
Preparing Your WordPress Site
Preparing your WordPress site is a key step before creating a subdomain. This ensures your website stays safe and your changes go smoothly. Taking simple steps now saves time and avoids problems later.
Backup Your Website
Backing up your website means saving a copy of all files and data. This protects your site if something goes wrong during setup. Use a WordPress plugin or your hosting provider’s backup tool. Download the backup to your computer for extra safety.
Make sure to include your database and media files in the backup. Confirm the backup is complete before moving on. This step helps you restore your site quickly if needed.
Access Your Hosting Control Panel
Access your hosting control panel to create the subdomain. Log in using your hosting account details. Most hosts use cPanel or a similar interface.
Find the section labeled “Domains” or “Subdomains.” This is where you will add a new subdomain. Having control panel access is necessary for setting up subdomains correctly.
Credit: 10web.io
Creating A Subdomain In Cpanel
Creating a subdomain in cPanel allows you to organize your website better. Subdomains act like separate websites under your main domain. They help you manage content or test new features without affecting the main site. Using cPanel makes the process quick and simple.
Locate The Subdomain Section
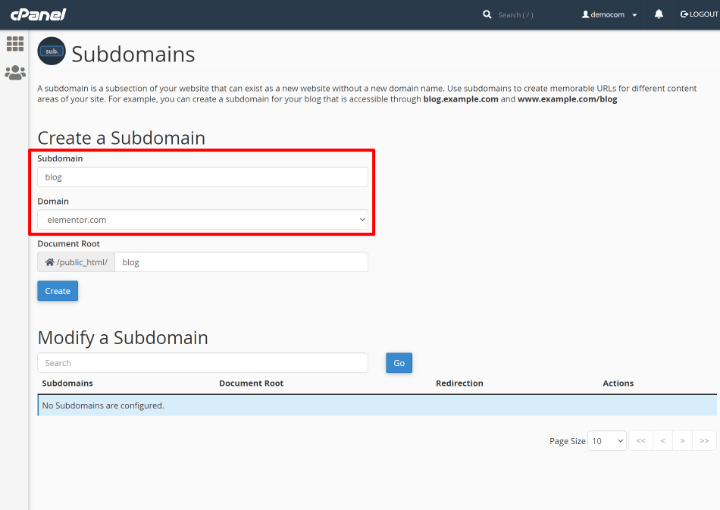
First, log into your cPanel account. Scroll down to find the “Domains” section. Look for the “Subdomains” icon and click it. This page lets you add and manage your subdomains easily.
Choose A Subdomain Name
Enter the name you want for your subdomain. Keep it short and clear. Avoid spaces or special characters. The subdomain will appear before your main domain, like subdomain.example.com.
Assign The Document Root
The document root is the folder where your subdomain files will be stored. cPanel usually fills this in automatically. You can change it to any folder you want. Make sure the folder exists or create it before proceeding.
Installing WordPress On Your Subdomain
Installing WordPress on your subdomain is a simple process. It allows you to run a separate website or blog under your main domain. This way, you can organize content better or test new ideas without affecting your main site.
The process involves three main steps. First, download the WordPress files. Next, create a new database for the subdomain. Finally, run the WordPress installation script to set up the site.
Download WordPress
Start by visiting the official WordPress website. Download the latest version of WordPress in a zip file. Once downloaded, unzip the file on your computer. Upload these files to your subdomain’s folder using an FTP client or your hosting file manager.
Create A New Database
Access your hosting control panel. Find the database section, usually called MySQL Databases. Create a new database for your subdomain. Then, create a new database user and assign it to the database. Note down the database name, username, and password. You will need these during installation.
Run The Installation Script
Open your web browser and go to your subdomain’s URL. WordPress will detect the new files. It will ask for the database details you saved earlier. Enter the database name, username, and password. Follow the on-screen instructions to complete the setup. Set your site title, admin username, and password. After finishing, log in to your new WordPress site on the subdomain.
Configuring Dns Settings
Configuring DNS settings is a key step in creating a subdomain in WordPress. It connects your subdomain to the right server. This process ensures visitors reach your new subdomain smoothly.
DNS settings tell the internet where to find your subdomain. Without proper configuration, your subdomain might not work. Let’s explore how to update nameservers and add DNS records correctly.
Update Nameservers
Start by logging into your domain registrar account. Find the section for nameservers. Replace the current nameservers with those provided by your hosting provider. This change directs traffic to your hosting server.
Save the changes. Nameserver updates can take up to 48 hours to spread across the internet. Patience is important during this time.
Add Dns Records
Access the DNS management area in your domain control panel. Look for the option to add new DNS records. Create an “A” record for your subdomain. Point it to your hosting server’s IP address.
Alternatively, use a “CNAME” record to point your subdomain to your main domain. This depends on your hosting setup. Save the new DNS records. Check that your subdomain resolves correctly after propagation.
Managing Subdomains In WordPress
Managing subdomains in WordPress is key to keeping your site organized and secure. Subdomains let you create separate sections for different topics or purposes. This helps visitors find content quickly without confusion.
Handling subdomains needs a few important steps. You must know how to switch between them and secure each one properly. Doing this right keeps your site professional and safe for users.
Switching Between Domains
Switching between subdomains in WordPress is simple. Use the WordPress dashboard to log into each subdomain’s admin area. Each subdomain acts like a separate site, so you manage content independently.
To switch, type the subdomain URL in your browser. Or use bookmarks to save time. This lets you work on different parts of your website without mixing content.
Setting Up Ssl For Subdomains
SSL certificates protect data on your subdomains. They show a padlock icon in the browser, proving your site is safe. Many hosts offer free SSL for subdomains.
Install SSL for each subdomain through your hosting control panel. Use tools like Let’s Encrypt for free certificates. Check the SSL status regularly to avoid security warnings.
Troubleshooting Common Issues
Troubleshooting common issues helps keep your subdomain running smoothly. Many problems arise from simple errors that you can fix quickly. Knowing where to check saves time and stress.
Subdomain Not Loading
Check if the subdomain is correctly created in your hosting panel. Make sure the DNS records point to the right server. Sometimes, it takes time for DNS changes to update worldwide. Clear your browser cache to avoid loading old data. Confirm your WordPress settings use the correct subdomain URL. If you use a caching plugin, clear its cache as well.
Ssl Certificate Errors
SSL errors happen if the certificate does not cover your subdomain. Obtain an SSL certificate that includes the subdomain or use a wildcard SSL. Install the certificate properly via your hosting control panel. Force HTTPS in WordPress by updating the site URL and using a plugin if needed. Check for mixed content issues where some resources load over HTTP instead of HTTPS.
Tips For Optimizing Subdomain Performance
Optimizing the performance of your subdomain is important for a smooth user experience. Fast loading times and clear structure help visitors stay longer. Proper optimization also supports your site’s search engine ranking. Focus on simple, effective methods to improve speed and SEO.
Caching Strategies
Caching stores copies of your web pages. It reduces server load and speeds up loading time. Use a caching plugin designed for WordPress. Set caching rules that refresh content regularly. Clear cache after updates to keep information fresh. Browser caching saves resources on repeat visits. Enable both server-side and browser caching for best results.
Seo Considerations
Search engines treat subdomains as separate sites. Use unique, relevant keywords for each subdomain. Create distinct titles and descriptions for all pages. Avoid duplicate content between your main domain and subdomains. Submit sitemaps for each subdomain to search engines. Use internal links that guide users clearly. This helps search engines understand your site better.
Credit: elementor.com

Credit: kinsta.com
Frequently Asked Questions
What Is A Subdomain In WordPress?
A subdomain in WordPress is a separate section of your website. It acts like a new site under your main domain. For example, blog. yoursite. com is a subdomain. It helps organize content or create distinct areas without buying a new domain.
How Do I Create A Subdomain In WordPress?
To create a subdomain, log in to your hosting control panel. Find the subdomains section, enter your desired subdomain name, and link it to your main domain. Then, install WordPress on the subdomain if needed for a new site or project.
Can I Use Subdomains For Different WordPress Sites?
Yes, subdomains can host entirely different WordPress sites. Each subdomain works like a standalone website. This setup helps manage multiple projects or content types under one main domain.
Do Subdomains Affect Seo Rankings?
Subdomains are treated as separate websites by search engines. This means SEO benefits don’t always transfer from the main domain. Proper SEO work is needed on each subdomain to rank well.
Conclusion
Creating a subdomain in WordPress is simple and helpful. It lets you organize your website clearly. You can separate different content or services easily. Just follow the steps carefully, and you will succeed. Take your time and check each detail.
Soon, your subdomain will work just as you want. This small change can improve your site’s structure a lot. Give it a try today!


