
Are you stuck with the default “Just Another WordPress Site” tagline on your website? It might seem like a small detail, but changing it can make your site look more professional and trustworthy to visitors.
You’re just a few simple steps away from giving your site a unique identity that truly reflects your brand or message. You’ll learn exactly how to change “Just Another WordPress Site” quickly and easily—no technical skills needed. Keep reading, and you’ll have your site standing out in no time.

Credit: www.youtube.com
Choosing A New Theme
Choosing a new theme changes the look of your WordPress site. It controls colors, fonts, and layout. A good theme fits your style and helps your content shine. Pick a theme that matches your website’s purpose and audience. This step sets the tone for your site’s success.
Finding Themes That Fit Your Style
Start by browsing the WordPress theme directory. Use filters to narrow down themes by features and layout. Preview themes to see how they appear on different devices. Choose a theme that looks simple and clear. Avoid themes with too many flashy elements.
Installing And Activating Themes
After selecting a theme, install it through your WordPress dashboard. Go to “Appearance” and then “Themes.” Click “Add New” and upload your theme or choose one from the directory. Press “Install” and then “Activate” to apply the theme to your site.
Customizing Theme Settings
Open the “Customize” option under “Appearance.” Adjust colors, fonts, and layout settings to match your style. Add your logo and change header images easily. Preview changes live before saving. Keep the design clean and user-friendly for visitors.

Credit: www.youtube.com
Modifying Site Identity
Modifying your site identity is the first step to make your WordPress site truly yours. This involves changing key details that visitors see first. The site title, tagline, logo, and icon all represent your brand online. Updating these elements helps your site look professional and unique.
WordPress makes it easy to customize these features. You can change them quickly from the dashboard. Small changes here create a big impact on how your site appears and feels.
Changing Site Title And Tagline
The site title is the main name of your website. The tagline is a short phrase that explains what your site is about. Both show up in browser tabs and search results. To change them, go to the WordPress dashboard, then “Settings” and “General.”
Type your new site title and tagline in the boxes. Keep the title clear and easy to remember. The tagline should describe your site in a few words. Save your changes. Now your site has a fresh identity that visitors will notice.
Uploading A Custom Logo
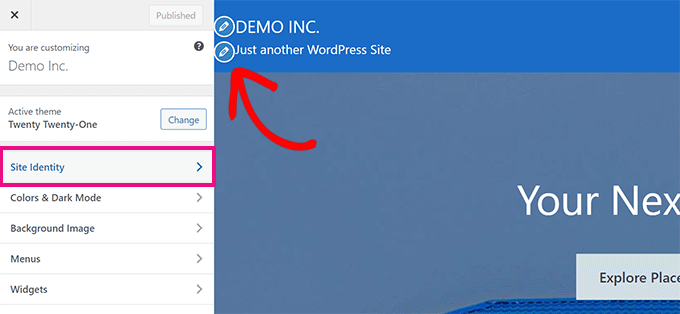
A logo gives your site a visual identity. It helps visitors recognize your brand quickly. To add a logo, open the WordPress dashboard and go to “Appearance” then “Customize.”
Find the “Site Identity” section and click “Select logo.” Upload your logo image file from your computer. Make sure the logo looks good on all devices. After uploading, crop it if needed and save your changes. Your site now stands out with a unique logo.
Setting A Site Icon
The site icon appears in browser tabs and bookmarks. It is a small image that represents your site. Setting a site icon helps with branding and makes your site easy to find.
Go to “Appearance” and then “Customize” in the dashboard. Click on “Site Identity” and look for “Site Icon.” Upload a square image, at least 512×512 pixels. Save your changes. This tiny icon helps your site look professional everywhere it appears.
Editing Pages And Posts
Editing pages and posts is a key part of customizing your WordPress site. It lets you change text, add images, and create a unique look. The WordPress editor is simple and user-friendly. It helps you update your content quickly. Understanding how to use it well makes your site better and more engaging.
Using The Block Editor
The Block Editor divides your content into blocks. Each block can be a paragraph, image, video, or button. This setup gives you control over each part of your page or post. You can move blocks around by dragging them. Editing text is easy—you just click and type. The editor also allows you to add new blocks with a plus (+) button. This way, you can build your content step by step.
Adding And Formatting Content
Adding content means typing or pasting text into blocks. You can format text by making it bold, italic, or underlined. Use headings to separate sections and make reading easier. Lists help organize points clearly. You can also add links to other pages or websites. The editor offers simple tools for these tasks, so no coding is needed. Formatting your content makes it look neat and professional.
Managing Media Files
Media files include images, videos, and audio. Adding media makes your pages more interesting. Upload files directly from your computer or select from the media library. Once uploaded, you can resize or crop images inside WordPress. You can also add alt text to describe images. This helps with SEO and accessibility. Managing media is simple and helps your site stand out visually.
Configuring Menus And Widgets
Configuring menus and widgets is key to customizing your WordPress site. Menus help visitors find content easily. Widgets add useful features to your site’s sidebars and footers. Both improve site navigation and user experience. Understanding how to manage these elements makes your site look professional and organized.
Creating Custom Menus
Custom menus let you control the links visitors see. Go to the WordPress dashboard and open the Appearance menu. Select Menus to create a new menu. Add pages, posts, or custom links to your menu. Arrange items by dragging them to the order you want. Save your menu and assign it to a location, like the header or footer. This makes your site easier to navigate.
Adding Widgets To Sidebars
Widgets add content blocks to your site’s sidebars. Open the Appearance menu and select Widgets. Choose the widget you want, such as search bars, recent posts, or calendars. Drag the widget to the sidebar area. Customize the widget settings to fit your needs. Widgets help visitors find important information quickly. They make your site more functional and interactive.
Managing Footer Widgets
Footer widgets appear at the bottom of your site. They often show contact info, links, or social icons. Access the Widgets section under Appearance. Drag widgets into the footer widget areas. Customize each widget for your site’s style and needs. Footer widgets improve site usability and keep visitors engaged. They give your site a polished, complete look.
Customizing Colors And Fonts
Customizing colors and fonts is a great way to make your WordPress site unique. It helps your site match your style and brand. Changing these design elements can improve readability and user experience. Simple adjustments can create a big impact on your site’s look.
Selecting Color Palettes
Start by choosing a color palette that fits your brand or mood. Use the WordPress Customizer to pick colors for backgrounds, text, and links. Stick to three or four main colors for a clean design. Use contrasting colors to make text easy to read. Test your colors on different devices for consistency.
Changing Typography Settings
Typography affects how your content feels and flows. WordPress themes often let you change fonts for headings and body text. Choose clear, simple fonts for better readability. Adjust font size and line spacing to avoid clutter. Keep font styles consistent across your site for a polished look.
Applying Custom Css
Custom CSS lets you add unique styles beyond the built-in options. Use it to fine-tune colors, fonts, or layout details. Access the Additional CSS section in the Customizer to add your code safely. Basic CSS knowledge helps but many tutorials are available online. Save your changes and preview them before publishing.
Credit: www.wpbeginner.com
Installing Essential Plugins
Installing essential plugins is a key step to improve your WordPress site. Plugins add new features and make your site work better. They help with security, SEO, speed, and more. Choosing the right plugins keeps your site safe and fast. Let’s explore how to pick, install, and set up these tools.
Choosing Plugins For Functionality
Select plugins that fit your site’s needs. Start with basics like security and SEO. Look for plugins with good ratings and many downloads. Check if the plugin updates often. Avoid plugins that slow down your site.
Consider what your visitors want. For example, use a contact form plugin if you need to collect messages. Use caching plugins to make pages load faster. Pick simple plugins that do one job well.
Installing And Activating Plugins
Go to your WordPress dashboard. Click on “Plugins” then “Add New.” Use the search bar to find your chosen plugin. Click “Install Now” and wait a few seconds. After installing, click “Activate” to start using it.
Activate only the plugins you really need. Too many plugins can cause problems. Keep plugins updated to avoid security risks and bugs.
Configuring Plugin Settings
After activation, find the plugin settings in your dashboard. Customize options to fit your site goals. For example, set up email alerts or SEO keywords. Follow simple guides or tutorials if available.
Test your site to see if the plugin works well. Adjust settings if something seems off. Proper configuration helps your site run smoothly and safely.
Optimizing Site Performance
Optimizing site performance is essential for any WordPress website. A fast site keeps visitors happy and lowers bounce rates. It also helps improve search engine rankings. Small changes can make a big difference in loading times and overall user experience.
Using Caching Solutions
Caching stores parts of your site temporarily. This reduces the time to load pages for repeat visitors. Plugins like W3 Total Cache or WP Super Cache are popular choices. They create static versions of your pages, so the server works less. This results in faster page loading and less strain on your server.
Optimizing Images
Large images slow down your site. Compress images to reduce their file size without losing quality. Tools like Smush or ShortPixel can help with this task. Also, use the correct image formats such as JPEG for photos and PNG for graphics. Resize images before uploading to avoid extra loading time.
Managing Updates And Backups
Keep WordPress core, themes, and plugins updated. Updates often improve speed and security. Outdated software can cause slowdowns or errors. Regular backups protect your site from data loss. Use plugins like UpdraftPlus to schedule automatic backups. This ensures your site stays safe and runs smoothly.
Frequently Asked Questions
How Do I Change The “just Another WordPress Site” Tagline?
To change the tagline, log into your WordPress dashboard. Go to Settings > General. Edit the “Tagline” field and save changes. This updates the default “Just Another WordPress Site” text across your site.
Where Can I Edit My WordPress Site Title And Tagline?
In your WordPress dashboard, navigate to Settings > General. There, you can modify both the site title and tagline. Save your changes to reflect them on your website immediately.
Can I Remove “just Another WordPress Site” Without A Plugin?
Yes, you can remove it manually. Go to Settings > General in the dashboard. Replace or delete the tagline text and save. No plugin is needed for this simple change.
Why Should I Change The Default WordPress Tagline?
Changing the tagline improves your site’s branding and SEO. The default is generic and doesn’t describe your site’s purpose. A unique tagline attracts visitors and boosts search engine rankings.
Conclusion
Changing your WordPress site is easier than it seems. Small steps can make a big difference. Focus on clear goals and simple changes. Regular updates keep your site fresh and secure. Test your site often to avoid errors. Use tools designed for beginners to help.
Keep learning and experimenting to improve. Your site can reflect your unique style. Start with one change, then build from there. A well-maintained site attracts visitors and grows your presence online.


