
Are you tired of relying on third-party web hosting services? Imagine having full control over your own web server, where you can manage everything from data security to website customization.
Hosting your own web server might sound complicated, but with the right guidance, it can be a straightforward and rewarding experience. This guide will walk you through the essential steps, breaking down complex tasks into easy-to-follow instructions. By the end of this article, you’ll not only understand the process but also feel empowered to take control of your online presence.
So, if you’re ready to unlock a new level of independence and customization for your website, keep reading. Your journey to mastering your own web server starts here.

Credit: www.siteuptime.com
Choosing The Right Hardware
Picking the right server is important. Dedicated servers are strong and reliable. They are great for big websites. VPS servers are like shared servers. But they give more control. They are good for medium-sized sites. Shared servers are cheap. Many sites use the same server. This can slow things down. For small sites, shared is fine. Think about what you need.
Money is key when buying a server. Dedicated servers cost the most. They give the best performance. VPS servers are middle-priced. They offer good value and control. Shared servers are the cheapest. They have limited power. Decide based on your site’s needs and your wallet. Spend wisely.
Understanding Server Software
Choosing the right operating system is important. Linux and Windows are popular choices. Linux is often free and open-source. It is known for stability and security. Windows is user-friendly and has good support. It may cost more, though. Both systems have pros and cons. Think about what you need. Decide which one fits best.
There are many web server software options. Apache is very common. It is free and open-source. Nginx is another choice. It handles many users well. LiteSpeed is known for speed. It is not free, though. Choose software based on your needs. Consider how many users you expect. The right software helps your site run smoothly.
Setting Up Your Network
Every device needs an IP address. This address helps devices talk. Check your computer’s settings. Find your current IP address there. Choose a static IP address for your server. Static means it won’t change. Write this number down. It’s important. Use this address for your server. Devices will find your server with it.
Log in to your router’s control panel. You might need a password. Look for port forwarding settings. This lets outside traffic reach your server. Enter your server’s static IP address there. Open port 80 for web traffic. Open port 443 for secure traffic. Remember, a firewall protects your network. Check its settings too. Make sure your server is safe.
Installing And Configuring The Web Server
Setting up your own web server begins with installing a server software like Apache or Nginx. Follow configuration steps to ensure your server runs smoothly and securely. Adjust settings to fit your needs and keep your website accessible to visitors.
Step-by-step Installation Guide
First, choose a web server software. Options include Apache, Nginx, or IIS. Download the software from the official website. Follow the installation instructions carefully. Each step is important. Install the software on your computer. Ensure all files are in the correct folders. Check if the server is running. Use a browser to test it. Type “localhost” in the address bar. This should show a test page. If not, check your settings.
Customizing Server Settings
Open the configuration file. This file is often named httpd.conf or nginx.conf. Look for the settings you need. Change the port number if needed. The default is usually 80. Set the root directory for your files. This is where your site files go. Adjust the security settings. Protect your server from threats. Set permissions for files and folders. Save all changes. Restart the server to apply them. Check if everything works fine. Make sure your site is visible online.
Securing Your Web Server
SSL Certificates are like a special lock. They keep your web server safe. They protect data from bad people. Without SSL, data is like an open book. Anyone can read it. SSL makes data secret. It turns plain text into secret code. This code is hard to break. Using SSL shows your site is trustworthy. It makes visitors feel safe. They know their data is secure. Websites with SSL get a padlock icon in the browser. This icon means safety. Always choose an SSL Certificate for your server. It is important for security.
Security updates are very important. They fix holes in the system. Without updates, servers are easy to attack. Bad people look for systems without updates. They can cause damage. Regular updates stop these attacks. They make servers strong. Always check for new updates. Install them as soon as you can. This keeps your server safe. It protects your data. It also protects your visitors’ data. Set your server to update automatically if possible. This makes it easier to stay protected.
Managing Server Performance
Servers need regular checks. Use monitoring tools to see how your server works. These tools watch CPU usage, memory, and disk space. They help find problems early. Some popular tools are Nagios, Grafana, and New Relic. Alerts can warn you of high usage. Keep your server safe. Check logs for errors. Use graphs to see patterns. Simple tools make big differences. Learn from data. Improve server life.
Speed is key for a good server. Use cache to store data. This makes it fast. CDN helps too. It sends data closer to users. Minimize code and files. Less code means faster load. Check network settings. A stable network boosts speed. Keep software updated. Updates fix bugs. Test your server often. Testing shows weak spots. Reliable servers need care. Regular checks keep them strong.
Hosting Websites On Your Server
Domain names are unique. They help users find your site. Register a domain name with a registrar. Pick a name that is simple. Users should remember it easily. Link your domain to your server. Use DNS settings. This connects the domain to your server’s IP address. Check if your domain name is active. Ensure it points to your server.
Website deployment is vital. It brings your site live. Use FTP to upload files. Place them on your server. Make sure all files are complete. Test your website. Check if it runs smoothly. Fix any errors quickly. Keep your site updated. Add new content regularly. Ensure your server stays online. Check server health often. Backup your data. Protect your site from loss.
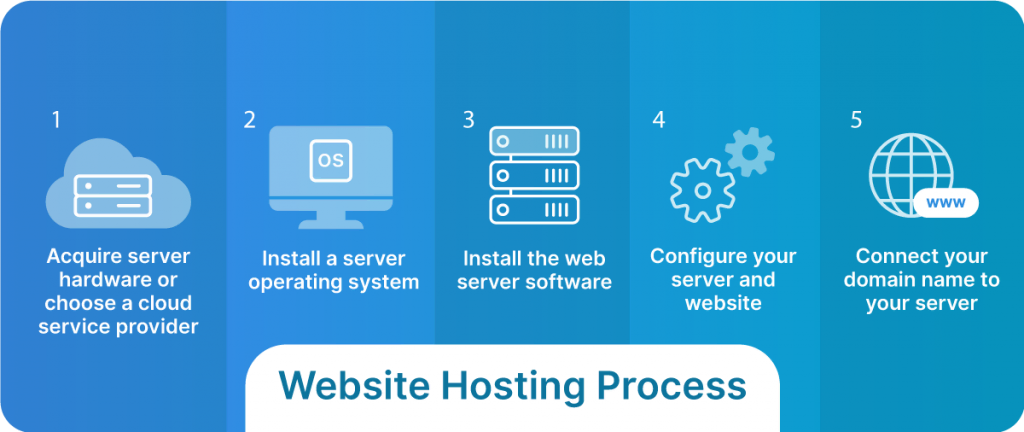
Credit: www.liquidweb.com
Handling Common Issues
Troubleshooting basic server problems involves checking internet connection and firewall settings. Ensure your server software is properly installed. Regularly update software to prevent vulnerabilities and improve performance.
Troubleshooting Network Problems
Many network issues come from incorrect settings. Check your IP address and subnet mask. Make sure they match your network. Restart your router and server. This can solve many problems. Check the firewall settings. Sometimes, it blocks connections. Test your internet speed. Slow speeds can cause trouble. Try a different cable. Sometimes, cables are damaged. Ask someone to ping your server. This checks if your server is online. If problems continue, contact your internet service provider. They can offer help.
Fixing Software Errors
Software errors are common. First, update your software. New updates fix many bugs. Check your configuration files. Incorrect settings cause errors. Restart the software. This clears temporary issues. Look at the error logs. They show what went wrong. Search online for error codes. Many people share solutions. If you installed plugins, disable them. Plugins can cause conflicts. Contact support if errors persist. They help solve complex issues.
Future-proofing Your Server
Explore the basics of hosting your own web server to secure your digital assets. Learn essential steps to future-proof your server setup, ensuring reliability and scalability. Enhance your technical skills while maintaining control over your online presence.
Scaling Up Hardware
Adding more RAM can make your server faster. More RAM helps with speed. A bigger hard drive stores more data. Think about a solid-state drive (SSD) for quick access. You may need a better CPU. It handles more tasks at once. Faster CPUs make your server work better. A strong CPU is key for future-proofing. Look at better cooling systems. They keep your server from overheating. Overheating damages hardware.
Upgrading Software
Always update your server software. New updates have better security. They fix bugs. Updates keep your server safe and efficient. Choose software that grows with your needs. Some software allows more users easily. Use tools that simplify tasks. They save time and effort. Backup systems are vital. They protect your data. Regular backups prevent data loss. Automated backups are helpful. They happen without you thinking about it.

Credit: superuser.com
Frequently Asked Questions
Can I Host My Own Website Server?
Yes, you can host your own website server. It requires technical knowledge, reliable hardware, and an internet connection. Ensure security measures and regular updates for smooth operation. Consider costs like electricity and maintenance. Alternatively, using a hosting provider might be easier and more efficient for most users.
How Do I Create My Own Web Server?
To create your own web server, install server software like Apache or Nginx on a reliable computer. Configure the server settings, ensuring your firewall allows traffic on port 80 or 443. Register a domain name and point it to your server’s IP address.
Ensure security measures like SSL certificates are in place.
Can I Turn My Pc Into A Web Server?
Yes, you can turn your PC into a web server. Install server software like Apache or Nginx. Configure your firewall settings for external access. Ensure your internet connection supports hosting. Regularly update and secure your server to prevent vulnerabilities. Consider a static IP for reliable access.
Can I Host My Website By Myself?
Yes, you can host your website by setting up a server and managing technical requirements. Ensure security, regular backups, and updates for smooth operation. Consider costs, internet speed, and maintenance before deciding. For ease, reliability, and scalability, consider using professional hosting services.
Conclusion
Setting up your own web server brings many benefits. It offers control and flexibility for your online presence. You can customize it to your needs. Security is in your hands. Hosting costs can be reduced. Technical skills improve with practice.
Troubleshooting becomes easier over time. Initially, the setup might seem daunting. But with patience, it becomes straightforward. Start small, and gradually expand your capabilities. Remember, every expert was once a beginner. Hosting your server is an exciting journey. Embrace the learning process and enjoy the experience.
Your online world awaits!


